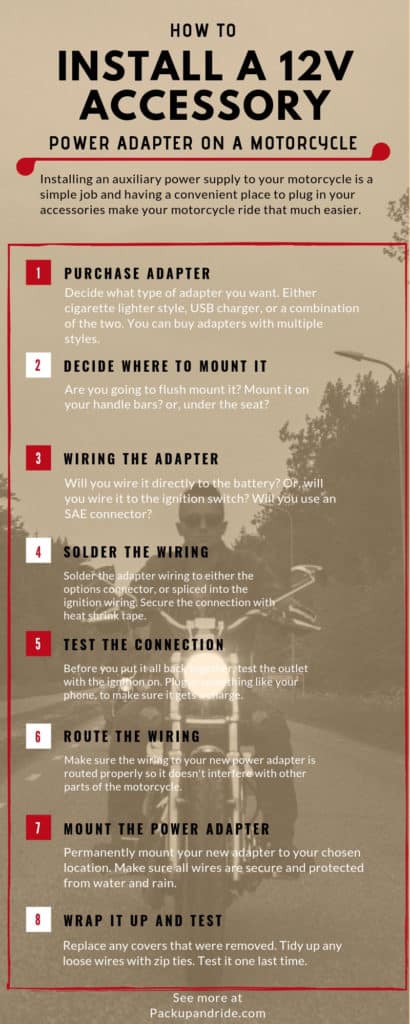
In this article I’m going to explain how to install a 12 volt power adapter on a motorcycle. I installed one on my 2014 Honda CB500X, but the techniques and concepts can be applied to just about any motorcycle.
A 12v power adapter can be mounted and wired in a lot of different ways, either connected directly to the battery, or integrated into the wiring and ignition switch. My goal was to flush mount the adapter and to hard wire it to the options connector located at the front of the motorcycle. But, I’ll talk about both methods.
What Type of Adapter to Buy
Your first step is to decide what kind of power adapter you want on your motorcycle. Think about how you want to use it and what you want to power up while riding. Do you want to power your phone, gps system, or both at the same time? Do you need a DC cigarette style adapter to power other accessories like an air compressor?
I opted for the cigarette lighter style for more diversity. I have an air compressor that only runs with that style of connecter. A simple USB adapter plugged into the outlet will allow me to power my phone and anything else that connects with USB.
Another consideration is weather proofing. If your adapter will be exposed to rain then you should buy a marine grade adapter. The wiring to the adapter will be sealed and they come with a waterproof cover. These are perfect if you’re mounting it to the handlebars or flush mounted to plastics on the dash. But, if you’re keeping it under your seat, then any simple style of adapter should work fine.
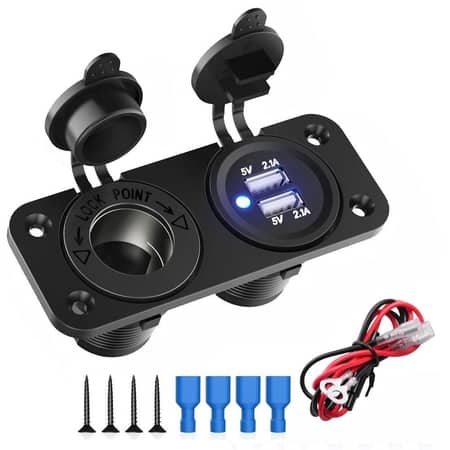
Power adapters also come in combination of cigarette lighter style with dual USB connectors. I would have preferred this type of convenience if I had the space for it. In any case, whatever you choose, power adapters are inexpensive and can easily be found on Amazon. You can check out the current prices here.
Why an Inline Fuse is Important
It’s recommended to use an adapter that has an inline fuse. Why? A fuse will protect your motorcycle’s electrical circuit from being completely destroyed if there is a short. Blowing a fuse instead of your electronics, is a much simpler and cheaper repair. If you don’t purchase an adapter with a fuse…wait…why would you do that? Just buy one with an inline fuse.
Decide Where to Mount
Your next decision is to decide where to mount the adapter. Your options depend greatly on what type of motorcycle you ride, how much space you have up front, and how accessible you want the adapter to be while you ride.
Under the seat is a very common place to stash an adapter and is, by far, the easiest install job. Use a couple of zip ties to keep it from rattling around too much and you’re good to go. Keep in mind that every time you want to plug or unplug something, you will have to remove the seat. So, determine for yourself if this is going to be a hassle, or no big deal.
Another common option is to mount it to your handlebars. This is a simple install and many adapters come with a handlebar mount, like this dual USB adapter. You should consider how much space you have available on your bars, especially if you want to add other accessories to the bars, such as a phone mount, or GPS navigation.
The last option is to flush mount the adapter to give it a factory installed look. This will likely involve drilling a hole into the plastics of your motorcycle which is always a bit nerve wracking. But, when it’s done right, you end up with something that looks great and functions properly. Flush mounting is the option I chose for my motorcycle and I’ll cover how I did it.
Direct Connect or Switched?
The next decision you need to make is whether your going to connect the adapter directly to your battery terminals, or hard wire it to the ignition switch circuit.
A direct connection to the battery is the easiest option as it doesn’t involve any splicing or soldering of pin connectors. If you choose this option you need to be careful in preventing parasitic draw. If you leave a USB adapter plugged in to your battery, it can draw enough power to drain your battery overnight even when the ignition is off. But, if you’re vigilant about removing all electronics when you turn off your motorcycle, then this would be the quickest, easiest install option.
Integrating the connector into the ignition switch circuit is a little more involved but is really not as difficult as you might think. Even if you’ve never done this kind of work, if you take your time to understand what’s going on, you’ll be able to wire up a connector with no problems.
So, now that you know what type of adapter you want, where you want to mount it, and how you want to connect it to the power source, let’s go through the all the steps.
How to Connect a Power Adapter Directly to your Battery
Let’s start with the easy install, directly to the battery terminals. I would recommend installing a simple cigarette lighter style adapter, or purchasing an adapter that has a power switch built in. The switch allows you to cut power to the adapter so it won’t drain the battery. The procedure is simple, and if you’ve ever installed an SAE connector for a battery tender, then you already know how to do this. You will need:
- 12V Power Adapter or USB adapter with positive and negative ring connectors.
- Philips Screw Driver
- Zip ties
Steps:
- Access your battery. This procedure depends on your motorcycle but you’ll need access to both positive and negative terminals.
- Remove the negative terminal screw and place the negative (black) wire to the terminal, and secure it with the same screw.
- Do the exact same thing with the positive terminal and positive (red) wire.
- Test by turning on the ignition and plugging in a USB adapter. If the light comes on, it’s working. Now, plug in something, like your phone, to make sure it’s charging.
You can choose this wiring option no matter where you want to mount the adapter. You can keep it under the seat, flush mount it to the plastics, or mount it to the handlebars. Keep reading for mounting instructions.
How to Wire the Adapter to an Existing Options Connector
A lot of motorcycles, especially touring bikes and adventure bikes, will come with an options connector pre-wired in line with the ignition switch. Connecting a power adapter here is a very convenient way to do this job and this is the procedure I chose to do on my CB500X. This project will require some soldering, but, don’t worry, it’s not as difficult as you might think.
What You Need
- 12v power adapter with 6 to 12 inches of wire available
- Connector pins and seals
- Soldering iron
- 60/40 solder with rosin core
- Small zip ties
- Electrical tape
- Wire cutters/crimpers
Step 1: Find the Options Connector
I highly recommend you purchase a service manual for your motorcycle, or, at the very least, get ahold of the wiring diagram specifically for your year, make and model in addition to the European or US edition.
When looking at the wiring diagram for my motorcycle, I discovered that it has two option connectors, one at the rear, and one at the front. The diagram shows that the connector at the front has three pins with different colored wires. The green wire is always a ground wire, or negative. The red/violet wire (on my bike) is the positive connection and the third blue wire is connected in line with the headlamp’s high beams. I found this by following the blue line on the diagram.

So, this diagram confirmed that I only need to use two of the three connections and I don’t need to worry about the blue wire, just the positive and negative. It’s a good idea to take a few minutes and study your wiring diagram to get to know the color code and the symbols.
Now that you’ve confirmed your motorcycle has an options connector, you need to actually find it on your bike. It will typically be sitting somewhere behind the instrument panel or cluster, near the headlamp. Get a flashlight and start looking underneath and anywhere around that area. You are looking for a bundle of wires and a connector that has wiring only at one end with the other end empty. This process will depend greatly on your motorcycle and you may be required to remove some plastics to gain access. Follow the procedure laid out in the service manual for your bike.
Once you’ve located your options connector, you’re going to want to remove the blank side so you can solder the adapter to it. But, before you remove it, mark the connector so that you know where to put the positive and negative wires. I marked mine with red fingernail polish, the same color as my toes. Hey, the sharpie wasn’t showing up on the black connector, ok! You can use whatever you want.
Step 2: Solder the Adapter to the Connector
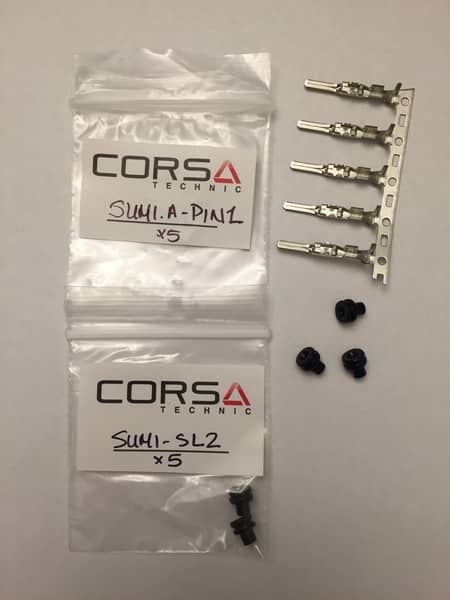
For this step you will need to purchase pin terminals that fit your specific connector. In doing this project I learned that there are different sizes and styles and you can’t just go down to your local auto parts store and buy some pins. However, Corsa Technic carries a huge line of electrical components for all types of motorsport vehicles. If you can’t find the information you need in your service manual, or in a forum, I recommend you give them a call so they can help you find the terminal pin you need.
My motorcycle used the Sumi-A Pin1 and the Sumi-SL2 seals. Pro tip: buy three times more than you need, or just get an even dozen. They are so inexpensive, it’s worth having a few extra, especially if you’ve never done this before so, if you mess up your first try, you won’t be at a stand still.
Steps for Soldering the Pin Terminals
You should have the following items ready: Power adapter with clean wires at one end; hot soldering iron; solder; pin terminals; seals; wire strippers; and a clean work surface.
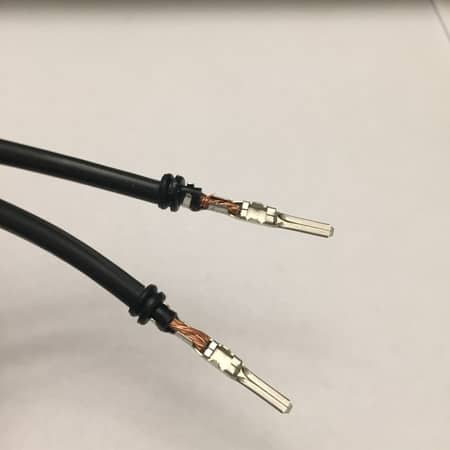
- Place one seal on the end of each wire and slide them down out of the way.
- Using your wire strippers, strip about 1/4 inch from the end of each wire. Always start with a fresh section of wire and not wire that has been exposed. This will make soldering easier.
- Place the end of the wire to the pin connector and crimp it down just enough so it stays in place.
- Solder the wire to the pin connector.
- Make sure the tip of your soldering iron is clean
- Hold the tip of the iron to the wire and pin to heat it up. Then, apply the solder to the wire, not the iron. The wire will draw the solder in.
- If your solder is not sticking or it’s just running off in clumps, you’re most likely using old solder or solder without flux rosin. The rosin prevents oxidation which can build up in a matter of seconds when metal is heated. Rosin is necessary to make the solder stick to metal. So, use new 60/40 solder with a rosin core.
- After the solder has cooled you should have a secure connection and a pin terminal that is ready for the connector.
- Do these steps for both ends of the wire.
Step 3: Connect the Pin Terminals to the Connector

The next step is to plug the pin terminals into the connector. Refer to the marks you made to indicate which is positive and negative. You may need to use a small screwdriver to push the pin into the connector until you hear it click. This will indicate a secure and permanent connection.
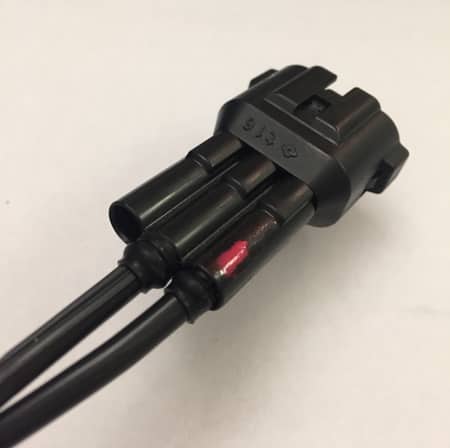
Next, slide the seals up the wire and tuck them into the open space at the end of the wire. This will prevent moisture from getting to the connection. If you like, you can secure it all with electrical tape, especially if you’re not 100% confident your pin terminals are perfectly clipped in (like me).
How to Wire an SAE Plug to the Options Connector
In determining what I wanted to do with my own motorcycle, I decided to connect an SAE plug to the options connector as opposed to directly wiring the power adapter as described above. I chose this because, in the future, I may want to connect other accessories to that connector using a splitter.
I used a spare SAE plug that came with my battery tender, removed the alligator clips at the ends and wired it to the pin terminals exactly as described above. If you go with this option, be careful to check the polarity of the plug. The female side should be the positive connection and the male side should be negative.
How to Wire an Adapter if you Don’t Have an Options Connector
So, what if your motorcycle doesn’t come with a pre-wired options connector? In this case, you can hard wire the adapter in line with the ignition switch wiring. Your first step in doing this is to find a live wire that is in line, or switched on and off, with your ignition. This can be a bit tricky, but you can use your wiring diagram to locate what it’s attached to and what color it is. That’s a good start.
Once you’ve found a live wire, your next step is to splice into that wire and add a second wire running off of it. I saw a nifty little trick in a video somewhere for testing to see if you have the right wire. If you stick a needle through the insulation of the wire you want to test, just far enough to make contact with the wiring inside, you can touch a meter to the needle to see if you get power when the ignition switch is off and on. This is a great way to test a wire without cutting it.
Splice Into Positive Wire
Let’s assume at this point you’ve found the positive wire you need. Now you need to splice into it and connect a second wire that will power your adapter plug. There are a couple of ways to do this.
In either case, you will need a strand of wire that is long enough to run from your power source to the front of the motorcycle where you want to mount the adapter. This will be the positive wire. The negative wire, or ground, will run from the power adapter to a point on the frame of the motorcycle. Search around on your motorcycle as there is likely a spot where several ground wires converge and connect to the frame.
First way is to use a plastic connector that you crimp onto the wiring, then cover it with a heat sleeve to protect it from water. This is by far the most simple, in my opinion, because you don’t have to fire up the soldering iron. The second method is to solder a second wire the the live wire, and protect it with a heat sleeve. Either method should work fine, just make sure you cut the live wire leaving yourself enough space to tap into it.
Test It!
Now it’s time to make sure it works. Do this step before you start putting anything back together, or before you start securing long strands of wiring. If something goes wrong, you don’t want to take everything apart again.
It is recommended that you use a multimeter, or volts meter to test the adapter. Why use a multimeter? Why not just plug in your phone and see if it charges? Because, if you wired it incorrectly, you could damage whatever you plug into it. So, instead, set your meter to volts, place the positive lead to the center of the adapter and the negative lead to the side of the adapter (don’t let them touch each other). With the ignition OFF, you should NOT be seeing any voltage. Turn on the ignition, and the meter should jump to 12 volts, or around 11.9. That’s what you want to see. Now you can test it with your phone.
If you installed a USB style adapter instead of the cigarette lighter style, you don’t need to use a meter. A LED light should light up when you turn on the ignition. If it does, test it with your phone, or other device, to make sure it charges. If everything tests out good, you can move on to mounting the adapter the way you want it.
Secure the Wiring
Now that you have a working connection, it’s time to route the wire and secure it with zip ties. If you spliced into a wire near the battery or fuse box, you’re likely going to have to route the wire under your tank. Best bet is to follow the existing wiring harness and use zip ties to secure it.
Mount the Power Adapter
If you chose to mount the power adapter to your handle bars, you’re nearly finished with your project. But, there are a couple things to look for after mounting it. Turn your handlebars all the way in both directions. Make sure the mounting doesn’t interfere with anything while you turn the bars. Also, make sure the wiring connected to the back of the adapter isn’t pulling when you turn the bars. Leave enough wire to accommodate turning the bars.
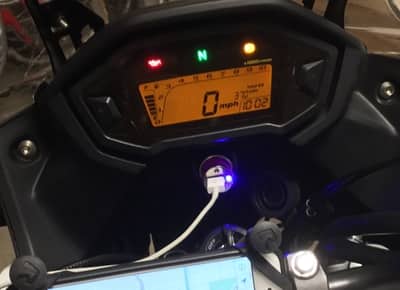
Flush Mounting the Power Adapter
Flush mounting the power adapter give your motorcycle a nice, tidy, professional look. When looking for a place to flush mount it, make sure there is ample space behind the panel you want to mount it to. For instance, on my CB500X, I want to mount it on the right side of the instrument panel. There’s a perfect little flat spot. However, just behind that spot is the turn signal light and it doesn’t allow enough space for the adapter. So, I opted to attach it to the headlamp access panel.
Once you figure out where to put it, the next step is to drill a hole in the plastic. This is always nerve wracking. What if I screw it up? What if it doesn’t work there? It took me quite a while to muster up the courage to do it. But, think it through and drill with confidence.
Use a small hole saw bit to make a nice, clean hole. If you don’t have a hole saw, consider getting set like this one on Amazon. It’s nice to have when you need them. But, if you don’t have a hole saw, do like the rest of us and use a normal drill bit to punch out the hole you need.
I decided to drill a series of small holes around the circle using my dremel. Then I used a sandpaper bit to increase the size of the hole gradually, until I got it to just the right size. I affixed the ring connector on the back side to secure the adapter and it looks better than I expected.
Re-Attach the Covers and Panels
The last step is to put it all back together. Reverse the steps you took when removing any panels. Be very careful to make sure any plastic clips or tabs are in place before you push and pound. I have found that tabs break more often when I’m putting the plastics back on the bike as opposed to removing them, so, take your time.
Stand Back and Admire Your Work
If you did everything right what you should have is a 12 volt power adapter flush mounted or handlebar mounted. All of your plastics should be back in place with nothing rattling and no extra screws in your pockets. Test the connector one more time to make sure nothing went haywire at the last minute. Use the multimeter to test it with the ignition off as well as on. If everything is working as expected, pat yourself on the back and pour yourself a cold one.
So, as you can see, this project is not super difficult, but it does take some careful planning and, in the end, you have the perfect place to power up your phone or GPS.