I admit to leaving the house on my motorcycle for a weekend trip without any repair items except a multi-tool. My motorcycle is fairly new, I keep it well maintained and I have confidence it will perform well on my rides. But, I realize that when I’m out on the road, anything can happen. That unforeseen breakdown could happen at any moment. So, I decided to research some potential breakdowns and learn how to fix them. I know there are plenty more miss-haps that can happen and there are more serious breakdowns, but, these are just a few that, if one if prepared, can be fixed on the roadside and you can be on your way.
1. Loose Chain
If your motorcycle has a belt or shaft drive then this wouldn’t apply to you. If your drive system breaks down it’s likely a lot more serious. But chains stretch over time and they need regular lubrication. I was once reminded of this when I took a weekend camping trip to the Northern California coast. On my way home I notice a squeaky rattling noise. At my next stop I looked at my chain and it was bone dry and extremely loose. Unfortunately I didn’t have anything in my kit to lubricate it or adjust it. So, it home, about 100 miles and fixed it up there.
So, what should you do if your chain is dangerously out of adjustment when you’re on a long trip? Below are the steps, tools and products you will need to clean, lube and adjust your chain on the roadside. These are general guidelines as the tools and steps may be specific to your motorcycle.
- You will need the following:
- A wrench that fits the rear axle bolt
- A smaller wrench that fits the adjustment bolt
- Small can of chain cleaner
- Small can of chain lube
- A Rag
- Know your motorcycle’s recommended chain slack, found in the owner’s manual
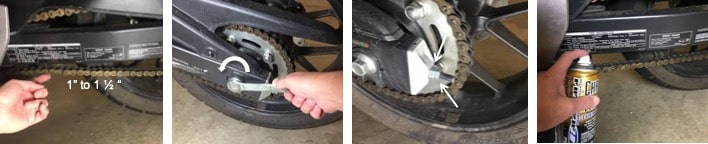
It’s easier to do this adjustment if your bike is on a stand, but, if you don’t have a center stand, or a Snap Jack, it’s still possible to make this adjustment with the rear wheel on the ground. Proper chain slack is generally between 1 to 1 1/2 inches but check your owner’s manual to be sure.
- Steps
- Clean the chain. While you won’t be able to do a thorough cleaning on the side of the road, you can at least get most of the dirt and grime off with a small canister of chain cleaner and a rag. Consider packing an old toothbrush too.
- Loosen the rear axle bolt a couple of turns. It does not have to be very loose. Some bikes will have a cotter pin through the axel bolt. This should be removed and replaced with a new one if possible. If you don’t have a new one, don’t lose or break the one you have.
- Most bikes will have an adjustment nut at the rear of the swing arm on each side and some will have two. If there are two, loosen the outer nut a few turns, then turn the inner nut clockwise a half turn at a time. This will pull the chain tighter. Always repeat the adjustment on the other side, equally.
- Check the chain slack and repeat the turn by turn adjustment until the chain is properly tightened. Again, be sure to turn the adjustment bolts equally on both sides of the rear wheel.
- Once the chain is at the correct tension, tighten down the rear axle bolt. Replace the cotter pin.
- Final step, lube the chain. If your bike is not on a stand, then you will have to lube the chain in sections and roll the bike as you go.
2. Broken Hose
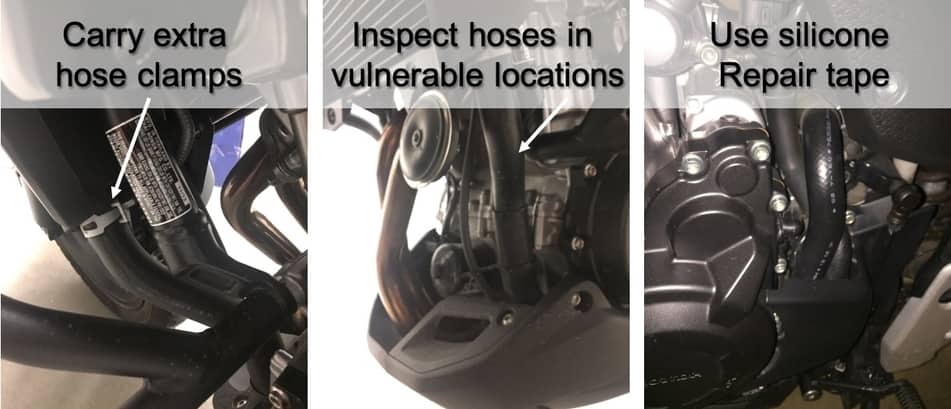
A cracked or broken hose can affect a motorcycle in a lot of different ways depending on what hose is broken. Hoses will commonly break or form a crack at the connection point. If this is the case, you can often trim off the hose at the crack, fit it back on and clamp it down again. Carry extra hose camps with you in case one breaks.
If you have a crack in a hose or in the fuel line, you can use silicone self fusing repair tape around the hole or crack. This type of tape sticks to itself when it is stretched and doesn’t rely on adhesives which can loose it’s ability to stick if it gets wet. When applying the tape, stretch it tight as you wrap to get a good seal. You can reinforce the repair by placing a few zip ties around the tape to prevent it from unwinding.
A taped up hose is a temporary repair in most cases. Hopefully it will be enough to get you going again so you can ride to the nearest town for a permanent fix. So, remember to keep a few hose repair supplies in your tool kit especially if you are on a long trip in remote locations.
3. Broken Clutch Cable
A sudden broken clutch cable can leave you stranded on the side of the road. While it is possible to shift gears without a clutch in some circumstance, and you may be able to limp your way to the nearest town in second gear, replacing your clutch cable on the roadside is really the best option if this ever happens to you. It’s a relatively simple repair.
A spare clutch cable specific to your motorcycle is one of my recommended repair items to take on long distance motorcycle trips. The repair usually only requires one tool: a 10mm or 12mm open end wrench which should always be included in your on board tool kit.
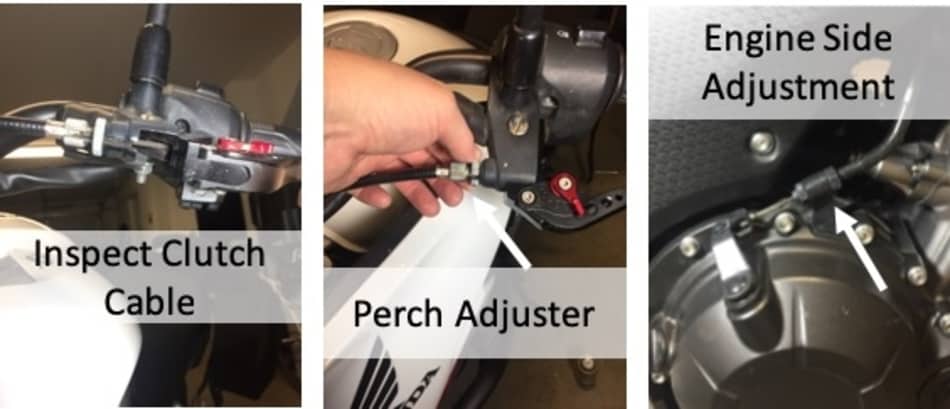
The trickiest part of this repair is figuring out where the cable line threads through the motorcycle, and you may have to remove some side panels to see the path. So, when removing the old cable, pay close attention to where it goes.
- At the clutch lever, loosen the perch adjuster and move it all the way towards the cable to loosen the cable, and remove the cable from the clutch lever.
- At the clutch end on the engine, loosen the adjustment nuts and remove the cable from the clutch bracket.
- Take the new cable and squirt some lube down one end until a little bit drips out the other end. A small bottle of all purpose lubricant should be part of your on board tool kit.
- String the new cable through the same path as the old cable. HACK: Don’t remove the old cable until you’re ready to install the new cable. String it through as you slide the old one out.
- Attach the cable to the clutch lever first and secure it to the perch adjuster, leaving the cable loose.
- Attache the other end of the cable to the engine side and tighten the adjustment nuts until the majority of the free play has been removed.
- Do the fine adjustments at the clutch lever to remove any excess free play. Check your owner’s manual for the recommended amount of free play for your motorcycle. If you don’t get this adjustment spot on while on the road side, don’t worry, it’s ok to estimate.
- After you set the free play, tighten the nuts at the engine side until they are secure. Then, tighten the adjustment screw on the perch adjuster.
Before you put all your tools away, make sure the new cable is secured with all the necessary cable stays or zip ties. Turn your handlebars all the way to the left and right to check for any interference. Lastly, start the motorcycle and check the clutch engagement to make sure it’s in the right spot. Make any minor adjustment if necessary, and you’re ready to get back on the road.
4. Broken Shifter Lever
On many motorcycles the shifter lever is in a vulnerable location and can be broken if the motorcycle is tipped over, dropped, or crashed on its left side. Sometimes you can get yourself up and running with a generous amount of duct tape wrapped around the joint of the shifter arm and the toe lever. But, this repair is not going to last and can create a frustrating riding experience. So, your best bet is to do a quick roadside replacement of the shifter lever.
This is probably one of the easier roadside repairs as it only needs a few tools and a replacement part. Make sure you carry a spare lever that fits your specific motorcycle. The tools needed will depend on your motorcycle but are often just a couple of hex key wrenches and small open ended wrenches, or you could use an adjustable wrench. In most cases you won’t have to remove any side panels or covers to access the lever and its attachment bolts.
Some bikes also have a rocker arm that should be inspected to make sure it isn’t bent or cracked. Often, even if there is a slight bend to the rocker arm, your shifter will still function properly and this can be repaired later on. Also, on some bikes, the end of the shifter lever may be attached to the foot peg bracket and you may need to remove that bracket to replace the lever.
5. Burned Out Headlight or Tail Light

The first step is to know what kind of bulbs your motorcycle requires and keep replacement bulbs in your on-board repair or tool kit. A lot of bikes, especially naked bikes or cruisers, use a standard H4 or H7 bulb that can be found at any auto parts store. Tail lights and turn signal light bulbs are much smaller and you should check your owners manual to find out exactly which bulbs to purchase for your kit.
Pro Tip: Avoid touching the glass portion of the bulb. Oils on your hands can create hot spots which will cause the bulb to burn hotter, reducing the life of the bulb.
It is much easier to replace a headlight bulb on a naked bike. Motorcycles with round, exposed headlights are by far the easiest but the exact procedure will depend on your make and model.
- Start by removing the headlight lens using the required wrench for your bike.
- Remove the connector from the back of the bulb. This will free up the headlight making it easier to work with.
- Remove the rubber cover on the back of the lens. This protects the inside of your headlight from dust and moisture.
- Remove the secure spring from the back of the bulb. You may have to loosen one of the small screws, but do not remove them completely.
- Remove the bulb and inspect it to make sure it is blown. A burned out bulb will look a little brown and the filament inside will be broken. If it’s not, if the bulb looks good, then you may have a deeper problem, such as a bad fuse.
- Replace the bulb with a new one. Line up the spacers on the bulb with the notches on the housing. It will only fit one way.
- Plug in the connector.
- Reverse each removal procedure and secure your headlight lens back on the motorcycle.
Replacing the headlight bulb on a motorcycle with plastics is a bit more tedious, but you don’t always have to remove the covers to access the bulb. This, of course will depend on your make and model. Sometimes you will have access to the bulb by reaching down under the dash. But, on many bikes you will have to remove some covers, and possibly the entire dash, to access the bulb. You will follow the same procedures outlined above for removal and replacement of the bulb.
Tips for Successful Roadside Repairs
Keep track of your screws! If you’re on the side of the road you’re likely working on dirt, gravel or a grass surface. Dropping a screw or nut is a real pain in the neck and will be hard to find. So, get out some kind of container that you can keep all the screws, nuts, washers, clips and whatever bits and pieces you need to remove to make your repair. Use a removed cover as a tray, or get out a cup or bowl from your gear. And, whatever you do, don’t kick over the screw tray! Not that it’s ever happened to me.
Be safe! Make sure you push your bike completely out of the roadway before you start making your repair especially if you are on a busy road. Having traffic zoom past you while you are kneeling down, preoccupied by your repair task, can make for a dangerous situation. Curious drivers often become fixated on what’s happening on the roadside which can cause them to swerve dangerously close. So, if you can pull into a parking lot, or stop at a pull out, rest stop or vista point, then you will be in a much safer place to do your motorcycle repairs.
If you’re alone, especially for us women, accept the assistance of strangers only if you feel safe. Trust your intuition on this one. Most people who offer to help you out have nothing but good intentions, so you shouldn’t pass up the kindness of a stranger out of fear. In my experience, 99% of people are good and kind hearted. Your gut will tell you when to say thanks, but no thanks.
It’s important to check if you need an oil change. Oil filters should also be replaced with every oil change. You can also do it by yourself. Install a new oil filter after the oil has been drained, then refill the engine with the right kind and quantity of motorcycle oil, as directed in the owner’s manual, using a funnel.
Changing an air filter is essential. The performance of your motorcycle will suffer if the air filter, which keeps particles out of the engine, is dirty and clogged. Although it’s not always difficult, changing an air filter can take some time. While the gas tank and other components might need to be removed in order to access the air filter, this is not always the case. The air filter should be removed and replaced once you’ve entered the air box. Then put back everything you took out.
Also, you may need to bleed your brakes out if they feel squishy. It’s quite easier to do on a bike than in a car. On a bike, the bleeder screw and brake levers should be easily accessible. Once you get to the brake levers and the bleeder screw, you can just bleed the brakes, which should make everything feel better.
In any case, being prepared before you leave for your trip will help you get out of a tight spot, fix common problems on the road side, and get back on the road before you know it.