Like any other skill, motorcycle riding skills can be lost if you don’t take time to practice them. Even if you ride often, you may not be using all the basic or more advanced skills in every ride, such as swerving to avoid an obstacle, emergency stopping, or making a U-turn. In this article I talk about why we need slow riding skills and how you can keep those skills sharp.
How it’s used, or where these skills will come in handy in real life. Like, traffic jams, parking lots, city riding, turning left at a green light, busy urban street.
Why You Need to Practice Slow Riding Skills
If you do any kind of riding on any kind of road, you will at some point need to use your slow riding skills. It may be in a parking lot, pulling into a gas station, or making a u-turn. Taking time to practice slow riding skills will ensure that those skills will be there when you need them and when you least expect having to use them.
Another good time to practice is whenever you get a new motorcycle. While on a group ride I watched one rider struggle to turn her motorcycle around in a crowded space. The bike was too big and heavy for her to push and she wasn’t comfortable with her ability to turn while moving slowly. Of course, we didn’t hesitate to give her a hand, but I couldn’t help but notice that other riders, with equally heavy motorcycles, were able to maneuver at slow speeds. I came to the conclusion that, even though she was a good rider, she was on a new bike and she hadn’t taken the extra time to work on those skills with her new motorcycle.
How to Ride a Motorcycle Slowly
Riding a motorcycle slowly involves the following skill:
- Counter Steering
- Counter Balance
- Friction Zone of Clutch
- Body Position
- Lean Angle
Understanding There Common Terms
Below are some definitions you need to understand when practicing your slow riding skills. These tips will help you in your ability to control the motorcycle like a pro.
Counter Steering
Counter steering is the concept of turning left to go right. Yep, you turn your handlebars slightly to the left, before you start to turn right. What happens is this: in order for your motorcycle to turn at higher speeds, it needs to lean. So, to help your motorcycle fall into a lean, the front wheel will have to turn the opposite direction very slightly, then the motorcycle will begin to lean. It’s a very small, subtle movement that riders do without even thinking about it, but it’s a good idea to understand the concept.
Counter-Balance
The definition of counterbalancing is a weight that balances another weight. On a motorcycle it means shifting your body weight to counterbalance the lean of the motorcycle. This is important to understand when you are making turns at slow speeds. It keeps the center of gravity in a straight line even when the motorcycle is leaning.
Friction Zone
The friction zone is the point at which the clutch lever begins to engage the clutch. It’s where you begin to feel the motorcycle move when you let out the clutch lever. If you’ve been riding for a while, the friction zone isn’t something you think about. You automatically know where it is. However, when you start doing slow speed exercises, you’re going to become very familiar with that friction zone and you’ll need to use it to your advantage.
Body Position
This goes hand-in-hand with counter balance, but there’s more to it. Let’s say you’re turning left at slower than 10mph. To lean the motorcycle you will adjust your body position to the right side of the seat. You could even go as far as sliding one cheek off, although that’s not always necessary. Position yourself closer to the tank, hug the tank with your knees, and keep your feet firmly placed on the pegs. Slight movements in your hips and lets, as well as pressure on the pegs can help you make little adjustments when counterbalancing. Your arms should be relaxed on the handlebars.
Lean Angle
This is the amount of lean your motorcycle will do when turning. Your motorcycle is capable of more lean angle than you probably realize, even at slow speeds, as long as you are practicing good body position and counter balance. If you’ve ever watched those police motorcycle competitions, you’ve seen just how far a bike can lean at low speeds.
Tips for Practicing
Before starting a practice session, take some time on the simple exercise of basic clutch control to re-introduce yourself to the friction zone. Ride in a straight line, let out the clutch slowly while smoothly rolling on the throttle, just like back in the day when you first learned to ride. Do several sets of starts and stops to get familiar with your clutch/throttle control again.
Hover your foot over the rear brake and apply slight pressure when needed. This will help keep you balanced and helps reduce dip in the front wheel when you brake.
Keep your eyes up and look out far in front of you. Avoid looking down at the ground directly in front of your bike.
Keep off the front brake, but instead use your clutch, throttle, and rear brake to control your speed.
Good throttle control means you roll on the throttle instead of jerking it, right? Well, when riding slow, speed control comes with clutch control and the friction zone. If you watch slow riding competitions, you’ll notice that you can hear the rider revving up the engine to just over idle speed. They are using the clutch to adjust their speed. Good clutch control is the key to good slow riding.
Parking Lot Practice Exercises
The MSF course has a specific set of exercises to teach you the basics of riding. These are excellent skills to practice, but it’s difficult to duplicate the exact layout of the exercises without one of their lots with all their painted lines. But we can simulate those exercises using any standard parking lot. In addition, there are more advanced exercises that are not included in the MSF course that you can practice.
When looking for a parking lot to practice in, choose one that is preferably un-used, or empty. At least find one that has a large, empty section where you know you will be out of the way. A closed business is usually a good bet. Choose a lot with no dividers, lamp posts, or trees mixed in. Also, choose a lot with straight parking spaces, instead of at an angle.
Plan on spending at least a few hours on this. It will take some time to walk out the measurements and set up cones. In fact, invite your riding buddies along and make a day of it. The set up will go faster, you can critique each other, and help each other out is someone drops their bike.
The point of these exercises is to learn how to handle your motorcycle at slow speeds rather than trying to complete them as fast as possible. As you become more proficient in your slow riding skills, you’ll find that you will naturally complete them at slightly faster speeds.
The Layout
To lay out the exercises, use the lines already painted on the pavement. A standard parking lot space is 10 feet wide by 20 feet long. The exercises I’ve laid out here are designed to use the existing lines as your markers.
However, you can use something to mark out the exercise patterns, such as disk cones (like these on Amazon.) The benefit of using cones, or some other kind of marker, is that you know when you’ve made a mistake. When you hit a cone, you know when you’ve done it wrong.
Without cones, it’s more like guesswork. Either way, cones or no cones, you’ll be getting good practice in. Besides, out in the real world, there aren’t any cones.
Slow, Straight Line

The purpose of this one is to ride in a straight line, as slow as possible. Use the edge of the parking spaces as your guide.
- Keep your eyes up and focus far ahead of you
- Use the clutch friction zone to control your speed
- Apply slight pressure on the rear brake for balance.
Slow Weave
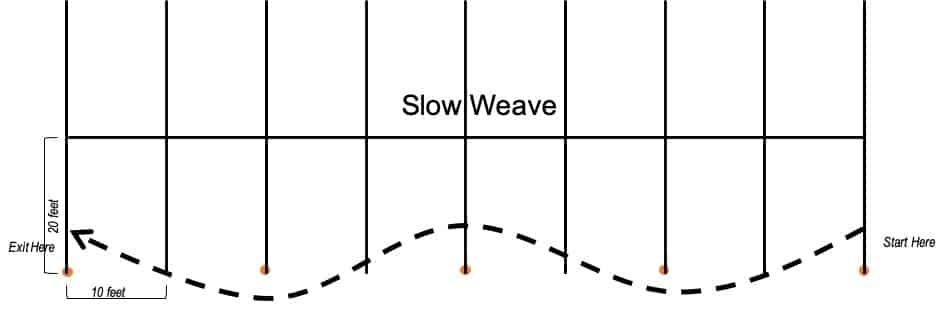
Set the cones in a straight line about 10 feet apart. Starting at one end, ride through the cones, weaving left, right, left, etc. Keep your engine at idle speed and use your clutch to control your speed. Use counterweight body position and focus your eyes down the line of cones.
Avoid looking directly down at the cones as you ride past them. If you find yourself weaving too far out, check your focal point and your body position.
If you want to make the slow weave more difficult, try to weave between every space, rather than every other space.
Offset Weave
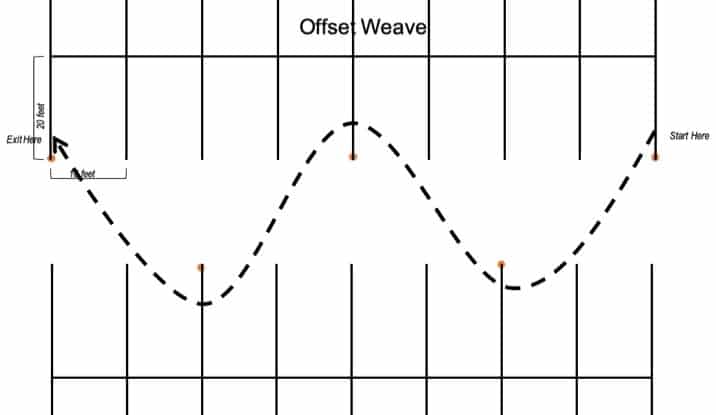
Use two sections of the parking lot and place the cones as shown in the diagram. For this exercise you want to move slowly through the cones.
- As soon as you the first cone your head and eyes should be focused on the next cone.
- Avoid looking directly down at the cones you’re riding through
- Adjust your speed using your clutch and rear brake
The people who have the most trouble with this exercises are the people who constantly look directly forward and down in front of their wheel. This doesn’t allow them to prepare for the next turn.
When you reach one cone, your head and eyes should be already turned and focused on the next one. Always look where you want to go.
If you want the offset weave to be more difficult, try weaving between every other parking space instead of every third space as shown in the diagram.
Turning Right and Left
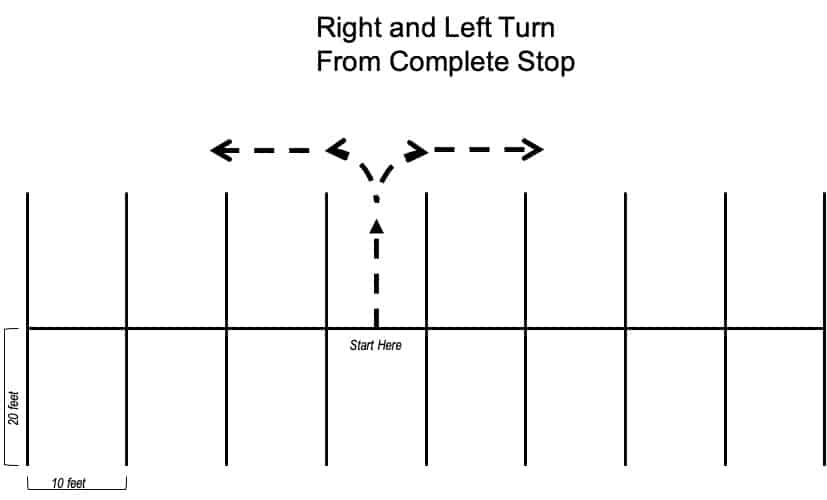
This practice exercise will help you make sharp left and right turns starting from a complete stop. This skill can come in handy in a lot of traffic situations.
From a stand still, with one foot on the ground, ride the length of one space and immediately turn left, then ride down the length of the parking lot. Swing around to the starting point again, and practice a right turn.
Basic U-Turn
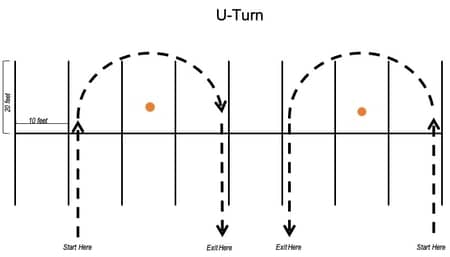
In a parking lot, start off by doing the u-turn in the area between three parking sections as shown in the illustration. The orange dot represents a cone that will act as your focal point.
Your goal is to make the U-turn within that area only. The most important tip for making a U-turn is to keep your head turned over your shoulder and look at the center focal point. Practice this exercise turning both left, and then right.
Tight U-Turn

Once you’ve practiced a standard U-Turn and it becomes comfortable, you can tighten the turn radius. Practice these tight U-Turns in both directions. Place a cone in the center for your focal point.
If you’re not using cones, pick a spot at the center of the turn to focus on. When riding on public roads, you will have to pick your own random focal point, so doing this exercise without a cone is good practice.
Figure 8
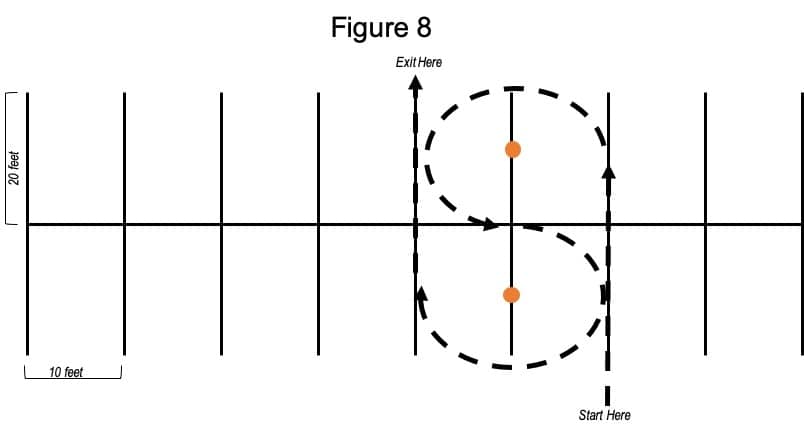
For a basic figure 8, enter in a straight line, then, as you begin the first turn, focus at the center of the turn. As soon as you are 3/4 the way through the first turn, quickly change your focus and turn your head toward the center of the second circle.
The diagram shows a more difficult figure 8 pattern between four parking spaces. If you’re not ready for tight turns, spread the circles out into a wider area. Try to make your figure 8 smaller as you get more comfortable.
Key Hole
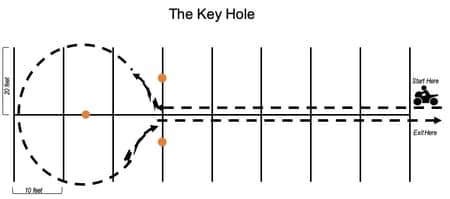
The keyhole starts with a straight line, followed by a quick right turn and and a wide left hand circle. Finish it off with a sharp right turn and go straight down the line again to finish the pattern.
Practice the keyhole going in directions around the circle.
Lolli-Pop
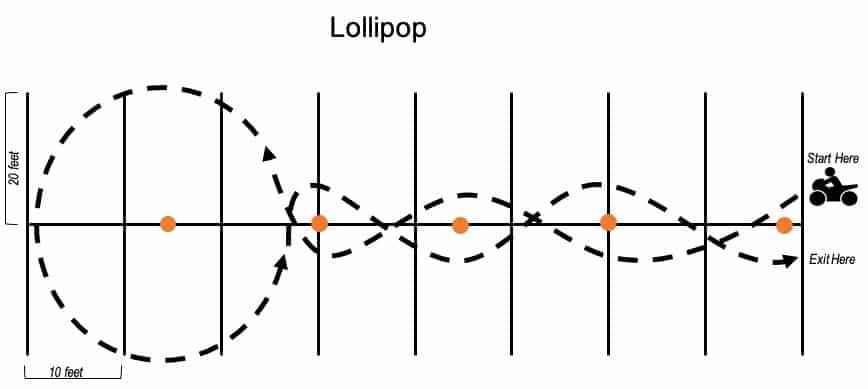
The Lollipop is very much like the Keyhole except, you will weave between the cones before you enter the circle. The graphic shown is not perfect, but you get the gist.
Practice the lollipop in both directions to practice the circle going to the right and to the left. Try to stay within the parameters of the parking spaces.
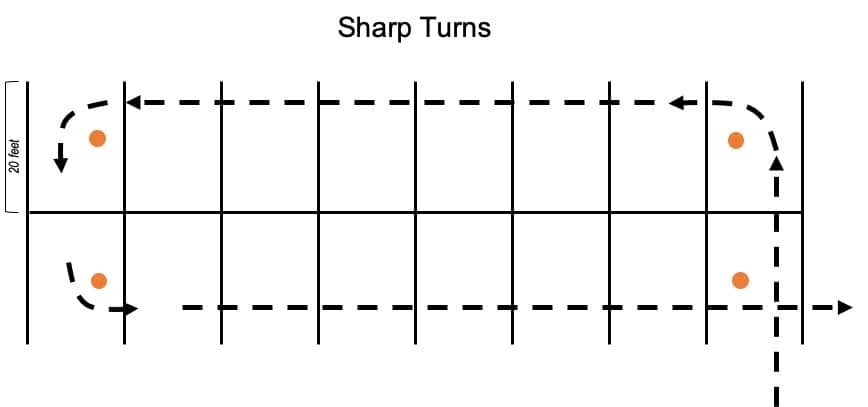
In this pattern you will practice sharp left and right hand turns. Remember to always look where you want to go. Once you’ve started a turn, direct your focus on the next turn. Reverse the direction to practice sharp right turns as well.
Practice, Practice, Practice
The more you practice these exercises, the better you’ll get. Remember, the purpose for these drills are to sharpen your slow riding skills, not to do the exercise as fast as possible.
With good slow riding skills you will be ready to get yourself out of difficult situations either in traffic, or on a narrow country road. When you’ve perfected your slow riding skills then it’s time to learn the smoothest way to stop your motorcycle.