It can be very frustrating to gear up and pull out your motorcycle for the first ride of the season, only to find that you’re bike won’t run unless the choke is fully on.
It seemed to be running fine last summer, right? Problems like this don’t just happen when your motorcycle has been sitting for a while either. They can also happen quite suddenly.
So, why does a motorcycle only run with the choke on? It means your motorcycle is not getting enough fuel, and this can be caused by dirty or clogged pilot jets, clogged fuel line, clogged fuel filter, dirty petcock, loss of vacuum in the carburetors, among other carburetor issues.
Narrow Down the Cause
Nine times out of ten the cause is clogged pilot jets. The pilot jets are responsible for providing fuel to the carbs during idle and during the first phase of acceleration, i.e. when you first roll on the throttle. So, if these jets are clogged, even in the slightest, it will prevent fuel from getting into the carbs enough to keep it idling.
Opening the choke, blasts fuel into the carbs to keep it going. But, if you’ve ever had this problem, you know that running on full choke is not feasible. The mixture is much, much too rich, the engine revs much too high, and the bike is almost impossible to ride for any significant distance.
How to Fix It
Let’s start from the simplest solution to the most complicated one. There’s no need to rebuild your carburetors if you don’t have to.
Run Sea Foam Through the System
The first, quick and easy solution (hopefully) is to run Sea Foam engine treatment through the engine to flush out any gunk in the carbs. Sometimes this works if you don’t have a major clog in the jets. Note: if you have a fuel injection system, this is a good way to clean the fuel injectors.
Start by using it as a fuel additive. Fill your tank with the recommended grade fuel for your motorcycle. Add to the tank one ounce of Sea Foam for every gallon of gas in your tank. Ride your motorcycle and allow the additive to work its way through. If this doesn’t work, go to the next step.
The next step is to run the Sea Foam directly into the carburetors. When you do this, be sure to run the bike in a very well ventilated area as the fumes from the burning Sea Foam will be pretty harsh.
- Remove fuel line from the the tank. The one that feeds the carbs.
- Drain the float bowls of any fuel.
- Using a funnel, pour a small amount of Sea Foam into the fuel line allowing the float bowls to fill up again.
- Start your motorcycle and keep pouring about 1/4 to 1/3 can of Sea Foam into the funnel while it runs. Note: you’ll see a lot of white smoke coming from your exhaust. That’s normal.
When your engine burns all the Sea Foam, it will stop. Reattach the fuel line to the tank and let your bike sit for 10 to 15 minutes. Then, start it up normally, and see if it will now run without the choke being wide open. You will have to open the choke to get it running again.
Clean the Carburetors
Did the Sea Foam work? No? Not surprising. Often a clogged pilot jet is too clogged for Sea Foam to be effective. So, to properly fix this issue, you’re looking at a thorough carburetor cleaning involving removal and disassembly of the carbs.
The main task or goal when doing a carb rebuild or cleaning, is to remove the jets and clean each one of them individually using carburetor cleaning and compressed air. You will also clean the inside of the carbs and float bowls, and any inline fuel filters.
I recommend purchasing a carburetor rebuild kit for your specific make and model of motorcycle if you suspect that the jets or needles will be beyond cleaning. These kits run around $50 for a two cylinder engine and $100 for 4 cylinders. It’s a good investment and often means you’ll fix whatever carburetor issues you’re having. Even the ones you didn’t know you have.
Another argument for buying a rebuild kit is, the jets are made of brass, a very soft metal. If you accidentally strip the screw on one of these jets when removing it, you’re screwed, and you’ll need to replace it anyway.
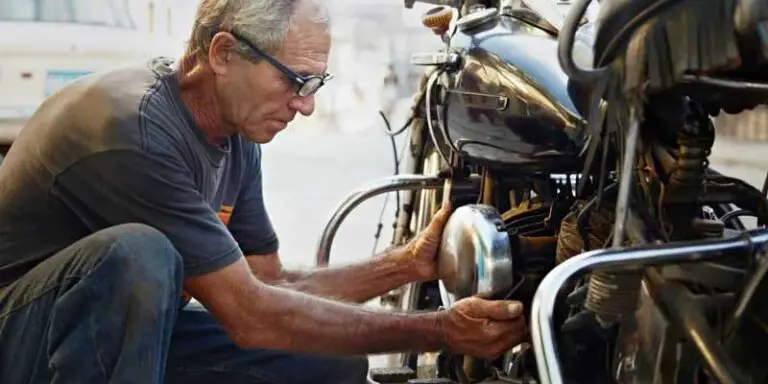
Removal and Dissaembly of Carbs
The procedure for the removal and disassembly of your carburetors is going to depend on the make and model of your motorcycle. This article won’t go into the specific steps for this, but I will share my knowledge on how NOT to screw up the job.
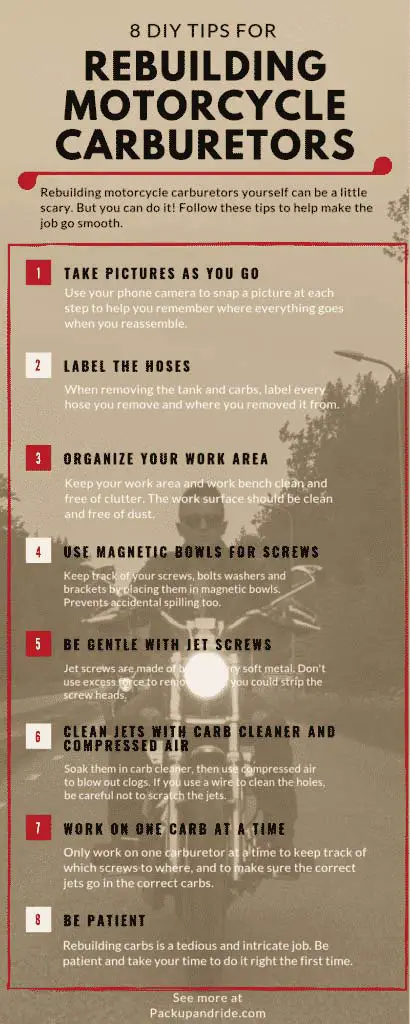
Tip #1 Label Your Hoses
When removing the gas tank, you will need to keep track of what hose goes where when you put it back together. By simply labeling the hoses with some masking tape, you won’t be scratching your head wondering where they go. You can number each hose, and also place a number on the part where the hose attaches. Or, you can use a color-coding system and use a sharpie to mark where the hoses go. However you decide to do it, those labels will be a lifesaver.
Tip #2 Keep Track of Screws, Clamps and Brackets
Before you take something off, take note of where it came from and what screws hold it together. Taking pictures of the process on your cell phone is a great way to do this. Keep all the screws, bolts, and brackets in a container away from work area so that they are not accidentally stepped on, knocked over, or spilled. Using separate small containers for different sections of the bike is very helpful. Again, use the labeling system so you don’t forget where the screws go.

Another trick is to take a thin piece of cardboard or heavy paper and trace out the pattern of the screws on the paper. When you remove a screw from your carbs, stick it through the paper; kind of like a map of where everything goes. This is a perfect trick for those of us who have trouble remembering where that one odd screw is supposed to go.
Also, magnetic parts bowls work great for this kind of job too. You should have one bowl for every carburetor you’re working with so you can keep the jets and screws from getting mixed up.
Tip #3 Organize your Work Area
Once you have the carburetors out of the motorcycle and on your workbench, you will want to keep this area clean and organized. When you start taking the carbs apart, removing little screws, springs and brackets, you will need to keep the parts organized and in order.
Gather only the tools you will need for this detailed work. Limit it to just a couple of screwdrivers, a small wrench, small containers for screws and a small container for cleaning solution. Also, a couple of lint free rags. Lint free is super important. You don’t want to wipe down a part that you just cleaned only to leave a tiny piece of lint inside your carbs.
Lay your carbs and tools on a solid, clean work surface free from cracks or gaps where your screws or jets can fall into. I have an old kitchen cutting mat that I use for jobs like this.
Tip #4 Be Gentle With the Jet Screws
Brass is a very soft metal. Stripping the screw heads is easier than you think. They are also quite small and require a small screwdriver head. So, when you get in there to remove the pilot jet screws, the smallest of the bunch, make sure your screwdriver is properly seated in the groove before you start turning. Turn firmly, while pressing down on the screw. Don’t rush. Once you hear a snap, the seal is broken and the screw should come out with no problems.
Tip #5 Clean Jets with Carburetor Solution and Compressed Air
When cleaning the individual jets, some people will recommend sliding a piece of wire through each hole to clear out gunk. This should be done with extreme caution. You do not want to scratch the inside of the jets or the holes. Remember, brass is soft and it doesn’t take much to scratch it.
The best method for cleaning jets is to soak them in a carburetor cleaning solution, then blow out the jets with compressed air. If you have an air compressor, then you’re all set. But, if you don’t, a can of compressed air will work. Word of caution when using canned air; always hold the can upright when spraying so the chemicals in the can remain in the can where they belong.
Adjusting the Pilot Jets
At this point, let’s assume you have done a proper cleaning or rebuild of the carbs and you’ve successfully put them back together. Don’t put them on the bike just yet. It is super important to make sure the pilot screws are adjusted to your bike’s manufacture specifications. Check your service manual to see how many turns out the screws should be.
When adjusting pilot screws, again, be gentle. Screw them all the way in until you just feel them seat. DO NOT tighten them any further. From there, turn the screws out the recommended number of turns for each carburetor. They may be different, i.e. one carb maybe 2 1/2 turns while the other will be 1 1/2 turns.
Install Carburetors onto the Motorcycle
Once you have all parts reassembled on your carburetors, and your pilot jet screws properly adjusted, then you can install them back onto your motorcycle.
Now you will be glad that you labeled the hoses. Make sure you reattach all the appropriate fuel hoses as well as all the vent hoses, which are equally as important. Make sure the air intake hoses are properly mounted to the mouth of the carbs and that they are properly seated on the air intake box. Leaks in the air intake portion of the system can affect the air to fuel mixture. While you’re at it, make sure the air filter is clean and properly installed.
When installing the gas tank, make sure no hoses are pinched or kinked. Make sure the vent hoses are properly routed down the motorcycle and clear from hot pipes, gears, and the chain.
Once everything is back on the motorcycle and connected again, it’s time to give it a test. Startup the bike with the choke on. Remember, it will take a bit to get the fuel running through the carbs at first. Hopefully, with clean, and properly adjusted jets, your motorcycle will be idling properly without the choke being fully open. Take it out for a test ride.
Other Causes
Vacuum leaks can also cause problems with idle speed and performance. While you have your carbs disassembled, you should inspect the rubber bladder around the main needle for any holes. When assembling your carbs, make sure you do not pinch the edges of the bladder which can cause leaks in the vacuum.
Clogged fuel filters can prevent fuel from flowing freely into the carbs. Check your service manual for the location of any inline fuel filters. Remove them carefully and make sure there is nothing clogging them. If your motorcycle has a gravity fuel delivery system, and a petcock or fuel switch, you should remove the petcock and check the filter at that point. Often, debris from the tank can clog this filter too.
To wrap it up, clean carburetors, fuel lines, and fuel filters will ensure that your motorcycle runs properly. While a carburetor rebuild is somewhat tedious and intricate, it’s definitely something that you tackle do yourself. It takes patience, but, if you don’t rush and if you follow the tips I’ve laid out here, you can get your motorcycle up and running again.