When it comes to motorcycle parts, we all know they don’t last forever. And in most vehicles, it’s a battery that tends to die first. So this begs the question, how long does a motorcycle battery last?
A motorcycle battery should last between 2 – 5 years if you’re doing the right things to look after it. However, the sad reality is that most people don’t get more than 2 years out of their motorcycle’s battery.
But, like a lot of things, it’s not exactly that simple. There are a few other factors both avoidable and unavoidable to that play a big part in how long your motorcycle battery will last. Let’s take a look at these and work out how long your motorcycle battery will last in your certain use case.
Average Lifespan of Motorcycle Battery as a commuter
If you are motorcycling to work and back on the daily in a climate without frozen winters, expect a solid 3-5 years before you have any issues with your motorcycle battery. By riding each day you are charging your bike’s battery daily and keeping your battery in that perfect voltage range of 12.5-12.6.
Average Lifespan of Motorcycle Battery as a weekend warrior
Assuming you’re living in a climate that doesn’t hit frozen, your motorcycle battery shouldn’t give you any grief for at least 2 years as a weekend warrior.
How long a motorcycle battery last without being run?
Typically, a motorcycle battery will die between 3-4 months without the motorcycle being turned on. For most riders, turn over your engine is the main way they keep their battery fully charged. Therefore when they don’t ride for a few months their battery dies. Because starting your engine is what charges your motorcycle battery, without this charging most modern new motorcycle batteries won’t last more than 4 months.
The newer the battery, typically, the better the battery is at this with a new battery usually hitting the 4-month mark and an older battery sometimes getting only 1-month before it dies.
Not running your motorcycle for a long period of time is one of the most common reasons motorcycle batteries tend to die.
Story time!
A motorcycle rider stops commuting to work on the bike for a few weeks, then goes on a holiday for a month. Very quickly a few months pass and your motorcycle’s battery is dead.
Sound familiar?
How long will my motorcycle battery last in winter?
If you live in a climate with freezing winters, you need to run your once per week to make sure the motorcycle battery doesn’t die before spring. For newer batteries, you might be able to push this to two weeks but expect your battery to be dead within 2 weeks of not being ridden. Of course, if you get your bike stuck somewhere with a dead battery you can always jump start your motorcycle with a car.
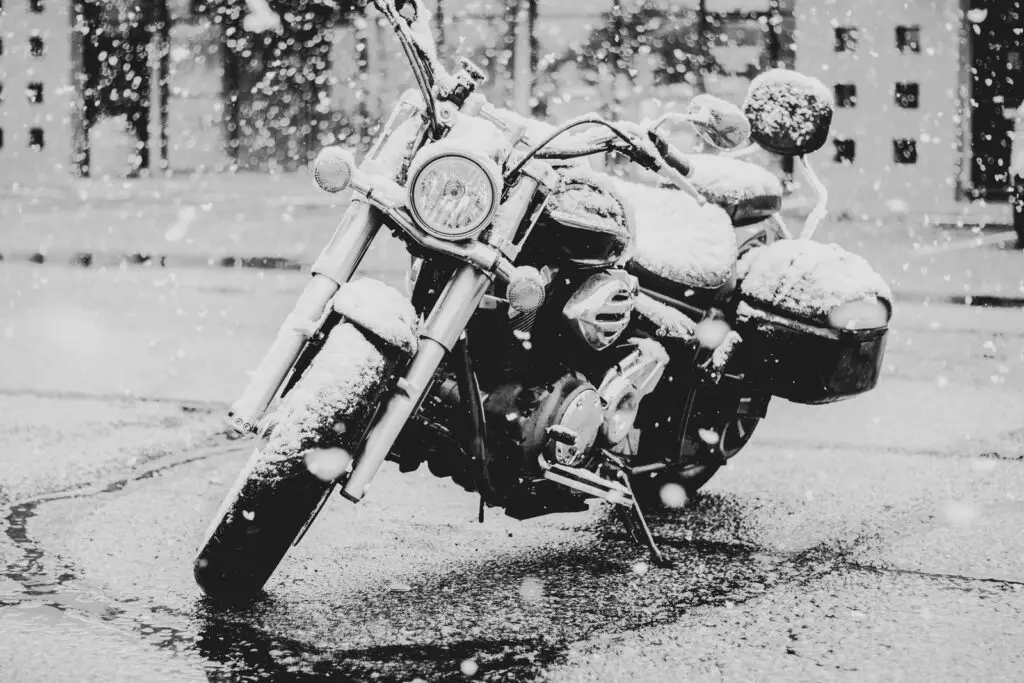
This can be very challenging for most since there is a reason we don’t ride in winter, everything is frozen! But try to find a way to go for a quick ride, even if it’s just around the block, every little bit will help. But if it’s completely snowing outside, just don’t risk riding your motorcycle in the snow.
What can you do to keep your battery fully charged?
The best thing to do is to keep riding your motorcycle!
But if you know you’ve got a couple of weeks/months coming up that you won’t be able to take the bike out of the garage there are a few ways you can make sure you don’t come back to a dead motorcycle battery.
Invest in a Trickle Charger: Trickle charges or battery tender are designed to automatically charge your battery to the optimal voltage and current for long periods of time. This type of charging system is perfect for making sure your motorcycle battery doesn’t die all year round.
Disconnect your battery from the bike: If you know you just won’t be using the bike for a while and you can’t be afford a trickle charger or battery charger then you should disconnect your battery over the winter.
Simply open up that saddle seat and disconnect your battery from your bike. Just be careful while you do this and make sure you don’t connect positive to negative.
In winter keep your bike somewhere warmer: This sounds like an obvious one, but you would not believe how many people store their motorcycle in a sub 0 degrees C shed or barn during the winter, opt for your house attached heated garage, or somewhere warmer. If your battery stays warmer, this alone will not keep your battery charged but will dramatically help extend the life of your battery.
Short periods of cold are fine, but if it’s anything over 48 hours, expect cold weather conditions to affect your battery.
Types of Motorcycle Batteries
Motorcycle batteries come in many different types. The type of battery that you choose will depend on your bike and how it is used. Below, we’ll identify the different types of motorcycle batteries available on the modern market so you can get an idea of what might be best for your specific application.
Standard wet cell
This is the most common type of motorcycle battery. It’s filled with a chemical solution (electrolyte) and is sealed, which means the battery cannot be changed without special tools. The acid in this battery can spill out if it is tipped or inverted, so care must be taken when charging or replacing these types of batteries.
Absorbed Glass Mat (AGM) Batteries
AGM batteries uses fiberglass between the plates to help contain the acid. This allows it to be mounted in almost any position and gives it more safety than standard wet cell batteries. It is not as spill-proof as gel cells, but they can still be tipped over without damaging the battery.
The sealed agm battery seems to be a popular type of battery very popular on motorcycles because they last longer than standard wet cells and can be mounted in any position.
Gel Cells
Gel cell batteries are another spill-proof battery that uses a thick, jelly-type acid to power the battery. Gel cell batteries are more expensive than standard or AGM motorcycle batteries but tend to last longer between charges. Gel cell batteries cannot withstand freezing temperatures like wet cells can.
Lithium motorcycle battery
This type is very popular among street bike riders because it is lightweight and powerful. They also do not produce as much heat when in use. Like gel batteries, they cannot withstand freezing temperatures and are expensive compared to standard wet cell batteries.
But they are not only lightweight but can outlive all other battery types. The maximum capacity or battery life of these batteries isn’t necessarily better, but they do allow for more charge-discharge cycles. These batteries are nothing like car batteries.
As with any motorcycle, tire condition will greatly affect your safety and your bike’s performance, so replacing your tires regularly is not only important but essential for your safety.
But, how do you know when your motorcycle tires are worn? You should develop the habit of doing monthly inspects to determine the tires wear indicators, tread wear, tire age, and tire condition to determine if your motorcycle tires need replacing.
I’m seeing wires on my motorcycle tires, what should I do?
We are going to hit this one on the head straight away. If your tires are showing wires stop riding immediately, your tire will not perform adequately and is in danger of blowing out.
Tread Wear
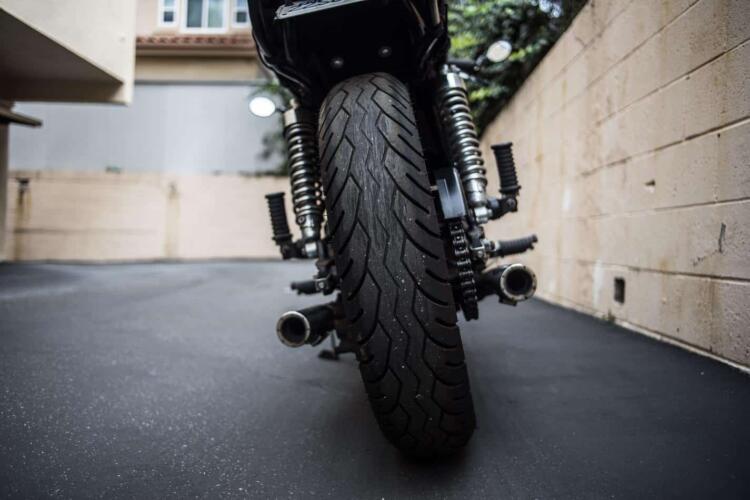
Sometimes simply looking at the tread down the centre of the tire will immediately tell you that the tires are ready to be replaced. Visible metal cords or threads showing through the tread is the most obvious sign that it’s time to replace them.
If you can see small curvy lines that look a bit like wrinkles running down the center portion of the tire, this is a sign that the cord is just below the surface. This is another indicator that it’s time to replace the tires.
Often a tire will have most of its wear down the center, especially if the majority of your riding is commuting, or freeway riding.
If you see any metal mesh showing, that’s a clear sign that your tires are toast. While that’s pretty obvious, there are other more subtle signs to look for on the tread. Sometime the tires doesn’t show wear right at the wear indicators, but the tread is worn all the way down to the metal weave underneath. This is the easiest visual indicator that your tires are finished.
Check the Wear Indicators
All new tires will be designed with some type of wear indicator, a small bar of tread that is raised slightly higher than the tire’s lowest point. When the tread has worn down even with this bar, the tire is ready to be replaced.
If you are finding it hard to locate your wear indicator lookout for little bumps at the bottom of the main grooves. If the depth of the rubber remaining reduces below the level of these indicators (1.5mm), the tire has reached its legal wear limit and must be replaced.
Often you can get a few more miles, maybe a couple hundred, after this point, but keep in mind that as the tire is coming to the end of its life, and will need to be changed fairly quickly.
Tire Age
When it comes to your motorcycle tires age it is important that you are abiding to the manufacturer’s recommendations. Even if you left your tires off your bike, sitting in the garage the material of the tires is still breaking down. That is why you should never exceed the maximum manufacturer’s tire age recommendations.
The average motorcycle tires last for 5 to 10 years, but according to most manufacturers, riders should expect their tires to last until the 6th year of frequent use. Of course, environmental factors, usage, build quality, type of rubber, and usage vs the intended purpose of the tire all play a factor in the aging process of a tire.
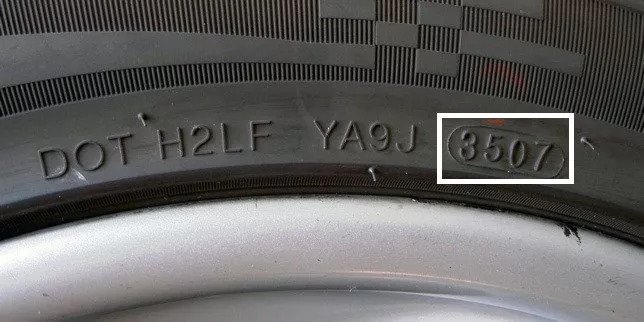
To locate the manufactures date code (such as in the photo below) have a lllook for a 4 digit part of the DOT code on the sidewall of your motorcycle tire.
The first 2 numbers indicate the week and the last 2 numbers indicate the year (following 2000). So in the example below, the manufacture recommends that you do not use this tire beyond the 35th week of 2007.
source: pitstoparabia.com
Cracks and Dry Rot
Put simply dry rot is characterized by cracks in the tire rubber, usually seen on the sidewall. All dry rot really is is the decay of your tire through regularly exposed to harmful substances and conditions.
Dry Rot compromises your safety
Dry rot is extremely harmful to your motorcycle and your overall motorcycle safety. Dry rot allows air to escape the tire, if you notice that it is impossible to fully inflate your tire, it might be dry rot!
Dry rot will also express itself as unnatural rubber expansion while driving. Tires with dry rot are known to develop leaks, holes and blowouts. This can cause mid-ride separation of tread and tire making it extremely dangerous.
With motorcycle deaths, 28 times more likely than other fatal crashes (Source: Forbes) dry rot is just not worth brushing over.
What can be done about dry rot?
It is important to say that there is no way of repairing cracks or dry rot on a motorcycle tire. My recommendation is to check for dry rot twice a year or so and if you find some on your tires get them changed immediately.
Tire Damage
Tire damage by cuts and tears are actually the most unlikely causes of needing to replace your tires, however, it does need to be mentioned. The most common things that can cause tire damage is over and under-inflation of your tires. By over or under inflating your tires you’re exposing them to an increased risk of being damaged by sharp objects.
Tire Cupping
Tire cupping is an odd and uneven wear pattern on your tires due to bouncing motion on your wheels. Tire cupping is often irregular in where it shows up on the wheel and will interfere with the tires ability to have proper contact with the road. Tire cupping will normally appear on one side of the tire only. Some slight cupping over time is normal and is due to low tire pressure. The best thing you can do is increase the tire pressure by about 2psi.
It is also important to mention here that depending on the your habits, how much you lean into corners or stay upright this can also change the amount of uneven wear on your tires. There is no right or wrong here, you just need to understand your habits as a rider and how this can affect your motorcycle.
Not sure how much wear is too much?
When evaluating your motorcycles tires it is important that you take a more catious than blazay approach. Often times we forget that there are only a few milimeters of tread that hold the shinny side up and the rubber side down.
If you’re still not sure, pop into your local garage and ask the question.
Reading Time: 7minutesHave you ever been riding down the freeway on your motorcycle and you feel your head shaking around involuntarily? Like an invisible force is slapping your head from side to side, up and down, forward and back in a weird random pattern. You find it hard to focus and you tense your neck and shoulders to keep it under control and 15 minutes later you have a stiff neck and a splitting headache. You have been the victim of wind buffeting.
What is Helmet Wind Buffeting? According to the Oxford Dictionary, buffeting is “The action of striking someone or something repeatedly and violently.” or, “Irregular oscillation of part of an aircraft, caused by turbulence.” On a motorcycle, it is the turbulent wind flowing around the windshield, front fairings, and helmet that cause the buffeting.
Wind buffeting is not the same as resistance. Wind resistance is the constant pressure of the wind blowing against the rider. The official definition is: “the forces that are in opposition to the relative motion of an object as it passes through the air”. Anyone who rides a naked motorcycle, a bike with no windshield, is familiar with wind resistance, and it is usually a constant force that the rider can adapt to. Buffeting is different.
What Causes Helmet Wind Buffeting?
Wind buffeting most often occurs on motorcycles with windshields or front fairings, and at freeway speeds. While the windshield pushes the oncoming wind away from the rider’s chest and shoulders, that wind begins to swirl around the edges and the inside of the windshield creating a vacuum, or airflow in the opposite direction. Wind can also flow up under the fairing and blow directly onto the rider’s chest or helmet. The air streams created in this vacuum are not consistent, so they and they can catch the edged of your helmet causing movement or vibration. Some riders who wear open face helmets and sunglasses have noticed that buffeting can go as far as shake their sunglasses while riding.
Wind buffeting can also be cause by a side wind even if your helmet and windshield are perfectly adjusted to prevent it. A strong air flow from the side will break up when it hits you and your motorcycle. This can cause the air to swirl around your helmet causing vibration or unwanted, random movement. In face, on any noticeably windy day, you can expect to experience some buffeting.
Sometimes riding with a passenger can break up the usual wind flow that you’re used to and cause the air to flow in a different pattern around your helmet. You or your passenger may experience the annoying affects of wind buffeting. So, it’s a problem that can’t be solved 100% of the time, but there are things you can do to reduce it.
How to Reduce Wind Buffeting
The first thing to look at is your windscreen. No matter what size you have on your motorcycle, if it’s not adjusted properly for your riding height, it can cause buffeting. If the wind coming off the windscreen and hitting the rider just under the helmet, the wind will catch the helmet and cause it to move around. So the key is to make sure the wind is passing over the top of the helmet, or, some on sport bikes, or motorcycles with small windscreens where the wind doesn’t go over the rider, the wind should hit below the helmet and across the rider’s shoulders.
So, the trick is to adjust the height of your windshield, or purchase an aftermarket windshield that will move the wind up and over your helmet. If you don’t want to invest in a new windshield, you might want to consider a windscreen spoiler blade add on that bolts to your existing windshield.
If your windshield height is adjusted properly and you still notice a problem, one solution is to provide some airflow just under the windshield. Having a small gap between the windscreen and the fairing will allow a slight amount of wind to flow up the inside of the windscreen reducing the vacuum that forms in that area. The amount of wind flowing through this gap is just enough to reduce the problem and not so strong that it blows agains the rider. Some touring motorcycles have the ability to adjust this gap on the fly or electronically to accommodate freeway riding. Another solution to adjusting this gap if you still notice buffeting, is to add spacers to the bolts that secure the windshield, providing a little more space under the windshield.
Another common area where riders notice a problem is the wind flowing up from under the front fairing or under a larger windshield. This wind can flow up the riders chest and cause movement of the helmet. A common solution for this problem is to install lowers on each side of the motorcycle, just below the fairing. This will cause the wind to flow around the riders legs instead of upward. There are a wide variety of lowers made by the manufacturers, especially Harley Davidson. But, there are also a lot of aftermarket choices that are sure to work with your motorcycle and your riding set-up. Look up your motorcycle here on Twisted Throttle to see if they have a solution for your bike.
The solution to wind buffeting doesn’t necessarily have to be installing a large windscreen. Often your helmet can be the culprit. As an example, my CB500x has a small windscreen that is not tall enough to move the wind up and over my head. It’s only tall enough to reduce the wind resistance against my chest and slightly on my shoulders. I used to have the windscreen in its upper most adjustment and ride with a dual sport helmet and had no wind buffeting. However, when I purchased a standard, full face helmet, I noticed more buffeting. The new helmet shape changed the way the wind flowed and caused an annoying amount of movement. My solution was to lower the windscreen slightly. This caused the wind to flow just below my helmet resulting in no more buffeting. If you have a similar situation, the key here is to purchase a good aerodynamic helmet that helps reduce wind noise and wind resistance making for a comfortable ride. Also, fun fact, adding a windshield to your motorcycle will help with wind buffeting too!.
So, to sum it up, reduce wind buffeting by looking at your
Windshield height and how the air flows over the windshield
Add windscreen spoiler to help deflect the wind over your head
Add space for air flow under your windshield
Add lowers to each side under the windshield
Wear an aerodynamic helmet
Related Questions
How can I tell where the wind is coming from? To figure out where the wind is coming from can be a little tricky if you don’t have a wind tunnel, laboratory and a staff of specialists handy. But you can still get a good idea of where wind flow is coming from. Go out for a ride on a calm day and get your motorcycle up to freeway speed where the wind is most noticeable. With your hands, start feeling around for that point where the wind hits. Place your hand, fingers together, palm down, at the side of your tank and move it around slowly until you feel where the wind resistance is happening. Do the same at the top and the sides of your windscreen. This test will give you a good idea of where the problem is coming from.
What’s the body position for riding in the wind? A cross wind, or wind coming from the side, is the type that causes the most problems for a rider, but in any case the best way to deal with excess wind is to create a lower rider profile. Lean over your tank and duck down as much as possible. Sometimes it’s nice to have a tank bag that you can lean on. In the case of a strong side wind, you will find yourself having to lean into the wind to keep your motorcycle upright and on a straight path. One way to reduce this is to create some drag on the same side as the wind by sticking out your knee. You’ll see professional Moto GP riders do this to slow themselves down just before a turn. Sticking out your knee helps reduce that sideways push that a side wind causes. Depending on how windy it is, it may not completely solve the problem, but it will help.
How do I measure more windshield height? Sizing a windshield is a two person job and if a very simple, 5 minute procedure. With the rider sitting on the motorcycle, off the kickstand, the second person will measure the distance from the top of the headlight, or handlebars, to the riders nose. You want the rider to be able to look over the top of the windshield and not through it. It will still be tall enough to deflect the wind over the rider, but not so tall to interfere with the rider’s vision.
I admit to leaving the house on my motorcycle for a weekend trip without any repair items except a multi-tool. My motorcycle is fairly new, I keep it well maintained and I have confidence it will perform well on my rides. But, I realize that when I’m out on the road, anything can happen. That unforeseen breakdown could happen at any moment. So, I decided to research some potential breakdowns and learn how to fix them. I know there are plenty more miss-haps that can happen and there are more serious breakdowns, but, these are just a few that, if one if prepared, can be fixed on the roadside and you can be on your way.
1. Loose Chain
If your motorcycle has a belt or shaft drive then this wouldn’t apply to you. If your drive system breaks down it’s likely a lot more serious. But chains stretch over time and they need regular lubrication. I was once reminded of this when I took a weekend camping trip to the Northern California coast. On my way home I notice a squeaky rattling noise. At my next stop I looked at my chain and it was bone dry and extremely loose. Unfortunately I didn’t have anything in my kit to lubricate it or adjust it. So, it home, about 100 miles and fixed it up there.
So, what should you do if your chain is dangerously out of adjustment when you’re on a long trip? Below are the steps, tools and products you will need to clean, lube and adjust your chain on the roadside. These are general guidelines as the tools and steps may be specific to your motorcycle.
You will need the following:
A wrench that fits the rear axle bolt
A smaller wrench that fits the adjustment bolt
Small can of chain cleaner
Small can of chain lube
A Rag
Know your motorcycle’s recommended chain slack, found in the owner’s manual
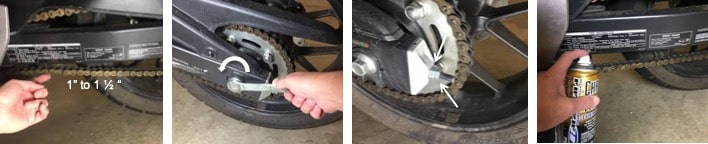
It’s easier to do this adjustment if your bike is on a stand, but, if you don’t have a center stand, or a Snap Jack, it’s still possible to make this adjustment with the rear wheel on the ground. Proper chain slack is generally between 1 to 1 1/2 inches but check your owner’s manual to be sure.
Steps
Clean the chain. While you won’t be able to do a thorough cleaning on the side of the road, you can at least get most of the dirt and grime off with a small canister of chain cleaner and a rag. Consider packing an old toothbrush too.
Loosen the rear axle bolt a couple of turns. It does not have to be very loose. Some bikes will have a cotter pin through the axel bolt. This should be removed and replaced with a new one if possible. If you don’t have a new one, don’t lose or break the one you have.
Most bikes will have an adjustment nut at the rear of the swing arm on each side and some will have two. If there are two, loosen the outer nut a few turns, then turn the inner nut clockwise a half turn at a time. This will pull the chain tighter. Always repeat the adjustment on the other side, equally.
Check the chain slack and repeat the turn by turn adjustment until the chain is properly tightened. Again, be sure to turn the adjustment bolts equally on both sides of the rear wheel.
Once the chain is at the correct tension, tighten down the rear axle bolt. Replace the cotter pin.
Final step, lube the chain. If your bike is not on a stand, then you will have to lube the chain in sections and roll the bike as you go.
2. Broken Hose
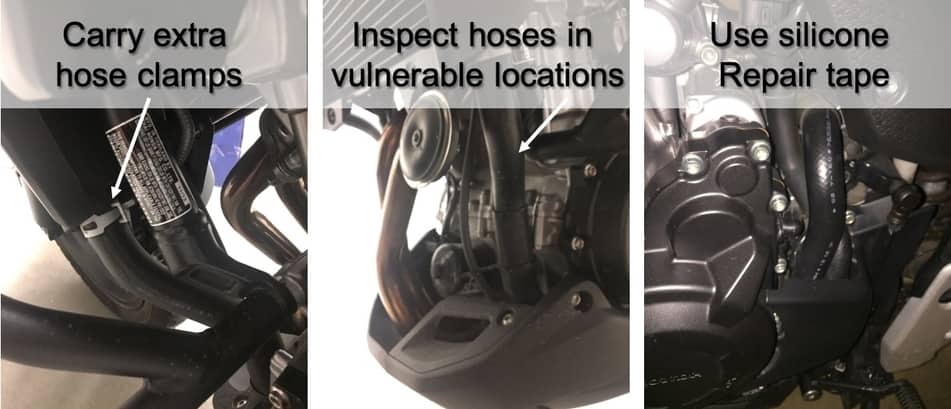
A cracked or broken hose can affect a motorcycle in a lot of different ways depending on what hose is broken. Hoses will commonly break or form a crack at the connection point. If this is the case, you can often trim off the hose at the crack, fit it back on and clamp it down again. Carry extra hose camps with you in case one breaks. If you have a crack in a hose or in the fuel line, you can use silicone self fusing repair tape around the hole or crack. This type of tape sticks to itself when it is stretched and doesn’t rely on adhesives which can loose it’s ability to stick if it gets wet. When applying the tape, stretch it tight as you wrap to get a good seal. You can reinforce the repair by placing a few zip ties around the tape to prevent it from unwinding.
A taped up hose is a temporary repair in most cases. Hopefully it will be enough to get you going again so you can ride to the nearest town for a permanent fix. So, remember to keep a few hose repair supplies in your tool kit especially if you are on a long trip in remote locations.
3. Broken Clutch Cable
A sudden broken clutch cable can leave you stranded on the side of the road. While it is possible to shift gears without a clutch in some circumstance, and you may be able to limp your way to the nearest town in second gear, replacing your clutch cable on the roadside is really the best option if this ever happens to you. It’s a relatively simple repair.
A spare clutch cable specific to your motorcycle is one of my recommended repair items to take on long distance motorcycle trips. The repair usually only requires one tool: a 10mm or 12mm open end wrench which should always be included in your on board tool kit.
The trickiest part of this repair is figuring out where the cable line threads through the motorcycle, and you may have to remove some side panels to see the path. So, when removing the old cable, pay close attention to where it goes.
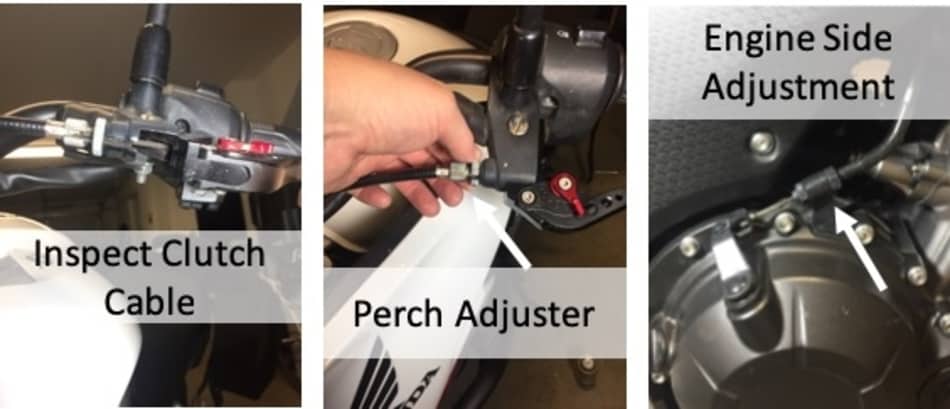
At the clutch lever, loosen the perch adjuster and move it all the way towards the cable to loosen the cable, and remove the cable from the clutch lever.
At the clutch end on the engine, loosen the adjustment nuts and remove the cable from the clutch bracket.
Take the new cable and squirt some lube down one end until a little bit drips out the other end. A small bottle of all purpose lubricant should be part of your on board tool kit.
String the new cable through the same path as the old cable. HACK: Don’t remove the old cable until you’re ready to install the new cable. String it through as you slide the old one out.
Attach the cable to the clutch lever first and secure it to the perch adjuster, leaving the cable loose.
Attache the other end of the cable to the engine side and tighten the adjustment nuts until the majority of the free play has been removed.
Do the fine adjustments at the clutch lever to remove any excess free play. Check your owner’s manual for the recommended amount of free play for your motorcycle. If you don’t get this adjustment spot on while on the road side, don’t worry, it’s ok to estimate.
After you set the free play, tighten the nuts at the engine side until they are secure. Then, tighten the adjustment screw on the perch adjuster.
Before you put all your tools away, make sure the new cable is secured with all the necessary cable stays or zip ties. Turn your handlebars all the way to the left and right to check for any interference. Lastly, start the motorcycle and check the clutch engagement to make sure it’s in the right spot. Make any minor adjustment if necessary, and you’re ready to get back on the road.
4. Broken Shifter Lever
On many motorcycles the shifter lever is in a vulnerable location and can be broken if the motorcycle is tipped over, dropped, or crashed on its left side. Sometimes you can get yourself up and running with a generous amount of duct tape wrapped around the joint of the shifter arm and the toe lever. But, this repair is not going to last and can create a frustrating riding experience. So, your best bet is to do a quick roadside replacement of the shifter lever.
This is probably one of the easier roadside repairs as it only needs a few tools and a replacement part. Make sure you carry a spare lever that fits your specific motorcycle. The tools needed will depend on your motorcycle but are often just a couple of hex key wrenches and small open ended wrenches, or you could use an adjustable wrench. In most cases you won’t have to remove any side panels or covers to access the lever and its attachment bolts.
Some bikes also have a rocker arm that should be inspected to make sure it isn’t bent or cracked. Often, even if there is a slight bend to the rocker arm, your shifter will still function properly and this can be repaired later on. Also, on some bikes, the end of the shifter lever may be attached to the foot peg bracket and you may need to remove that bracket to replace the lever.
5. Burned Out Headlight or Tail Light
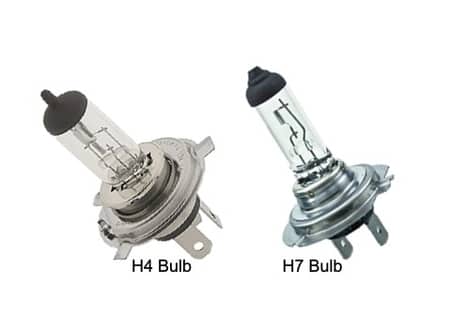
The first step is to know what kind of bulbs your motorcycle requires and keep replacement bulbs in your on-board repair or tool kit. A lot of bikes, especially naked bikes or cruisers, use a standard H4 or H7 bulb that can be found at any auto parts store. Tail lights and turn signal light bulbs are much smaller and you should check your owners manual to find out exactly which bulbs to purchase for your kit.
Pro Tip: Avoid touching the glass portion of the bulb. Oils on your hands can create hot spots which will cause the bulb to burn hotter, reducing the life of the bulb.
It is much easier to replace a headlight bulb on a naked bike. Motorcycles with round, exposed headlights are by far the easiest but the exact procedure will depend on your make and model.
Start by removing the headlight lens using the required wrench for your bike.
Remove the connector from the back of the bulb. This will free up the headlight making it easier to work with.
Remove the rubber cover on the back of the lens. This protects the inside of your headlight from dust and moisture.
Remove the secure spring from the back of the bulb. You may have to loosen one of the small screws, but do not remove them completely.
Remove the bulb and inspect it to make sure it is blown. A burned out bulb will look a little brown and the filament inside will be broken. If it’s not, if the bulb looks good, then you may have a deeper problem, such as a bad fuse.
Replace the bulb with a new one. Line up the spacers on the bulb with the notches on the housing. It will only fit one way.
Plug in the connector.
Reverse each removal procedure and secure your headlight lens back on the motorcycle.
Replacing the headlight bulb on a motorcycle with plastics is a bit more tedious, but you don’t always have to remove the covers to access the bulb. This, of course will depend on your make and model. Sometimes you will have access to the bulb by reaching down under the dash. But, on many bikes you will have to remove some covers, and possibly the entire dash, to access the bulb. You will follow the same procedures outlined above for removal and replacement of the bulb.
Tips for Successful Roadside Repairs
Keep track of your screws! If you’re on the side of the road you’re likely working on dirt, gravel or a grass surface. Dropping a screw or nut is a real pain in the neck and will be hard to find. So, get out some kind of container that you can keep all the screws, nuts, washers, clips and whatever bits and pieces you need to remove to make your repair. Use a removed cover as a tray, or get out a cup or bowl from your gear. And, whatever you do, don’t kick over the screw tray! Not that it’s ever happened to me.
Be safe! Make sure you push your bike completely out of the roadway before you start making your repair especially if you are on a busy road. Having traffic zoom past you while you are kneeling down, preoccupied by your repair task, can make for a dangerous situation. Curious drivers often become fixated on what’s happening on the roadside which can cause them to swerve dangerously close. So, if you can pull into a parking lot, or stop at a pull out, rest stop or vista point, then you will be in a much safer place to do your motorcycle repairs.
If you’re alone, especially for us women, accept the assistance of strangers only if you feel safe. Trust your intuition on this one. Most people who offer to help you out have nothing but good intentions, so you shouldn’t pass up the kindness of a stranger out of fear. In my experience, 99% of people are good and kind hearted. Your gut will tell you when to say thanks, but no thanks.
It’s important to check if you need an oil change. Oil filters should also be replaced with every oil change. You can also do it by yourself. Install a new oil filter after the oil has been drained, then refill the engine with the right kind and quantity of motorcycle oil, as directed in the owner’s manual, using a funnel.
Changing an air filter is essential. The performance of your motorcycle will suffer if the air filter, which keeps particles out of the engine, is dirty and clogged. Although it’s not always difficult, changing an air filter can take some time. While the gas tank and other components might need to be removed in order to access the air filter, this is not always the case. The air filter should be removed and replaced once you’ve entered the air box. Then put back everything you took out.
Also, you may need to bleed your brakes out if they feel squishy. It’s quite easier to do on a bike than in a car. On a bike, the bleeder screw and brake levers should be easily accessible. Once you get to the brake levers and the bleeder screw, you can just bleed the brakes, which should make everything feel better.
In any case, being prepared before you leave for your trip will help you get out of a tight spot, fix common problems on the road side, and get back on the road before you know it.
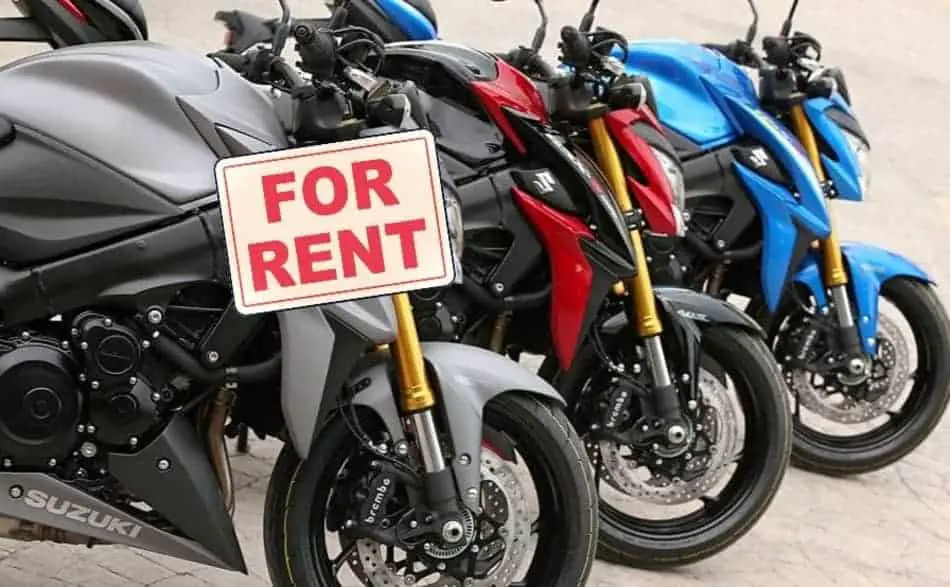
Have you ever planned a vacation to a beautiful destination and wish you could bring your motorcycle with you? Have you ever wanted to test ride a motorcycle for an entire day but dealers aren’t even willing to let you take it around the block? Are you planning on visiting the United States and want to see the country on two wheels? Renting a motorcycle could be your solution.
In this post, I’ll talk about how to rent a motorcycle and everything that’s involved in doing so. I’ll try to answer all your questions like, what’s required to rent, how much does it cost, insurance, safety, where to rent, and anything else in between.
Requirements for Renting
Renting a motorcycle is similar to renting a car meaning that they don’t let just anyone jump in and drive off; you have to meet certain requirements. The most obvious requirement is a license and a credit card (any major credit card will do). Like car rental companies, motorcycle rentals require that you carry a valid driver’s license with an M1 rating, or motorcycle rating, that is recognized in the state you reside. Unfortunately, a learner’s permit won’t cut it and will not be accepted by any rental company.
If you are from a country outside the US, any motorcycle license that is recognized in your home country will be valid when renting. However, if your license is written in a language other than English, you should consider getting an IDP (international driver’s permit). This will eliminate any confusion or language barriers in the case of an accident or any encounter with law enforcement.
Most motorcycle rental companies will have age limits and you must be at least 21 years old to rent. Of course if you were to rent a motorcycle in other countries this age would change. Some companies have raised this to 25 years old. Often, if you are younger than 21, you can rent a scooter, moped, or another small engine vehicle as long as you are over 18. The reason for this is to ensure that the renter has at least a few years of riding experience or maturity.
Insurance Requirements
The minimum insurance coverage for motorcycle rentals is liability insurance with a minimum amount of coverage and this may vary depending on the state in which you are renting. It is required by law. However, your own liability insurance that you have at home for your own motorcycle does not meet this requirement. Rental insurance is different and separate. Basic liability insurance is usually provided by the rental company and is included in the daily cost. This liability insurance will cover you if you cause an accident that results in injury or property damage to someone else.
While liability insurance is the minimum amount of coverage required, there is always a way to increase your coverage if you want. Some companies will charge a daily rate for supplemental liability insurance. This will increase the amount of coverage in the case of an accident. For example, if the basic liability insurance covers up to $15,000, then the supplemental insurance will cover up to $30,000, or $50,000 depending on which plan you choose.
Comprehensive insurance is also an add-on cost charged on a daily basis. This type of coverage will be in addition to the liability insurance and will cover you in the case of theft or damage to the motorcycle. For example, if the motorcycle turns up missing when you walk out of your hotel, this insurance will cover the cost of that theft. If the motorcycle is damaged by something other than your negligence; i.e. hit by a car, knocked over by someone, dented from a flying golf ball, smashed headlight from an angry, jealous bar patron after you hit on his girl, those damages will be covered by the comprehensive insurance.
Often you can bump up your insurance coverage again to include loss or damage to your personal property. With this upgrade, you will be covered if someone breaks into your saddlebags or luggage and steals your personal belongings.
Be aware that with any type of insurance coverage, there may be a deductible of anywhere from $500 to $5,000. So, even if the damage is covered, or even if the theft of the motorcycle is covered, you will be responsible for paying the deductible.
It’s extremely important to read the fine print when dealing with insurance coverage. And, if you’re not on a super tight budget, it may very well be worth the cost to get the full coverage available so you can rent and ride without worrying about any of that. Paying a little extra per day would be better than buying the company a new motorcycle. Consider it based on the deductible amount, how long you’re renting, where you’re riding (although anything can happen anywhere).
How Much Does it Cost?
The cost of renting a motorcycle will vary depending on what type of motorcycle you rent. Smaller bikes tend to be cheaper while the big bore bikes and fully loaded cruisers will cost more. But, in general, you can expect to pay at least $125 per day for a small bike, and up to $300 or more for a big touring motorcycle. Select the bike that not only fits your budget but fits your riding ability. Some rental companies will offer discounts for military or law enforcement or if you are a member of an auto club such as AAA. And if you’re an old fart, over 55 or 60, they may have senior discounts. Check with the company to see if any apply to you.
Security deposits are often required and are placed on a credit card when you rent the motorcycle. If all goes well, the security deposit will be refunded to you after the bike is returned. Depending on what kind of insurance coverage you choose, the security deposit can be as much as $5,000 and that amount MUST be available on the credit card used for the deposit. So, if they charge $3,000 for your deposit, but your card limit is only $2500, that card won’t be valid. So, be ready to have that credit available at the time of renting.
Another common cost that people don’t always consider is the cancellation fee and late charges. Cancellation fees can be anywhere from 30% to 60% of the rental cost and some companies require cancellations 30 days in advance. So, cancel within a month of your trip or else you could be paying hundreds of dollars for not renting the motorcycle. This policy will be different for each rental company so before renting, make sure you understand it completely.
Late fees are another cost that can surprise the renter. Most rentals are made on a 24-hour basis and if you rent a bike for 2 days, you will likely be required to return it at the end of the second day. In addition, you may have to return the bike during business hours so this may limit your return time. Always make sure you not only understand how many days your renting, but ask the company exactly what day and time the late fees will begin to incur. You’ll want to know this because late fees can be as expensive as $25 per hour. Yes, per hour.
One last fee that some people don’t always expect is a surcharge. This is an extra daily charge if the motorcycle is rented during a special event such as a motorcycle rally or gathering. This is similar to what hotels do on holiday weekends, they increase the rates when they know their product is in high demand. So, if you’re renting to go to Sturgis, be ready for a surcharge.
What’s Provided?
When you get a motorcycle rental, the company is required to provide you with the motorcycle and one helmet. Of course, you can always use your own helmet if you prefer, but if you don’t have one, they are required to provide it. Also, even though some stated in the US do not have helmet laws, you may still be required to wear a helmet while operating the rental motorcycle, this is for insurance purposes. If you require a second helmet for a passenger, the rental company should have them available for a reasonable daily fee, like $10.
Rental companies may also have riding gear, jackets, pants, leathers, and possibly gloves or boots that you can rent for a daily fee. The availability of these items will vary with each company. It’s also a good idea to ask if they recommend any local roads or routes that are fun on the motorcycle and they may provide route maps of nearby roads, so it’s a good idea to inquire about that. Motorcycle rentals are easily available for motorcycle riders. Rental motorcycles are easy to find with valid motorcycle endorsement. Motorcycle enthusiasts keep a track of great bike like a Harley Davidson and others that are available for rent. Eaglerider locations are the best spot for motorcycle riders to get rentals. The rental rates are usually non refundable and the rents are usually location or tours contract.
The rental company should also provide you with an orientation of the motorcycle you’re renting. It’s important that you are familiar with the location of things like the gas tank (don’t laugh, sometimes it’s under the seat), turn signals, horn, ignition, kill switch, fuel switch if it has one, etc. It’s important that you feel confident and comfortable on the bike before you ride off, so, even if it’s not a required part of the inspection, take the motorcycle for a quick spin around the parking lot or block before you leave and ask questions if you have them.
Limits and Restrictions
Each rental company will have its own set of restrictions and limitations so it’s important to read the rental agreement to understand exactly what they are. Here are some restrictions you can expect.
If you’re renting within the United States you will likely be required to stay within the US border. You will not be allowed to ride into Mexico or Canada unless you have made special arrangements with the rental company to do so.
You will likely be restricted to riding on certain roads depending on what kind of motorcycle you rent. For instance, if you rent a street bike, you will not be allowed to ride that bike on unpaved roads, fire roads, gravel roads, on sand, or on any unauthorized road. Again, it’s up to the rental company to determine exactly what this means. Often, any supplemental insurance that you purchase will be void if you ride in a restricted area.
Also, be aware of any mileage limits. Often you can purchase a rental plan that includes unlimited mileage, but make sure you are aware of any limitations before you sign the rental agreement. Some companies may go as far as to have you file a basic itinerary, but this may not be too common.
What’s Expected of You, the Renter?
You, as a renter, are expected to properly maintain the motorcycle while it is in your possession. While a good motorcycle rental company will make sure the bike is maintained and ready to go when you rent it, you are responsible for keeping it fueled up, keeping the chain lubed if you ride more than 1,000 miles, keeping the tires at optimal pressure, checking the oil level and other fluid levels daily before you ride. These are topics that should be covered in your orientation so there is no confusion regarding your responsibility and how to do these simple maintenance tasks.
You are also expected to follow traffic laws for each state in which you ride. This includes speed limits, parking, curb colors, crosswalks, pedestrian right-of-way, left-hand turn lanes, and those pesky left-turn green lights where you have to wait for oncoming traffic. Whatever the rules are, you’re expected to know and follow them.
On a side note, lane splitting is legal in only one state: California. Also on a side note, if you are visiting from outside the US, make sure you are familiar with how to pump gas in the states. It’s easy to get confused with different types of fuel such as diesel or ethanol.
3-Wheeled Motorcycles
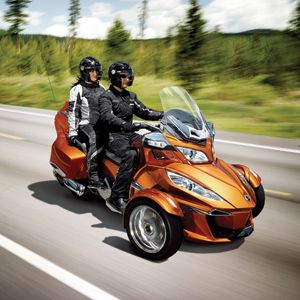
If you are interested in renting a three-wheeled motorcycle such as a trike, Can-Am Spyder, or a Polaris SlingShot, you will run into different requirements as far as licensing goes. But, the good news is, that in some states, you may not need a motorcycle license at all.
To ride a basic trike style motorcycle, such as the Harley Davidson Freewheeler or Tri-Glide you will need a motorcycle license, or a 3-Wheel vehicle license in most states, if not all of them. If you have a motorcycle license, you’re good to go. If you don’t, then you will need a 3-Wheel license. You won’t be able to rent one with a basic automobile driver’s license.
Riding a Can-Am Spyder requires the same licensing as above unless you’re in California. In the state of California, it is legal to ride a Spyder-type vehicle with only a basic automobile driver’s license. It is the only state that allows this (as of 2018).
The Polaris SlingShot has much more lenient requirements, probably because the vehicle closely resembles a car rather than a motorcycle and is controlled with a steering wheel instead of handlebars. Therefore, to drive the SlingShot, you only need a basic automobile driver’s license in most states. But, the states of Montana, Wisconsin, Maine, New York, and Massachusetts require that you have your motorcycle license to drive one.
Not all motorcycle rental companies will rent 3-wheeled vehicles and you may have to seek out a dealership to inquire about rentals. In any case, you will likely be required to wear the same safety equipment as when riding a motorcycle, such as a helmet and proper riding gear.
Peer-to-Peer Motorcycle Rental
There is a new way to rent motorcycles that are gaining more popularity and that’s peer-to-peer motorcycle rentals. Think Air B-n-B for your bike. Companies such as twistedroad.com or riders-share.com provide platforms where people can list their own motorcycles for rent. You, as the renter, can search for an available bike in your area, communicate with the owner and make the rental arrangements.
There are several benefits to this type of ride-sharing or motorcycle sharing. First of all, the rental prices are much lower than rental companies and they are set by the owner of the motorcycle. Second, you will likely have a much wider variety of motorcycles to choose from and you may even be able to rent a vintage bike or custom motorcycle.
Payments and insurance are provided by the rental platform which takes that hassle out of the equation. Keep in mind that companies like riders-share.com will have stricter requirements than a basic rental company. For instance, renters must be at least 25 years old, have a minimum of 3 year’s riding experience, and renters must meet a list of criteria regarding traffic violations, DUI records and felony charges. So, if you consider renting from a peer-to-peer company, be sure to read their rental policies to make sure you meet those important criteria.
Can I Rent a Motorcycle for a Track Day?
If you’re interested in riding a motorcycle on the race track, (which by the way is one of the funniest things you could ever do as a rider) and you need to rent a ride, you will have to rent from a company that provides motorcycle specifically for the track. I can’t imagine any average motorcycle rental company that would allow you to ride one of their rentals on a race track due to the risk of crashing.
Track Day Providers are companies that purchase the use of a race track for the day to allow amateur riders to learn how to ride the track and how to race their bikes. The organizers offer coaching, instruction, emergency medical services, mechanical services, and everything else to allow you, the average rider, the rip around the track on your motorcycle as fast as you can (for a price). Often these companies will provide motorcycles for rent. These bikes are specifically set up to be safe on the track. They are stripped down, safety wired, and have no lights or rearview mirrors.
These rentals will often come with extras, not just bikes. The rental package may come with a set of race tires, tire warmers, pit services as well as coaching and instruction. So, if you want to do a track day, but don’t want to ride your own motorcycle, a rental through one of the companies might be the way to go.
Related Questions
How far in advance should I book a motorcycle rental?
This will depend greatly on the rental company that you choose, but keep in mind that it would be best to make a reservation several months in advance especially if you are riding in a popular location or for a rally or event. But, if you get a wild hair, there’s always a chance of last-minute availability, but that would be hit or miss.
What if I get in an accident while renting a motorcycle?
If you’re in an accident, follow the normal procedures in getting medical or emergency assistance if someone is injured. You will likely be required to notify the rental company as soon as you are able. Most rental companies will provide you with an emergency phone number to call for assistance in the case of an accident.
What if my rented motorcycle breaks down?
Most motorcycle rental companies will provide a phone number for roadside assistance. Some rental companies will have special insurance for vacation interruptions. In these cases, depending on the coverage, the rental company may pay for your transportation or lodging. In the case of peer-to-peer rentals, you must notify the owner of the motorcycle immediately if the motorcycle breaks down or if you are involved in a traffic accident.
Can I rent a 250cc motorcycle on a car Licence?
Licensing requirements for motorcycle rentals follow the law of the land. So, if you have a car license, any motorcycle with a displacement greater than 150cc will likely require a motorcycle license.
At what age can I get a motorcycle rental?
For most motorcycle rentals you will need to be 21 years old. There are some rental companies that offer rentals for people under 21, but they will require you to show proof of having taken a motorcycle safety course or motorcycle riding training.
How can I lease a motorcycle with no credit?
To lease a motorcycle without credit can be difficult, but not impossible. First, you would need to go through a private owner or small dealership. Many of the larger dealerships require that you have an established credit history before you can sign a motorcycle purchase agreement.
Do I need a motorcycle endorsement to rent a motorcycle?
In general, a valid motorcycle license or a motorcycle endorsement on a car license is required. In some cases, you may be able to rent from one of the companies that provide rentals for those under 21 years old with proof of training or course completion.
Do I need insurance for rental motorcycles?
In most cases, you will need to provide proof of insurance or a guarantee of insurance from your personal insurer. In some states, the rental company may be able to get you an exemption from coverage if they have their own insurance policy on file for riders who have taken a safety course or training class.

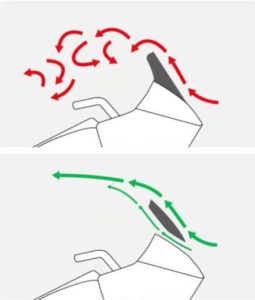 If your windshield height is adjusted properly and you still notice a problem, one solution is to provide some airflow just under the windshield. Having a small gap between the windscreen and the fairing will allow a slight amount of wind to flow up the inside of the windscreen reducing the vacuum that forms in that area. The amount of wind flowing through this gap is just enough to reduce the problem and not so strong that it blows agains the rider. Some touring motorcycles have the ability to adjust this gap on the fly or electronically to accommodate freeway riding. Another solution to adjusting this gap if you still notice buffeting, is to add spacers to the bolts that secure the windshield, providing a little more space under the windshield.