Author: Joel Hathaway

  • How to Install a 12V Power Adapter on a Motorcycle

    How to Install a 12V Power Adapter on a Motorcycle

    Reading Time: 17 minutes

    In this article I’m going to explain how to install a 12 volt power adapter on a motorcycle. I installed one on my 2014 Honda CB500X, but the techniques and concepts can be applied to just about any motorcycle.

    A 12v power adapter can be mounted and wired in a lot of different ways, either connected directly to the battery, or integrated into the wiring and ignition switch. My goal was to flush mount the adapter and to hard wire it to the options connector located at the front of the motorcycle. But, I’ll talk about both methods.

    What Type of Adapter to Buy

    Your first step is to decide what kind of power adapter you want on your motorcycle. Think about how you want to use it and what you want to power up while riding. Do you want to power your phone, gps system, or both at the same time? Do you need a DC cigarette style adapter to power other accessories like an air compressor?

    I opted for the cigarette lighter style for more diversity. I have an air compressor that only runs with that style of connecter. A simple USB adapter plugged into the outlet will allow me to power my phone and anything else that connects with USB.

    Another consideration is weather proofing. If your adapter will be exposed to rain then you should buy a marine grade adapter. The wiring to the adapter will be sealed and they come with a waterproof cover. These are perfect if you’re mounting it to the handlebars or flush mounted to plastics on the dash. But, if you’re keeping it under your seat, then any simple style of adapter should work fine.
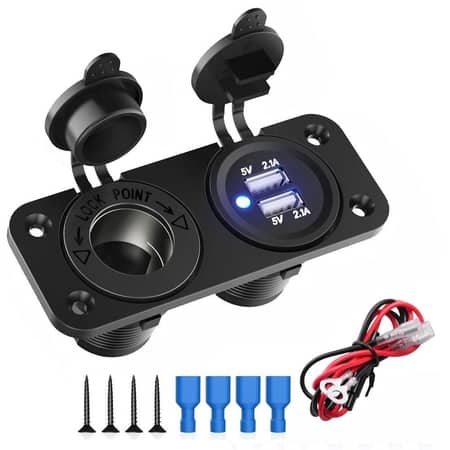
    Power adapters also come in combination of cigarette lighter style with dual USB connectors. I would have preferred this type of convenience if I had the space for it. In any case, whatever you choose, power adapters are inexpensive and can easily be found on Amazon. You can check out the current prices here.

    Why an Inline Fuse is Important

    It’s recommended to use an adapter that has an inline fuse. Why? A fuse will protect your motorcycle’s electrical circuit from being completely destroyed if there is a short. Blowing a fuse instead of your electronics, is a much simpler and cheaper repair. If you don’t purchase an adapter with a fuse…wait…why would you do that? Just buy one with an inline fuse.

    Decide Where to Mount

    Your next decision is to decide where to mount the adapter. Your options depend greatly on what type of motorcycle you ride, how much space you have up front, and how accessible you want the adapter to be while you ride.

    Under the seat is a very common place to stash an adapter and is, by far, the easiest install job. Use a couple of zip ties to keep it from rattling around too much and you’re good to go. Keep in mind that every time you want to plug or unplug something, you will have to remove the seat. So, determine for yourself if this is going to be a hassle, or no big deal.

    Another common option is to mount it to your handlebars. This is a simple install and many adapters come with a handlebar mount, like this dual USB adapter. You should consider how much space you have available on your bars, especially if you want to add other accessories to the bars, such as a phone mount, or GPS navigation.

    The last option is to flush mount the adapter to give it a factory installed look. This will likely involve drilling a hole into the plastics of your motorcycle which is always a bit nerve wracking. But, when it’s done right, you end up with something that looks great and functions properly. Flush mounting is the option I chose for my motorcycle and I’ll cover how I did it.

    Direct Connect or Switched?

    The next decision you need to make is whether your going to connect the adapter directly to your battery terminals, or hard wire it to the ignition switch circuit.

    A direct connection to the battery is the easiest option as it doesn’t involve any splicing or soldering of pin connectors. If you choose this option you need to be careful in preventing parasitic draw. If you leave a USB adapter plugged in to your battery, it can draw enough power to drain your battery overnight even when the ignition is off. But, if you’re vigilant about removing all electronics when you turn off your motorcycle, then this would be the quickest, easiest install option.

    Integrating the connector into the ignition switch circuit is a little more involved but is really not as difficult as you might think. Even if you’ve never done this kind of work, if you take your time to understand what’s going on, you’ll be able to wire up a connector with no problems.

    So, now that you know what type of adapter you want, where you want to mount it, and how you want to connect it to the power source, let’s go through the all the steps.

    How to Connect a Power Adapter Directly to your Battery

    Let’s start with the easy install, directly to the battery terminals. I would recommend installing a simple cigarette lighter style adapter, or purchasing an adapter that has a power switch built in. The switch allows you to cut power to the adapter so it won’t drain the battery. The procedure is simple, and if you’ve ever installed an SAE connector for a battery tender, then you already know how to do this. You will need:

    • 12V Power Adapter or USB adapter with positive and negative ring connectors.
    • Philips Screw Driver
    • Zip ties

    Steps:

    1. Access your battery. This procedure depends on your motorcycle but you’ll need access to both positive and negative terminals.
    2. Remove the negative terminal screw and place the negative (black) wire to the terminal, and secure it with the same screw.
    3. Do the exact same thing with the positive terminal and positive (red) wire.
    4. Test by turning on the ignition and plugging in a USB adapter. If the light comes on, it’s working. Now, plug in something, like your phone, to make sure it’s charging.

    You can choose this wiring option no matter where you want to mount the adapter. You can keep it under the seat, flush mount it to the plastics, or mount it to the handlebars. Keep reading for mounting instructions.

    How to Wire the Adapter to an Existing Options Connector

    A lot of motorcycles, especially touring bikes and adventure bikes, will come with an options connector pre-wired in line with the ignition switch. Connecting a power adapter here is a very convenient way to do this job and this is the procedure I chose to do on my CB500X. This project will require some soldering, but, don’t worry, it’s not as difficult as you might think.

    What You Need

    • 12v power adapter with 6 to 12 inches of wire available
    • Connector pins and seals
    • Soldering iron
    • 60/40 solder with rosin core
    • Small zip ties
    • Electrical tape
    • Wire cutters/crimpers

    Step 1: Find the Options Connector

    I highly recommend you purchase a service manual for your motorcycle, or, at the very least, get ahold of the wiring diagram specifically for your year, make and model in addition to the European or US edition.

    When looking at the wiring diagram for my motorcycle, I discovered that it has two option connectors, one at the rear, and one at the front. The diagram shows that the connector at the front has three pins with different colored wires. The green wire is always a ground wire, or negative. The red/violet wire (on my bike) is the positive connection and the third blue wire is connected in line with the headlamp’s high beams. I found this by following the blue line on the diagram.
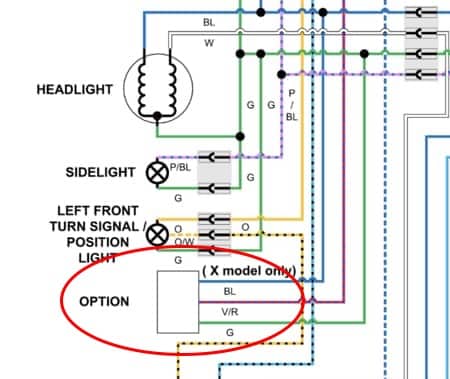
    Wiring diagram for front options connector, 2014 Honda CB500X.

    So, this diagram confirmed that I only need to use two of the three connections and I don’t need to worry about the blue wire, just the positive and negative. It’s a good idea to take a few minutes and study your wiring diagram to get to know the color code and the symbols.

    Now that you’ve confirmed your motorcycle has an options connector, you need to actually find it on your bike. It will typically be sitting somewhere behind the instrument panel or cluster, near the headlamp. Get a flashlight and start looking underneath and anywhere around that area. You are looking for a bundle of wires and a connector that has wiring only at one end with the other end empty. This process will depend greatly on your motorcycle and you may be required to remove some plastics to gain access. Follow the procedure laid out in the service manual for your bike.

    Once you’ve located your options connector, you’re going to want to remove the blank side so you can solder the adapter to it. But, before you remove it, mark the connector so that you know where to put the positive and negative wires. I marked mine with red fingernail polish, the same color as my toes. Hey, the sharpie wasn’t showing up on the black connector, ok! You can use whatever you want.

    Step 2: Solder the Adapter to the Connector
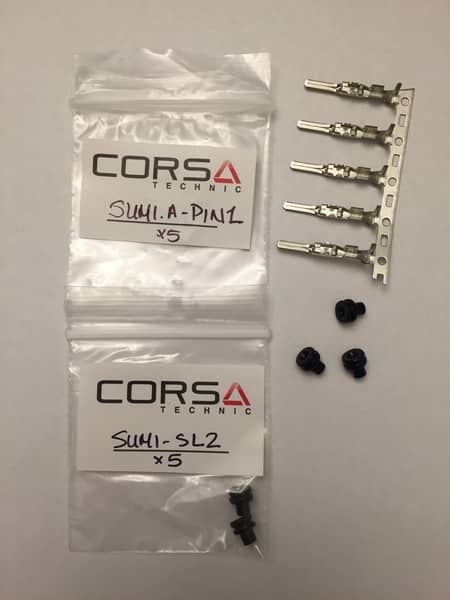
    For this step you will need to purchase pin terminals that fit your specific connector. In doing this project I learned that there are different sizes and styles and you can’t just go down to your local auto parts store and buy some pins. However, Corsa Technic carries a huge line of electrical components for all types of motorsport vehicles. If you can’t find the information you need in your service manual, or in a forum, I recommend you give them a call so they can help you find the terminal pin you need.

    My motorcycle used the Sumi-A Pin1 and the Sumi-SL2 seals. Pro tip: buy three times more than you need, or just get an even dozen. They are so inexpensive, it’s worth having a few extra, especially if you’ve never done this before so, if you mess up your first try, you won’t be at a stand still.

    Steps for Soldering the Pin Terminals

    You should have the following items ready: Power adapter with clean wires at one end; hot soldering iron; solder; pin terminals; seals; wire strippers; and a clean work surface.
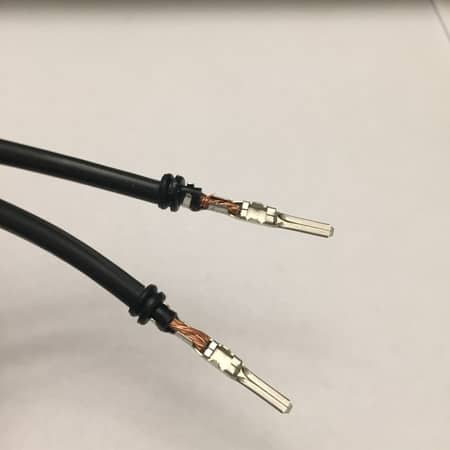
    Wires and pin connectors ready to be soldered.
    1. Place one seal on the end of each wire and slide them down out of the way.
    2. Using your wire strippers, strip about 1/4 inch from the end of each wire. Always start with a fresh section of wire and not wire that has been exposed. This will make soldering easier.
    3. Place the end of the wire to the pin connector and crimp it down just enough so it stays in place.
    4. Solder the wire to the pin connector.
      • Make sure the tip of your soldering iron is clean
      • Hold the tip of the iron to the wire and pin to heat it up. Then, apply the solder to the wire, not the iron. The wire will draw the solder in.
        • If your solder is not sticking or it’s just running off in clumps, you’re most likely using old solder or solder without flux rosin. The rosin prevents oxidation which can build up in a matter of seconds when metal is heated. Rosin is necessary to make the solder stick to metal. So, use new 60/40 solder with a rosin core.
      • After the solder has cooled you should have a secure connection and a pin terminal that is ready for the connector.
      • Do these steps for both ends of the wire.

    Step 3: Connect the Pin Terminals to the Connector
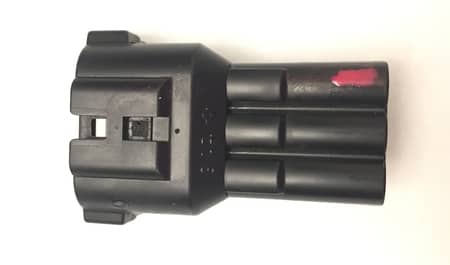
    Connector with positive terminal marked. Ready for the wired pins.

    The next step is to plug the pin terminals into the connector. Refer to the marks you made to indicate which is positive and negative. You may need to use a small screwdriver to push the pin into the connector until you hear it click. This will indicate a secure and permanent connection.
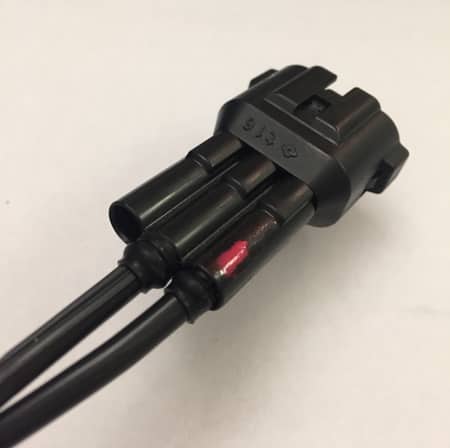
    Next, slide the seals up the wire and tuck them into the open space at the end of the wire. This will prevent moisture from getting to the connection. If you like, you can secure it all with electrical tape, especially if you’re not 100% confident your pin terminals are perfectly clipped in (like me).

    How to Wire an SAE Plug to the Options Connector

    In determining what I wanted to do with my own motorcycle, I decided to connect an SAE plug to the options connector as opposed to directly wiring the power adapter as described above. I chose this because, in the future, I may want to connect other accessories to that connector using a splitter.

    I used a spare SAE plug that came with my battery tender, removed the alligator clips at the ends and wired it to the pin terminals exactly as described above. If you go with this option, be careful to check the polarity of the plug. The female side should be the positive connection and the male side should be negative.

    How to Wire an Adapter if you Don’t Have an Options Connector

    So, what if your motorcycle doesn’t come with a pre-wired options connector? In this case, you can hard wire the adapter in line with the ignition switch wiring. Your first step in doing this is to find a live wire that is in line, or switched on and off, with your ignition. This can be a bit tricky, but you can use your wiring diagram to locate what it’s attached to and what color it is. That’s a good start.

    Once you’ve found a live wire, your next step is to splice into that wire and add a second wire running off of it. I saw a nifty little trick in a video somewhere for testing to see if you have the right wire. If you stick a needle through the insulation of the wire you want to test, just far enough to make contact with the wiring inside, you can touch a meter to the needle to see if you get power when the ignition switch is off and on. This is a great way to test a wire without cutting it.

    Splice Into Positive Wire

    Let’s assume at this point you’ve found the positive wire you need. Now you need to splice into it and connect a second wire that will power your adapter plug. There are a couple of ways to do this.

    In either case, you will need a strand of wire that is long enough to run from your power source to the front of the motorcycle where you want to mount the adapter. This will be the positive wire. The negative wire, or ground, will run from the power adapter to a point on the frame of the motorcycle. Search around on your motorcycle as there is likely a spot where several ground wires converge and connect to the frame.

    First way is to use a plastic connector that you crimp onto the wiring, then cover it with a heat sleeve to protect it from water. This is by far the most simple, in my opinion, because you don’t have to fire up the soldering iron. The second method is to solder a second wire the the live wire, and protect it with a heat sleeve. Either method should work fine, just make sure you cut the live wire leaving yourself enough space to tap into it.

    Test It!

    Now it’s time to make sure it works. Do this step before you start putting anything back together, or before you start securing long strands of wiring. If something goes wrong, you don’t want to take everything apart again.

    It is recommended that you use a multimeter, or volts meter to test the adapter. Why use a multimeter? Why not just plug in your phone and see if it charges? Because, if you wired it incorrectly, you could damage whatever you plug into it. So, instead, set your meter to volts, place the positive lead to the center of the adapter and the negative lead to the side of the adapter (don’t let them touch each other). With the ignition OFF, you should NOT be seeing any voltage. Turn on the ignition, and the meter should jump to 12 volts, or around 11.9. That’s what you want to see. Now you can test it with your phone.

    If you installed a USB style adapter instead of the cigarette lighter style, you don’t need to use a meter. A LED light should light up when you turn on the ignition. If it does, test it with your phone, or other device, to make sure it charges. If everything tests out good, you can move on to mounting the adapter the way you want it.

    Secure the Wiring

    Now that you have a working connection, it’s time to route the wire and secure it with zip ties. If you spliced into a wire near the battery or fuse box, you’re likely going to have to route the wire under your tank. Best bet is to follow the existing wiring harness and use zip ties to secure it.

    Mount the Power Adapter

    If you chose to mount the power adapter to your handle bars, you’re nearly finished with your project. But, there are a couple things to look for after mounting it. Turn your handlebars all the way in both directions. Make sure the mounting doesn’t interfere with anything while you turn the bars. Also, make sure the wiring connected to the back of the adapter isn’t pulling when you turn the bars. Leave enough wire to accommodate turning the bars.

    Flush Mounting the Power Adapter

    Flush mounting the power adapter give your motorcycle a nice, tidy, professional look. When looking for a place to flush mount it, make sure there is ample space behind the panel you want to mount it to. For instance, on my CB500X, I want to mount it on the right side of the instrument panel. There’s a perfect little flat spot. However, just behind that spot is the turn signal light and it doesn’t allow enough space for the adapter. So, I opted to attach it to the headlamp access panel.

    Once you figure out where to put it, the next step is to drill a hole in the plastic. This is always nerve wracking. What if I screw it up? What if it doesn’t work there? It took me quite a while to muster up the courage to do it. But, think it through and drill with confidence.

    Use a small hole saw bit to make a nice, clean hole. If you don’t have a hole saw, consider getting set like this one on Amazon. It’s nice to have when you need them. But, if you don’t have a hole saw, do like the rest of us and use a normal drill bit to punch out the hole you need.

    I decided to drill a series of small holes around the circle using my dremel. Then I used a sandpaper bit to increase the size of the hole gradually, until I got it to just the right size. I affixed the ring connector on the back side to secure the adapter and it looks better than I expected.

    Re-Attach the Covers and Panels

    The last step is to put it all back together. Reverse the steps you took when removing any panels. Be very careful to make sure any plastic clips or tabs are in place before you push and pound. I have found that tabs break more often when I’m putting the plastics back on the bike as opposed to removing them, so, take your time.

    Stand Back and Admire Your Work

    If you did everything right what you should have is a 12 volt power adapter flush mounted or handlebar mounted. All of your plastics should be back in place with nothing rattling and no extra screws in your pockets. Test the connector one more time to make sure nothing went haywire at the last minute. Use the multimeter to test it with the ignition off as well as on. If everything is working as expected, pat yourself on the back and pour yourself a cold one.

    So, as you can see, this project is not super difficult, but it does take some careful planning and, in the end, you have the perfect place to power up your phone or GPS.
  • How To Ride A Motorcycle Slowly: 5 Simple Tips

    How To Ride A Motorcycle Slowly: 5 Simple Tips

    Reading Time: 12 minutes

    Like any other skill, motorcycle riding skills can be lost if you don’t take time to practice them. Even if you ride often, you may not be using all the basic or more advanced skills in every ride, such as swerving to avoid an obstacle, emergency stopping, or making a U-turn. In this article I talk about why we need slow riding skills and how you can keep those skills sharp.

    How it’s used, or where these skills will come in handy in real life. Like, traffic jams, parking lots, city riding, turning left at a green light, busy urban street.

    Why You Need to Practice Slow Riding Skills

    If you do any kind of riding on any kind of road, you will at some point need to use your slow riding skills. It may be in a parking lot, pulling into a gas station, or making a u-turn. Taking time to practice slow riding skills will ensure that those skills will be there when you need them and when you least expect having to use them.

    Another good time to practice is whenever you get a new motorcycle. While on a group ride I watched one rider struggle to turn her motorcycle around in a crowded space. The bike was too big and heavy for her to push and she wasn’t comfortable with her ability to turn while moving slowly. Of course, we didn’t hesitate to give her a hand, but I couldn’t help but notice that other riders, with equally heavy motorcycles, were able to maneuver at slow speeds. I came to the conclusion that, even though she was a good rider, she was on a new bike and she hadn’t taken the extra time to work on those skills with her new motorcycle.

    How to Ride a Motorcycle Slowly

    Riding a motorcycle slowly involves the following skill:

    • Counter Steering
    • Counter Balance
    • Friction Zone of Clutch
    • Body Position
    • Lean Angle

    Understanding There Common Terms

    Below are some definitions you need to understand when practicing your slow riding skills. These tips will help you in your ability to control the motorcycle like a pro.

    Counter Steering

    Counter steering is the concept of turning left to go right. Yep, you turn your handlebars slightly to the left, before you start to turn right. What happens is this: in order for your motorcycle to turn at higher speeds, it needs to lean. So, to help your motorcycle fall into a lean, the front wheel will have to turn the opposite direction very slightly, then the motorcycle will begin to lean. It’s a very small, subtle movement that riders do without even thinking about it, but it’s a good idea to understand the concept.

    Counter-Balance

    The definition of counterbalancing is a weight that balances another weight. On a motorcycle it means shifting your body weight to counterbalance the lean of the motorcycle. This is important to understand when you are making turns at slow speeds. It keeps the center of gravity in a straight line even when the motorcycle is leaning.

    Friction Zone

    The friction zone is the point at which the clutch lever begins to engage the clutch. It’s where you begin to feel the motorcycle move when you let out the clutch lever. If you’ve been riding for a while, the friction zone isn’t something you think about. You automatically know where it is. However, when you start doing slow speed exercises, you’re going to become very familiar with that friction zone and you’ll need to use it to your advantage.

    Body Position

    This goes hand-in-hand with counter balance, but there’s more to it. Let’s say you’re turning left at slower than 10mph. To lean the motorcycle you will adjust your body position to the right side of the seat. You could even go as far as sliding one cheek off, although that’s not always necessary. Position yourself closer to the tank, hug the tank with your knees, and keep your feet firmly placed on the pegs. Slight movements in your hips and lets, as well as pressure on the pegs can help you make little adjustments when counterbalancing. Your arms should be relaxed on the handlebars.

    Lean Angle

    This is the amount of lean your motorcycle will do when turning. Your motorcycle is capable of more lean angle than you probably realize, even at slow speeds, as long as you are practicing good body position and counter balance. If you’ve ever watched those police motorcycle competitions, you’ve seen just how far a bike can lean at low speeds.

    Tips for Practicing

    Before starting a practice session, take some time on the simple exercise of basic clutch control to re-introduce yourself to the friction zone. Ride in a straight line, let out the clutch slowly while smoothly rolling on the throttle, just like back in the day when you first learned to ride. Do several sets of starts and stops to get familiar with your clutch/throttle control again. 

    Hover your foot over the rear brake and apply slight pressure when needed. This will help keep you balanced and helps reduce dip in the front wheel when you brake.

    Keep your eyes up and look out far in front of you. Avoid looking down at the ground directly in front of your bike.

    Keep off the front brake, but instead use your clutch, throttle, and rear brake to control your speed.

    Good throttle control means you roll on the throttle instead of jerking it, right? Well, when riding slow, speed control comes with clutch control and the friction zone. If you watch slow riding competitions, you’ll notice that you can hear the rider revving up the engine to just over idle speed. They are using the clutch to adjust their speed. Good clutch control is the key to good slow riding.

    Parking Lot Practice Exercises

    The MSF course has a specific set of exercises to teach you the basics of riding. These are excellent skills to practice, but it’s difficult to duplicate the exact layout of the exercises without one of their lots with all their painted lines. But we can simulate those exercises using any standard parking lot. In addition, there are more advanced exercises that are not included in the MSF course that you can practice.

    When looking for a parking lot to practice in, choose one that is preferably un-used, or empty. At least find one that has a large, empty section where you know you will be out of the way. A closed business is usually a good bet. Choose a lot with no dividers, lamp posts, or trees mixed in. Also, choose a lot with straight parking spaces, instead of at an angle.

    Plan on spending at least a few hours on this. It will take some time to walk out the measurements and set up cones. In fact, invite your riding buddies along and make a day of it. The set up will go faster, you can critique each other, and help each other out is someone drops their bike.

    The point of these exercises is to learn how to handle your motorcycle at slow speeds rather than trying to complete them as fast as possible. As you become more proficient in your slow riding skills, you’ll find that you will naturally complete them at slightly faster speeds.

    The Layout

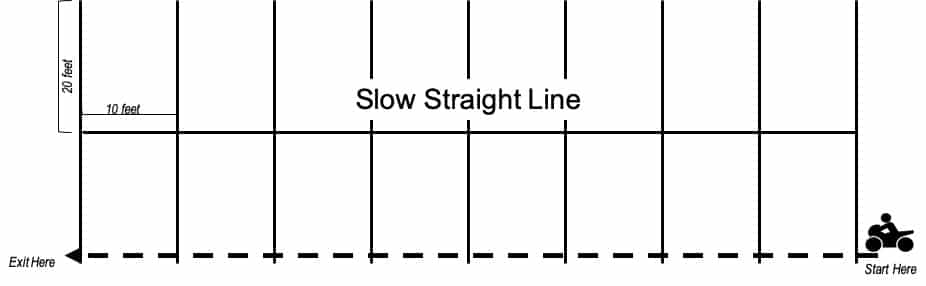
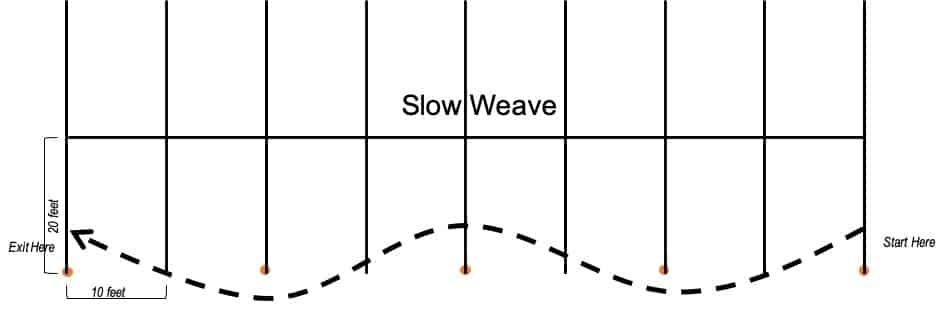
    To lay out the exercises, use the lines already painted on the pavement. A standard parking lot space is 10 feet wide by 20 feet long. The exercises I’ve laid out here are designed to use the existing lines as your markers.

    However, you can use something to mark out the exercise patterns, such as disk cones (like these on Amazon.) The benefit of using cones, or some other kind of marker, is that you know when you’ve made a mistake. When you hit a cone, you know when you’ve done it wrong.

    Without cones, it’s more like guesswork. Either way, cones or no cones, you’ll be getting good practice in. Besides, out in the real world, there aren’t any cones.

    Slow, Straight Line

    The purpose of this one is to ride in a straight line, as slow as possible. Use the edge of the parking spaces as your guide.

    • Keep your eyes up and focus far ahead of you
    • Use the clutch friction zone to control your speed
    • Apply slight pressure on the rear brake for balance.

    Slow Weave

    Set the cones in a straight line about 10 feet apart. Starting at one end, ride through the cones, weaving left, right, left, etc. Keep your engine at idle speed and use your clutch to control your speed. Use counterweight body position and focus your eyes down the line of cones.

    Avoid looking directly down at the cones as you ride past them. If you find yourself weaving too far out, check your focal point and your body position.

    If you want to make the slow weave more difficult, try to weave between every space, rather than every other space.

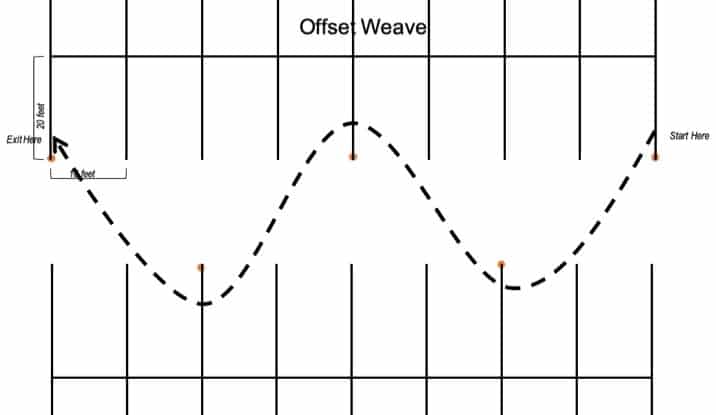
    Offset Weave

    Use two sections of the parking lot and place the cones as shown in the diagram. For this exercise you want to move slowly through the cones.

    • As soon as you the first cone your head and eyes should be focused on the next cone.
    • Avoid looking directly down at the cones you’re riding through
    • Adjust your speed using your clutch and rear brake

    The people who have the most trouble with this exercises are the people who constantly look directly forward and down in front of their wheel. This doesn’t allow them to prepare for the next turn.

    When you reach one cone, your head and eyes should be already turned and focused on the next one. Always look where you want to go.

    If you want the offset weave to be more difficult, try weaving between every other parking space instead of every third space as shown in the diagram.

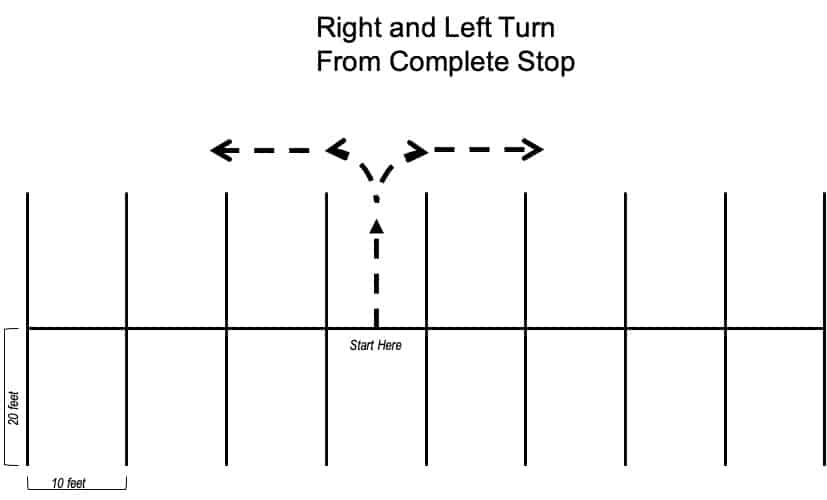
    Turning Right and Left

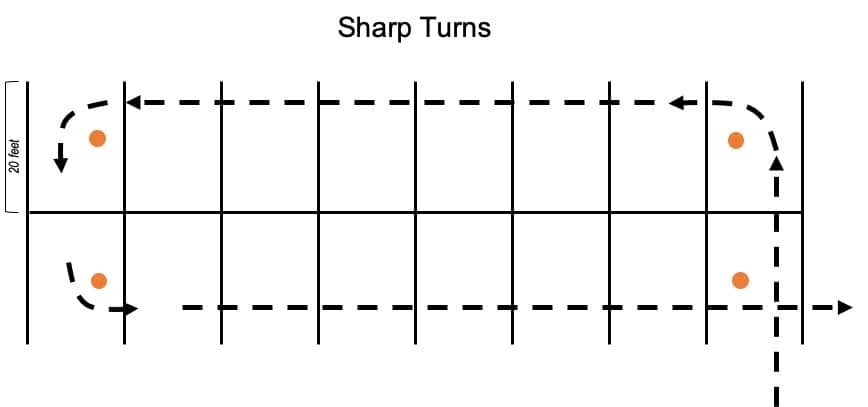
    This practice exercise will help you make sharp left and right turns starting from a complete stop. This skill can come in handy in a lot of traffic situations.

    From a stand still, with one foot on the ground, ride the length of one space and immediately turn left, then ride down the length of the parking lot. Swing around to the starting point again, and practice a right turn.

    Basic U-Turn

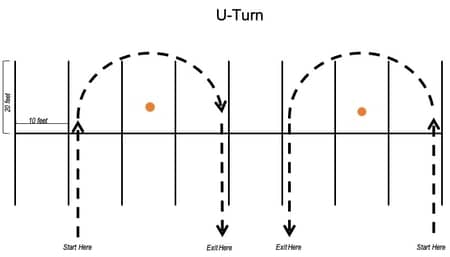
    In a parking lot, start off by doing the u-turn in the area between three parking sections as shown in the illustration. The orange dot represents a cone that will act as your focal point.

    Your goal is to make the U-turn within that area only. The most important tip for making a U-turn is to keep your head turned over your shoulder and look at the center focal point. Practice this exercise turning both left, and then right.

    Tight U-Turn

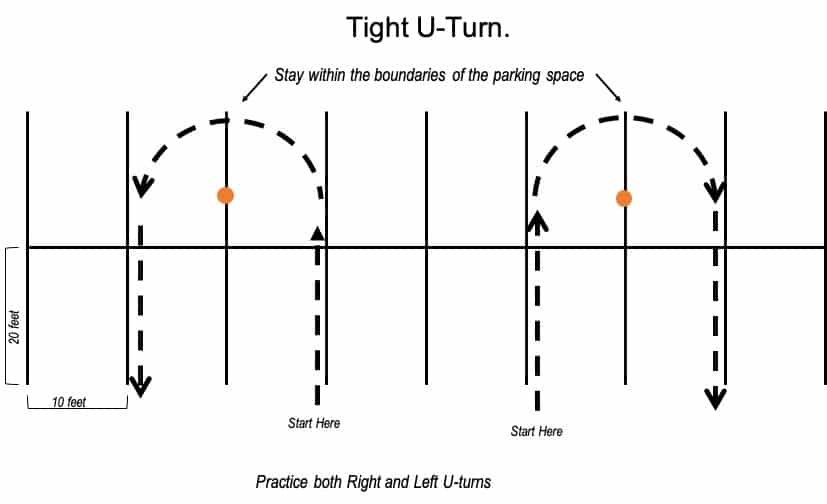
    Once you’ve practiced a standard U-Turn and it becomes comfortable, you can tighten the turn radius. Practice these tight U-Turns in both directions. Place a cone in the center for your focal point.

    If you’re not using cones, pick a spot at the center of the turn to focus on. When riding on public roads, you will have to pick your own random focal point, so doing this exercise without a cone is good practice.

    Figure 8

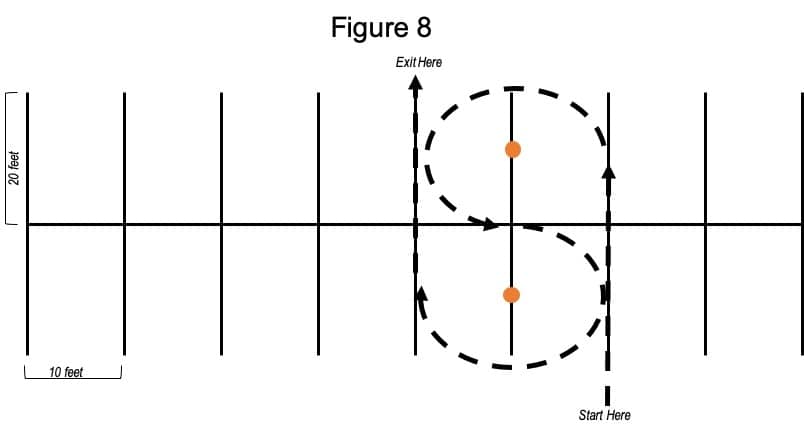
    For a basic figure 8, enter in a straight line, then, as you begin the first turn, focus at the center of the turn. As soon as you are 3/4 the way through the first turn, quickly change your focus and turn your head toward the center of the second circle.

    The diagram shows a more difficult figure 8 pattern between four parking spaces. If you’re not ready for tight turns, spread the circles out into a wider area. Try to make your figure 8 smaller as you get more comfortable.

    Key Hole

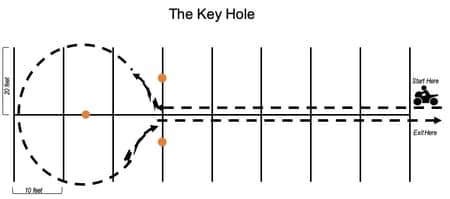
    The keyhole starts with a straight line, followed by a quick right turn and and a wide left hand circle. Finish it off with a sharp right turn and go straight down the line again to finish the pattern.

    Practice the keyhole going in directions around the circle.

    Lolli-Pop

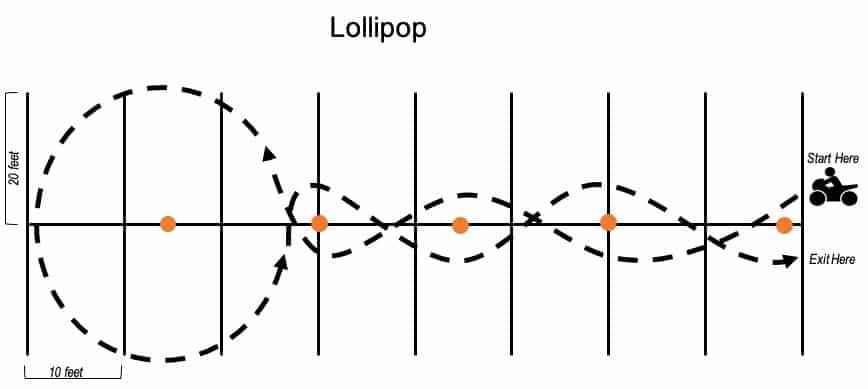
    The Lollipop is very much like the Keyhole except, you will weave between the cones before you enter the circle. The graphic shown is not perfect, but you get the gist.

    Practice the lollipop in both directions to practice the circle going to the right and to the left. Try to stay within the parameters of the parking spaces.

    In this pattern you will practice sharp left and right hand turns. Remember to always look where you want to go. Once you’ve started a turn, direct your focus on the next turn. Reverse the direction to practice sharp right turns as well.

    Practice, Practice, Practice

    The more you practice these exercises, the better you’ll get. Remember, the purpose for these drills are to sharpen your slow riding skills, not to do the exercise as fast as possible.

    With good slow riding skills you will be ready to get yourself out of difficult situations either in traffic, or on a narrow country road. When you’ve perfected your slow riding skills then it’s time to learn the smoothest way to stop your motorcycle.

  • How to Ride a Motorcycle in Traffic

    How to Ride a Motorcycle in Traffic

    Reading Time: 11 minutes

    Whether you ride a motorcycle for fun, for long distance travel, or for commuting, you will be riding in all sorts of traffic situations from bumper to bumper freeway traffic to congested city streets. Mixing and mingling with automobiles puts you at greater risk of an accident, so it’s important to stay alert. Here are some tips on how to safely ride a motorcycle in traffic.

    One tip that applies to riding in traffic in all situations is to try to anticipate what other drivers are going to do. This takes a certain amount of mental alertness. Always scan your environment for potential obstacles. Cars can enter the roadway from driveways, side streets and intersections and you should always assume they don’t see you.

    Another general tip is to avoid riding if you are angry or upset. If you’re commuting home from a really lousy day at the office, take a few minutes to wind down, breath deep and relax before you jump on your motorcycle for the ride home. Maintaining this relaxed nature and attitude while riding in traffic will help get you home safe. Once you’re home, you can pour yourself a drink, let it all out and vent all you want.

    Freeway Riding

    Freeways, highways or interstates are actually some of the safest places to ride, although new riders seem to fear it the most. It’s safer because everyone is going the same direction at relatively the same speed. There are no traffic lights or people trying to turn in front of you. But, you still need to practice certain skills to ride safely on the freeway.

    Your choice of lanes and your lane position can help keep you safer. When you enter the freeway, move over to the far left lane as soon as it is safe to do so. Stay in the far left lane, closest to the center divider, commonly known as the fast lane or the number one lane. Here, you only have to worry about traffic to the right of you and you only need to check one mirror instead of two. There is a reduced risk of someone swerving in front of you to catch an exit. And, you’re less likely encounter someone merging into you when entering the freeway from an on-ramp.

    Stay out of a driver’s blind spot. Position yourself so that you can see their face in their sideview mirror. That means they can see you when they look in their mirror. Don’t linger and ride beside a car or truck if you can help it. If you find yourself riding alongside another vehicle, accelerate ahead of it to avoid a collision if the car decides to change lanes and they don’t see you.

    Large, big rig trucks will have a much harder time seeing you on a motorcycle. You should assume they don’t see you at all. If you’re passing a big rig, accelerate past it quickly and do not move in front of it until you are at least a few car lengths ahead. Truck drivers can’t see you when you are riding directly in front of the truck. That’s one of the most dangerous places you can be. So, when it comes to big rigs, pass them when necessary, but stay clear of them as much as possible.

    Use the high occupancy vehicle (HOV) lanes or car pool lanes. Motorcycles are allowed to use these lanes without a passenger, so take advantage of it. The congestion in these lanes is often less. Keep in mind that some cities have designated entrance and exit points for HOV lanes and drivers, including yourself, are not allowed to cross over into the HOV lanes outside these designated areas. However, since there are no physical barriers to prevent people from doing so, cars don’t always obey those lines and there is always a risk of someone entering the lane in front of you.

    Position yourself on either the left side or right side of the lane. This part of the road is generally cleaner with less debris and oil. It also allows you to swerve out of the way if traffic stops suddenly.

    Never follow a vehicle too close. Increased following distance is not only to prevent you from slamming into a car’s rear end when it stops, but to also be prepared to react if the car runs over an obstacle. A car or truck can easily run over debris in the roadway, such as a board or a piece of tire tread. But on a motorcycle, this obstacle could be a disaster. Leaving yourself ample room will give you more time to react in this situation.

    City Streets

    Riding on busy city streets can introduce a whole new set of fears and anxiety. Tall buildings towering over head, busses and taxis merging in and out of traffic, and the confusion of one-way streets can put any motorcycle rider on edge. But, many of the same safe riding techniques used on the freeway can apply in a busy city.

    While it’s difficult to maintain a safe distance behind cars in a crowded city, try to keep a safe distance based on your speed and position yourself to one side or the other of your lane to avoid being hit from behind.

    Be extra aware of your surroundings and try to anticipate what drivers are going to do. Look at a car’s front wheels for signs of changing lanes and watch for turn signals. If one lane is extremely congested, but the other lanes are clear, you can be certain someone from that crowded lane is going to jump over into the clear lane. If there’s a truck blocking a lane, you can bet that the car behind it will want to change lanes to avoid it. When you start recognizing these potential behaviors, you’ll be in a better position to avoid them.

    One-way streets can be tricky, but they can also be a blessing. Riding in the center lane of a one-way street helps reduce encounters with turning cars or parked cars pulling out. Look for traffic signs that will tell you which streets are one-way and which direction traffic flows. One clue, if you don’t see a sign, is to look at how the cars are parked. If they’re all parked in the same direction on both sides of the streets, then it’s a one-way street.

    Downtown city streets, especially cities with subway systems, will often metal grates on the road. Be aware that these metal grates can be slick if they’re wet. Keep your motorcycle straight and upright when riding over them, and keep your grip relaxed.

    Be careful when riding alongside rail road or trolly tracks. Not only can they be slick when they’re wet, they can upset your front wheel if you get it caught in the rut. Especially at slow speeds, this can cause your bike to go down. If you need to change lanes over parallel tracks, do so at an angle as much as possible. Get your front wheel past the tracks at an angle, and the fatter, rear wheel will follow.

    Large cities with bus transit systems often have designated bus lanes. While it varies from city to city, motorcycles are usually not allowed to travel in these lanes. You can enter the lane to make a turn or to pull in and out of a parking space if necessary, but they are reserved for buses, taxis and emergency vehicles. So, while it’s tempting to take advantage of the open lane, it could cost you a ticket.

    Suburban Streets

    Riding in the suburbs is like a combination of city riding and highway riding. The main roads are often two or more lanes wide with signal lights at the intersections. There are often business driveways where cars are pulling in and out. On these roads, it’s best to position yourself in the center of the roadway, away from the edges, giving you more time to react. If you see a car waiting to pull out onto the road, assume it doesn’t see you. Rest your fingers on you brake and clutch levers and have an escape route ready.

    Watch out for the dreaded left hand turn lane. This is one of the most common causes of motorcycle accidents; a car turning left in front of you. Do everything you can to stay visible to oncoming traffic wanting to turn left. Be aware of your surroundings. Is there a car next to you? Can you maneuver out of the way in time? Cover your front brake and horn and be ready always assuming the car does not see you.

    That’s a lot to think about when driving on suburban streets and going through intersections, but those thoughts happen in a matter of seconds and with a little practice they become second nature.

    When riding in residential areas, keep your speed down as there will be more activity in the streets, especially in summer when kids are out playing. While going a measly 25 miles per hour may seem daunting, it’s safer and better for our reputation as riders.

    If your daily commute takes you past a school, be extra cautious. Parents will be pulling in and own of the school parking lot dropping off their kids. Other kids will be crossing the streets and, believe me, they are NOT paying attention to traffic. So, it’s up to you to watch out for them. If traffic builds up in front of a school, don’t get impatient and zip around the cars. You never know when a kid is going to jump out. If a school zone slows you down and gets on your nerves, consider changing your route to avoid it.

    Do Loud Pipes Help?

    There is a common belief that loud pipes save lives; that loud pipes will alert cars that a motorcycle is close by. There is a lot of debate about this and riders will generally take one side or the other. However, there is no proof that this concept makes you safer. Let’s look at a few reasons why.

    • There’s no guarantee that a car driver will hear you if their windows are up, music is playing, or on the phone.
    • Exhaust pipes are facing towards the back of the bike, so the sound travels behind you, not in front of you. A car won’t hear your pipes until you are right up on it.
    • Sudden loud noises can startle some drivers and cause them to swerve, unintentionally towards you.
    • Use your horn. The horn is a forward facing sound that will do a better job at alearting cars to your presence.

    Lane Splitting or Lane Filtering

    Lane splitting and lane filtering are actually two different things. Lane splitting is when a motorcycle rides between the lanes of moving traffic. Lan filtering is when a motorcycle moves between stationary cars to get to the front of the line at a stop light, for example.

    In european and asian countries, lane splitting and filtering are not only legal, it is expected. Riders do it all the time and car drivers are used to it and accept it. However, in the United States, for some reason there is an absolute disdain for lane splitting. Drivers hate it, cops hate it (ok, not all drivers and cops hate it, but still…). It seems like the U.S. has yet to catch up with the rest of the world to see the benefits of lane splitting.

    California is the only state that legally allows it, however, there are some states that allow it even though it is not officially on the books. Those states, as of 2018, are

    • Montana
    • New Mexico
    • Texas
    • Oklahoma
    • Arkansa
    • Missouri
    • Mississippi
    • Ohio
    • Kentucky
    • North Carolina
    • Delaware

    Why U.S. drivers have a hard time with motorcycles splitting lanes is a bit of a mystery. Could it be that drivers are so agitated being stuck in traffic that they feel a twinge of jealousy when a motorcycle zooms by? Could it be that irresponsible riders tarnished our reputation by splitting at dangerous speeds? Who knows. But the truth is, lane splitting is safe when done properly. It reduces the risk of being rear ended and has resulted in 30% fewer deaths in California compared to other states that don’t allow lane splitting.

    Splitting lanes can be a little nerve wracking at first, but with a little practice, it’s the best way to avoid traffic jams and do your part to keep traffic flowing. There is actually a lot more room between cars than you might realize. But, there are a few thing to be aware of when lane splitting. The California Highway Patrol has posted guidelines to help you do it safely.

    • Evaluate the entire area, all of your surroundings.
    • Do not split at more than 10 miles per hour faster than the traffic around you.
    • Do not split if traffic is moving faster than 30 miles per hour.
    • Be aware of road conditions in between lanes. Sometimes there can be wide cracks in between lanes that can catch your front tire causing you to swerve.
    • It’s safer to lane split between the #1 and #2 lanes.
    • Do not split between large trucks or wide vehicles. If you can’t fit, don’t split.
    • It is illegal to ride on the shoulder, and doing so is not considered lane splitting.
    • Try to anticipate what a driver is going to do. Look for turn signals, turned tires or changes in a driver’s head position (are they looking back to check for clearance?). This could mean they are changing lanes.
    • Keep two fingers on the brake and clutch levers as well as a thumb on the horn. This will keep you ready to react if needed.

    No Road Rage – Let it Go

    Riding in traffic also requires a little extra patience. At one point or another a car is going to cut you off, turn left in front of you, or be a complete idiot. If you have a close call, it’s better to just let it go. Don’t let yourself get a case of road rage, which can cause us to ride more aggressively. I know, we’d all love to smash that guys side mirror, but doing stuff like that will only escalate an issue and cause more problems.

    Anticipating what a vehicle will do comes with experience; the more you ride, the better you get. And, as always, never ride if you’ve been drinking, and always wear your gear.

  • Tips for Motorcycle Canyon Riding

    Tips for Motorcycle Canyon Riding

    Reading Time: 16 minutes

    Like most riders, I love riding my motorcycle on twisty canyon roads. Come to think of it, for most riders that’s one of the great pleasures of riding: canyon carving. But all too often, novice riders will test their new skills or their new motorcycle on these roads with disastrous consequences.

    Twisting mountain roads are the most challenging and dangerous roads you can ride on your motorcycle. They can be very technical, unpredictable, and are filled with obstacles. So it makes sense to learn proper techniques for riding these roads, and to practice those skills responsibly so that you enjoy your ride and make it home in one piece.

    Before You Ride the Twisties

    Like every good ride it all starts before you leave your driveway. Make sure your bike is in good mechanical condition, brakes are working, chain is clean and lubed, nothing’s leaking, etc. Make sure you are also prepared for the ride. If you’re not up for a challenging ride, feeling under the weather, hungover, angry or upset, consider saving the ride for another day. But, if you’re feeling good and mentally alert, then go for it.

    Wear all you gear and get dressed for the slide. This is not the place to skimp on riding gear. Wear leather if you got it, good boots, gloves, jacket with armor and good knee protection. If you’re going to be pushing yourself, be prepared.

    Tire Pressure

    There’s a lot of debate about the perfect tire pressure and it is somewhat of a personal preference and can vary with every type of tire and motorcycle combination. So, I’m not going to make any recommendations in this article. But, there are a few things you should know about tire pressure.

    Every tire manufacturer has a different recommended tire pressure which will vary depending on the terrain. Know the tires you’re running and look up the manufacturer recommendations for technical street riding. Check your owners manual for the right pressure and don’t go by the psi printed on the sidewall of the tire. That number is the maximum psi your tire can handle, and will be too much for a good ride.

    Under-inflated tires will result in a larger contact area, which is great if you’re riding dirt, but not so great if riding on asphalt. Your bike will be harder to handle and sloppy, with heavy steering. Conversely, if they are over inflated, you will have less traction.

    Check your tire pressure when the tires are cold to get an accurate reading. Since many riders like to adjust their tire pressure by as little as 1/2 psi, it’s important to use a good tire pressure gauge like this one on Amazon.

    Take a Practice Lap

    Often motorcyclists will have a few favorite roads where they can run laps. So, before you start pushing yourself, take a practice lap at a reasonable speed and at about 50% of your riding ability. This lap will allow you to inspect the road conditions before you go all out. Take note of any gravel, rocks, oil spots, or wet spots on the road. Get to know the turns and corner combinations. Be aware of who else is out on the road such as pedestrians, cyclists or other vehicles. This first lap will help reduce surprises on the route. Now that you’re ready to ride, let’s get into the nitty gritty of canyon carving techniques.

    Body Position

    I remember riding with a group of sport bikes, enjoy one of our favorite roads. It was very technical and we weren’t going very fast, maybe 45mph. The guy in front of me was sliding one cheek off the seat at every turn, sticking his knee out every time. Yet, his upper body was still straight up over the tank. I tried not to laugh at him too much, but I couldn’t help notice that I had no problem keeping up with him without a single butt cheek leaving my seat.

    Basic body position through the corners should start with the head and the shoulders instead of the hips. At lower speeds, hanging off the bike is unnecessary, but as you go faster, getting your weight to the inside of the turn, will help the bike stay more upright around the corner, placing more traction on the tires.

    When you approach a corner, lead with your inside shoulder and pull your upper body down and towards the turn. This will allow you to turn your head in the direction you want to go. Aim with your head and eyes towards your target and allow your upper body to follow by dipping that shoulder. Often, this is all the body adjustment you’ll need to get around a corner. But, if you’re really flying and your speed is high enough, add your hips to that equation and slide your butt slightly off the seat to add more weight off the bike around the turn. The faster you go, the more hanging off the bike will benefit you. But, it always starts with the head and shoulders.

    Practice adjusting your body position smoothly but quickly to set up for consecutive turns. If you’re leaning into a left hand curve and the road transitions into right hand curve, you’ll want to change your body position without upsetting the line of the motorcycle. Avoid using your arms to push yourself into position. Instead, use your legs to lift yourself off the seat slightly and slide over to the other side of the seat. If, at the end of a ride, your thighs are sore and burning, you’re doing it right.

    Other tips for body position is to keep your toes on the inside foot peg to avoid scraping them, and put more weight on the outside foot peg. Aslo, slide back in your seat a little allowing you to lay your shoulders over the bike.

    Reading the Corners

    Out in the road you’re going to come across different types of corners; blind corners, off camber, delayed apex, double apex, each with their own challenges. One way to read a corner is to look for its vanishing point. That’s the furthest point of the corner you can see before it disappears around the bend. If the vanishing point moves toward you as you approach it, the turn is getting tighter and may require you to slow down before entering. If it moves away from you as you approach, the turn is opening up to a straight and you may be able to take it at a higher speed. The danger of judging a corner based solely on vanishing point is that you don’t always know what’s beyond. The corner could tighten suddenly, or have a double apex. The vanishing point is only one tool you can use to read a corner, so don’t chase the vanishing point and take into account other conditions.

    Camber is the the way the road tilts around a corner. Well designed roads have a positive camber which means the road is higher on the outside of the turn and lower on the inside. This improves traction as you go through the corner. Off camber, or negative camber turns tilt the opposite direction. The high side is on the inside of the turn. Tire traction will be reduced going through these turns, so you need to take them with more caution.

    Selecting the Line

    You probably learned to take a corner by starting from the outside of the turn moving toward the apex, then exit towards the outside of the turn again. This technique works great on the track and still holds true on public roads. However, there are some adjustments you should make since you’ll be dealing with a lot of unknowns.

    The first tip is enter the turn late and as wide as you can without crossing over into the oncoming lane. Entering late gives you a wider view of the corner so you’ll be able to judge how tight the corner is. Entering late puts you in a better position to complete the curve if the curve has a surprise double apex. So, if you find yourself often drifting over the center line on a right turn, it means you’re entering the corner too soon. You apex the curve too early and the bike can’t finish the last tight cut of the curve, so it drifts into oncoming traffic.

    When approaching a section with two consecutives turns, start on the outside of the first curve just as you usually would. When you hit the apex on the inside of that curve, hug the inside a little bit longer than usual. This will put you in position to approach the second turn from the outside. So, as you exit the first corner, you’ll be on the outside of the next one setting yourself up to follow a good line through the second turn.

    Lastly, when choosing your line on a left hand curve, the apex of the curve will often be the center line dividing a two way road and you will likely be leaning into the opposite lane even if your tires are in your own lane. This can leave you vulnerable to oncoming traffic. So choose a line that places you a little farther away from the center line in case oncoming traffic runs a little wide.

    Braking

    When approaching a curve always try to get your braking and downshifting done before you enter the corner and not while you’re in it. Squeezing the front brake while leaning through a corner will upset the stability of the front tire and could cause it to wobble out from under you. Using the front brake also causes the bike to lunge forward taking traction off the rear tire, which could result in a skid. Get in the habit of using 2 fingers for braking rather than all four. This will help keep you from grabbing a handful of front brake.

    Using the back brake is a little bit safer, but will still cause the rear tire to lose traction and can cause it to skid out. So, stay off the brakes as much as you can through the turn. This is one area where taking a practice lap will help you judge how much acceleration you’ll need between turns, so you can brake early enough to set up for the curve.

    Throttle Control

    Practice rolling on and off the throttle smoothly. Quick throttle reactions can upset the stability of the motorcycle just like braking can. Suddenly letting off the throttle in the middle of a curve can cause the front end to dip and result in a loss of traction in the rear tire.

    Staying relaxed in your shoulders, arms and hands will help you have better throttle control. Keep your grip light and your shoulders down and relaxed. As soon as you start tensing up and gripping the throttle hard, your acceleration will become jerky instead of a nice smooth on and off the throttle.

    Riding Uphill vs. Downhill

    Twisty mountain or canyon roads are not going to be all the same level. You’ve be climbing up in some sections while descending back down in others. Riding uphill is a blast and is much easier. Not as much braking is required when approaching a turn because the uphill incline will slow you down on its own. Sometimes letting off the throttle will be all you need to do to slow down to turning speed.

    Going downhill is a bit different. Gravity and momentum are pushing you to go faster and it will require more control in the brakes and throttle to maintain a safe speed. Prepare for a corner earlier and get all of your braking and downshifting done before you enter the curve.

    Adjust your body position when going downhill. Sit further back in the seat and grip the tank with your knees. This will keep some of the pressure off your handlebars providing you with more control. Be careful when downshifting and keep track of what gear you’re in. There is a tendency to downshift and use engine braking a little more, but don’t over do it. Downshift while you’re braking and approaching a turn.

    Road Surface

    Ideally, your favorite motorcycle road is going to be a nicely paved road with sweeping turns. But, even the most pristine road surface will change day to day or with the seasons. It’s important to anticipate what kind of obstacles you might encounter based on road conditions.

    Did it recently rain? If so, how much? Even a couple days after rain some portions of a canyon road can still be wet if they are in constant shade. Add to that some wet, rotting leaves and you have a nice coating of slime that your tires can easily slip on. Erosion often occurs when it rains too, spilling mud and gravel on the roadway. So, take extra caution even a few days after the rain.

    Other roads will not be as well maintained and you could be dealing with a twisty road filled with uneven patchwork or potholes. I’m not sure about the rest of the country, but here in Northern California, the road condition can change drastically as soon as you hit the county line. One minute you’ll be riding on a perfectly paved dream road, then suddenly the road will narrow and be riddled with potholes. So, be aware of the road surface conditions and change your speed accordingly.

    Obstacles

    Out on public roads you’re going to deal with a number of different obstacles. Potholes, gravel, rocks, leaves, pine needles, wet patches, tar snakes, cows, deer, trucks, cars, people, cyclists; just to name a few. Some of these obstacles you can prepare for and expect such as gravel hiding on the inside of a curve, which is where it usually likes to hide. But other obstacles are completely out of your control. You never know when oncoming traffic, that big RV, is going to take a corner wide and end up in your lane.

    Road signs as well as your surroundings can give you clues as to what kind of animals you might encounter. A deer crossing sign will tell you that deer are present and commonly cross the road. If you’re riding through pastures and you encounter cow grates, be aware that you could turn a corner and find a cow standing in your path. Staying aware of your surroundings can help you prepare for those surprise encounters.

    Passing

    Let’s face it. Getting stuck behind a slow car on twisty roads can be torture. All you want to do is pass them. But sometimes as riders we get a little too eager to pass and we put ourselves in unnecessary dangerous situation. Legally, you are only allowed to pass when there is a broken yellow or white line on your side of the lane. Even then, you should only pass when oncoming traffic allows you room to do so. That’s common sense.

    Other roads will break out into passing lanes allowing you to fly past a line of cars and get out in front again. But often passing opportunities are few and we’re stuck behind a line of slow cars. If you do choose to pass in a non-passing zone, do so at your own risk and only pass on a straight section of the road, not on a turn. If you’re passing a line of cars sometimes you can pass one or two cars at a time until you make your way to the front. Pro tip: Don’t be a jerk. Dangerous and irresponsible passing not only endangers you, it also puts other vehicles at risk.

    Commonly traveled canyon roads, especially those frequented by campers, trailers and RVs, will have pull-out sections at the side of the road. If there are more than 5 vehicles behind a slow vehicle, that driver is required to pull out and let the faster vehicles pass. Often people will recognize that a motorcycle wants to pass and they will use these pull outs. If this happens, always give the driver a thank you wave and a nod, they just did you a big favor.

    Group riding on Canyon Roads

    When riding with a group on wide open roads, we are taught to ride in a staggered formation. But when you enter narrow canyon roads you will need to ride single file and increase the distance between you and the rider in front of you. Often you can learn from the more advanced riders about choosing a line as well as braking.

    Often in a group situation, riders of different skills will naturally break into their own groups. More advanced riders will take off up front, intermediate riders will form a small group and ride together, while slower riders will take up the rear. Every group ride should have a designated sweeper to make sure slower, novice riders aren’t left behind.

    Traffic

    As mentioned in the section on passing, you will encounter different types of traffic depending on what road you’re riding. You can get an idea of how heavy the traffic will be based on several factors. Summertime weekend traffic will be heavier than during the week. Popular scenic roads will have more car traffic and you’re more likely to run into the typical Sunday driver. Roads that lead to lakes will often have boats on trailers. Keep in mind that at the end of the day, when these boaters drive home, they are often tired, had too much sun, and could possibly have been drinking, which creates an even more dangerous situation.

    If you’re riding in farm country, don’t be surprised to see some farm equipment slowly driving down the road at a snail’s pace. Slow down and pass them when it’s safe. So, to avoid annoying traffic situations, consider these things before you choose where to ride. Try to choose routes that will take you away from the tourists. Start your ride early to beat the crowds.

    Ride Your Own Pace

    The most important thing you should remember when riding canyon road, especially if you are riding with a group, is to ride at your own pace. It can be tempting to keep up with the faster riders but this is where riders get themselves into trouble and they don’t have the skills needed to handle the turns at higher speeds. Too often I’ve heard stories of serious or fatal crashes because riders are trying to keep up with the big boys.

    When you’re on your own, take it easy at the beginning of your ride. It takes time to warm up, get the feel for the road, and get yourself in the right frame of mind. Don’t push your limits while on a canyon road. There are too many risks. You should start out riding at about 50% of your ability at first, then gradually push yourself until you’re riding at about 70% of your ability. If you want to ride at 100% or push yourself further, don’t do it on public roads. Instead take it to the track. For now, ride at a safer pace.

    Build Your Confidence

    The more you ride twisty roads, the more your confidence will build. As you ride, try to become more comfortable with leaning your bike at a more aggressive angle. Gradually you will become more comfortable with the sensation you get when you lean. Trust in the bike and trust your tires. If the road is clear and if you’ve entered the turn properly, your tires will grip and support you around the turn.

    Lastly, commit to the corner when you’re in it. This goes along with trusting your tires and the lean. Once you’re in the curve, stay there, roll on the throttle as you exit. The last thing you want to do is have a mental hick-up in the middle of taking a corner and change your mind. This would cause you to panic, let go of the throttle, resist the lean and that will cause your motorcycle to do all sorts of bad. Commit to the corner all the way through it.

    Wrap Up

    Riding twisty canyon roads is one of the great pleasures of motorcycle riding. So, when you’re out there remember these tips. Wear all your gear. Ride at your own pace. Start slow and work your way to a faster pace. Watch for obstacles, traffic and animals. And above all else, ride safe.

  • Cross Country Motorcycle Trip: Complete Guide

    Cross Country Motorcycle Trip: Complete Guide

    Reading Time: 23 minutes

    Riding your motorcycle across the country is going to include a lot of nights away from your own, comfortable bed. So, how do you decide where to sleep on a motorcycle trip? There is a wide variety of choices with varying levels of comfort and cost. Cross country motorcycle trip offers choices like camping, boondocking, fancy hotels, cheap motels, couch surfing, hostels, and a lot more.

    A cross country trip on a touring bike is a great deal for riders. Aid kit, rain gear, tire repair kit and other essentials are necessary for traveling cross country on touring bikes. Save money on a road trip to the grand canyon or a glacier national park. Drive away from rush hour traffic into unlimited options for cruise control on two wheels. There are appropriate tools to guide riders to new places of camping across the countryside. Riders need to wear protective gear at all times during riding. Popular destinations include Southern California, Las Vegas, Washington State Park, Canadian provinces, New Jersey and more. Always carry granola bars in case of emergency and hunger. Bad weather can create a dangerous situation for a cross country motorcycle ride. Extra gear should always be packed for long stretches. There are many hotels throughout small towns. A cross country motorcycle ride or a motorcycle road trip is incomplete without a local gas station. There are fun roads in Salt Lake City and incredible locations for skyline drive in New Mexico, New Orleans and other places. Always carry bottled water, extra t shirt and remember to stay hydrated.

    A cross country motorcycle trip or a motorcycle road trip is highly economical. It is important to keep a check for gas stations at all possible junctions to refill in case of emergency.

    Where to sleep When Riding Motorcycle Cross Country Trip

    1. Camping in National Parks

    A national park is a land set aside and protected by the federal government so that we all can enjoy them for generations. The US has some incredibly beautiful landscapes in the world and most are in a national or state park. These are places where you can enjoy mountains, deserts, towering forests, and grasslands. Entering national forests requires payment of an entrance fee and in some, more popular parks such as The Grand Canyon, the entrance fees can be up to $30 per vehicle. Luckily, fees for motorcycles are usually discounted and a pass is good for up to 7 days. If you plan to visit a lot of parks, consider purchasing an annual pass. Riding cross country is a thrilling experience.

    National parks are more protected than other places and the rules for camping are a little more strict. You will be staying in an assigned, designated campsite with a picnic table, food storage locker, fire ring, and often a platform for a tent. You’ll find a designated area next to your campsite to part your motorcycle and it’s probably against park rules to park your motorcycle inside your campsite.

    Campgrounds are patrolled by park rangers who are there to make sure your stay is safe and enjoyable but also to make sure the rules are being followed. They are authorized to give citations, so, make sure you know and follow the rules of the park. Most campgrounds require reservations well in advance, especially in peak seasons, and some may be closed for winter. So, if you want to camp, be sure to plan ahead. However, parks often have first-come-first-serve campsites as well. They are easily found on any map, digital or printed.

    2. State Parks

    Campgrounds within state parks are similar to a national park but on a smaller scale and they are funded and maintained by the state government. Each state will have its own regulations for its campgrounds as well their own process for making reservations. Again, depending on the popularity of the location, reservations may have to be made well in advance. 

    State parks also have first-come-first-serve campgrounds. Often these campgrounds can be a good bet if you didn’t plan ahead with reservations. On weekdays you will have much better luck finding a spot when you ride up. Check with the state’s park website to find all the information you need, where to go, entrance fees, and vehicle fees. Sometimes you can actually find these on google maps.

    3. Privately Owned Campgrounds

    cross country motorcycle trip

    Privately owned campgrounds can be found all over the country and can greatly range in size as well as in amenities offered. Some of these campgrounds can be found tucked away in a grove of trees close to a small town, while others can be found smack dab in the middle of a large suburban area. Many of them cater to the RV crowd but they often have sections set aside for tent only camping with no hookups and at a lower price. 

    You will often find a camp host that is either the owner of the campground or is employed by the owner. The camp host lives on-site and can help you if you have any issues or questions about camping there. They are often the ones you will go to for firewood. Because private campgrounds can be so different, you’ll find a wide variety of services for each one. Some will have flush toilets and free showers. Many have coin-operated showers.

     You might find a small camp store which is great when you’re camping. There you can pick up snacks and often a cold beer. Most private campsites will be motorcycle friendly, but, if you don’t enjoy being surrounded by families in big RV’s, try for a tent site instead. The price for these campgrounds will depend on what kind of services they offer. The more services, generally the higher the price. But, most seem to range between $20 to $35 per night.

    4. Dispersed Camping

    Also known as boondocking, dry camping, or wilderness camping, dispersed camping is when you find a spot on public land such as a national forest, park your motorcycle, and camp. Keep in mind that you can’t just park anywhere and there are common rules that must be followed when camping. Check the local national forest information center to find out the rules and regulations regarding taking motorcycles off the main road in order to camp.

    In some states, like California, you will need a permit to have a campfire and will be required to pass a short fire safety test to obtain that permit. This is common in dry states where the threat of forest fire is imminent, and I can’t stress enough how important it is to follow fire safety rules in drought-ridden areas. But, permits are free, easy to get, and can be found online.

    There will be no services when wilderness camping. You will have to bring in your own food and water, you’ll have to dig a cat hole for your waste, and you will be expected to pack everything out, including all your trash. As a motorcycle camping enthusiast myself, this is the type of camping I love. Away from the crowds and noise, out in nature, and disconnected from the daily grind.

    5. Roadside Camping

    Camping by the roadside is similar to dispersed camping. You won’t find any services, picnic tables, bathrooms or camp host, and, like dispersed camping, it’s free. But, be aware that roadside camping doesn’t mean you can pull over at any point and set up your tent. That would be illegal as most roadsides are private property or owned by the city or county. Even in designated rest stops, you will find signs that specifically say “No camping”. And if you ever see a No Trespassing sign, don’t camp there unless you want a rude awakening and possibly dangerous situation.

    If you are on public land, however, you can camp just about anywhere you like. Land that is managed by the Bureau of Land Management (BLM) or a national forest, or any federally owned land, is fair game for camping up to 14 days at a time. A good example of this is a section of BLM land off highway 10 just outside Joshua Tree National park. There’s literally nothing there, but you are allowed to camp there.  

    Follow the same rules as you would for dispersed camping. Bury your waste, pack out your trash, control your fires and put them out completely. Try to look for an area that has been used before and avoid trampling on nearby vegetation. Keep your campsite clean and store your food and toiletries away from your tent in a place where critters can’t get them. Also, practice common sense personal safety. These areas won’t be patrolled by park rangers.

    6. Beach Camping

    cross country motorcycle trip

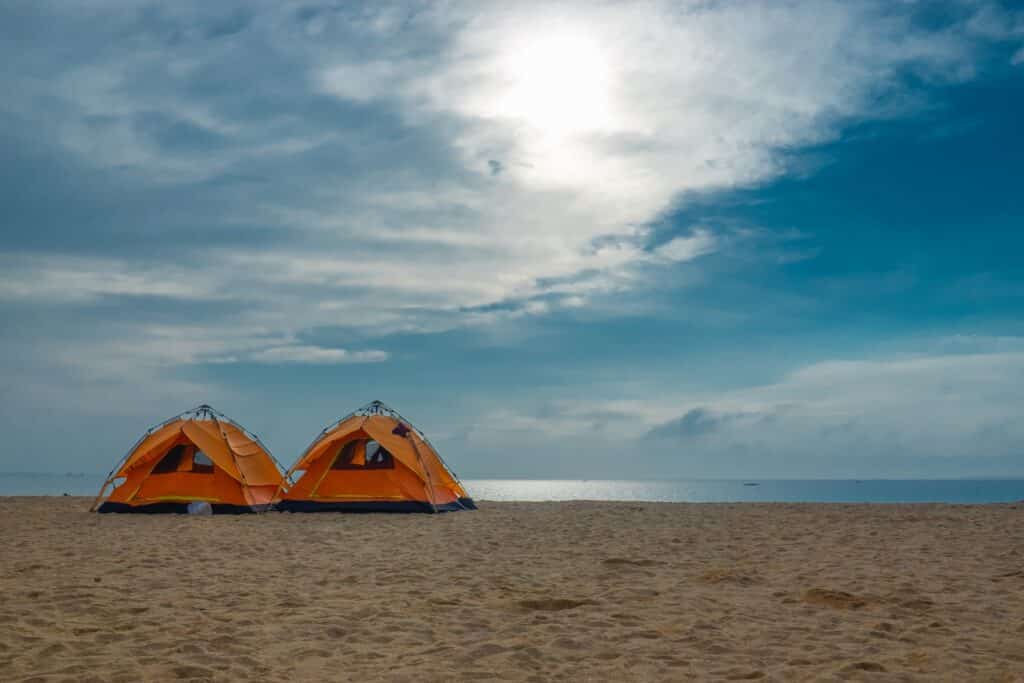
    Beach camping can fit into all other categories like national and state parks, or private campgrounds. But camping on the beach is a whole different experience and everyone should try it at least once. There’s nothing better than watching the sun rise or set, depending on what coast you’re on, over the ocean and listening to the sound of the waves while you sleep.

    Beach camping comes with its own set of problems, the main one being sand. You will get sand pretty much everywhere, in your tent, your shoes, your boots, your sleeping bag. Sand seems to show up in the oddest places.  So, be prepared to shake everything out when you leave. Even if you don’t take your motorcycle on the sand, you might consider cleaning and lubing your chain after your beach stay. 

    Beaches can also be very windy especially in the late afternoon and you can expect fog or a lot of moisture in the morning. Make sure you use a rain fly and that your gear is covered and protected and that your tent is secured to the ground. Check with the local authorities to see if fires are allowed on the beach. A beach bonfire is an incredible way to enjoy the evening. 

    Beach weather can vary greatly depending on where you are and what season it is. All of my experience with beach camping is on the northern coast of California. It’s usually pretty chilly at night and summer brings morning fog. But, southern beaches are warm and sunny for most of the year. And it’s so nice to have a coast trip or if you’re in a group of touring bikes riding up the east coast.

    7. Resort Camping

    Resort camping could be considered the same as a private campground, but on a more upscale level, we’re talking luxury campsites at their best. I suppose KOA could be considered a resort-style campground, but there are others that are more luxurious. Resorts have extra goodies like swimming pools, spas, upscale cabins, often a restaurant on-site, private showers, and concierge services to take care of your needs. For long trips, resort camping is a cruisy way to spend the night after being on two wheels all day.

    Keep in mind that resorts are more popular with RVers and some require a membership. This is where rich old people go with their million-dollar motor homes. Some can be expensive and not all of them will be motorcycle friendly. So, if you want to be pampered for a night or two, do some research for resort camping in the area you want to stay. Check all the fine print to make sure they allow motorcycles. 

    8. Glamping

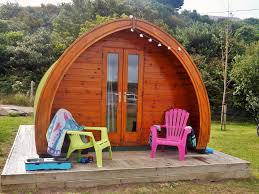
    Glamping has become a buzzword in the travel world over the last few years. Glamping is glamorous camping or luxury camping. You will find them on privately owned properties and some of them will be tucked away in a beautiful forest, on the coast looking over the ocean, or in a desert valley. Glamping is for people who love the outdoors and would like to camp but don’t want the hassle of setting up, sleeping on the ground, and roughing it.

    These campsites can come it a variety of themes and levels, of luxury. You could be sleeping in a large canvas tent, a yurt, a teepee, or a treehouse. In any case, you will be sure to have a comfortable bed and nice linens, sitting areas, maybe a deck, along with other perks such as continental breakfast, or even room service (or yurt service). Most glamping campsites will be motorcycle friendly, but always double-check when you make a reservation.

    Like resort camping, this luxury comes at a price. The simplest glamping experience will probably cost around $150 per night and can go as high as $1500 a night and anywhere in between. But, hey, if you have the money and you want the experience, go for it. 

    9. Urban Camping 

    cross country motorcycle trip

    It’s possible that while on a long trip cross country, you find yourself in a town with absolutely no place to stay. Hotels are full, there’s no camping available, no rentals available, etc. This is a time when you could consider urban camping, also known as squatting. Whilst it might not be the most glorious cross country ride experience you’ll have, it’ll give you a memory for sure!

    Keep in mind that it is illegal to camp in a non-designated camping area without a permit. But, a lot of people do it, and homeless people are forced into this lifestyle of squatting due to their situation.  You could probably get away with one night of urban camping on private property as long as you are respectful of the area, quiet, and have no fire

    Some of the more acceptable places to camp in an urban area would be on the property of a church, or on the property of a business that allows boondocking, like Walmart. Often you can tuck yourself into a hidden area alongside a park, creek, a greenbelt, or by a river. Once you find a spot, be aware that you could, at any time, be asked to leave by local authorities. Even at 3:00 in the morning. If this happens, be respectful and comply with their requests, pack up and move on. 

    Urban camping can also be more dangerous since you are in an area that has more night time activity.  You are more susceptible to criminal activity. As a woman on a solo trip (just you), I would only urban camp if there were absolutely no other option and I probably wouldn’t sleep very well. 

    10. Vacation Rentals

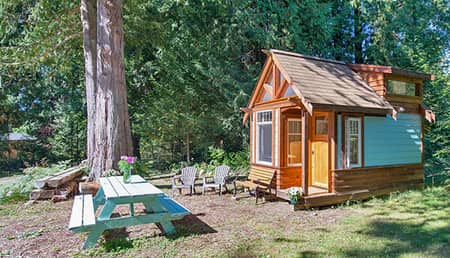
    A vacation rental is a privately owned home, managed by a rental company, and offered to anyone who would like to stay there. They can be houses, cottages, cabins, condos, large or small and come equipped with dishes, cook wear and linens so you can make yourself at home. Owners of vacation rentals rely on the property management company to take care of the logistics of renting, maintenance, cleaning, etc. When staying at one, you deal with the management company and not the property owner.

    If you’re interested in staying at one of these homes, your best bet is to turn to a website that manages reservations. Vacationrentals.com is a great start. The rental prices will vary widely depending on location and size. for instance, a studio apartment in downtown Chicago will cost more than a 4 bedroom house in the Sierra mountains. But, if you want a few days off while on your cross country motorcycle trip, you can feel like you’re at home again at least for a while.

    11. Air BnB

    Air BnB has become a very popular way for people to find a place to stay. They are similar to vacation rentals because they are privately owned homes, condos or apartments that are offered for short-term rental. There is no property management company and you will deal directly with the owner of the property for pricing, keys, maintenance requests, etc. The Air BnB website is simply a way to connect you with the owner and find a great place to stay.

    It’s a good idea to read the reviews carefully. One important thing to know about these rentals is that the owner of the property or house is often present and living there. Some deals are for a single room in an occupied house. Some are for small cottages or pool houses in the backyard of an occupied home. Owners have the right to enter at any time and check up on the rental whenever they like. This is the number one downside I’ve heard from people I know who’ve used Air BnB. So, if you’re ok with that, you could have a great experience. Make sure you ask about the parking situation and if there is a safe place to park your motorcycle.

    12. Motorcycle Festivals

    Babes Ride Out Women‘s motorcycle festival – Joshua Tree, CA

    Wouldn’t it be great to coordinate your trip around the country to include Stergis, or Daytona bike week? Or how about women’s only festivals like Babes Ride out or The Dream Roll. There are small motorcycle festivals happening all over the country. Find one to join and camp with 1,000 motorcycles nearby. It’s a great way to make friends, share stories, party and listen to music and each festival brings its own special flair. 

    13. Home Sharing

    Motostays.com is a home-sharing service that is designed strictly for motorcyclists. This membership website allows motorcyclists to offer up their home and their hospitality to other motorcyclists who are looking for a place to stay.  The website is a vehicle to connect the homeowner with the rider who needs a place to stay. 

    Membership to Motostays is free and, get this, there is no charge for staying with a host. It’s based on sharing and hospitality and a common love of motorcycle travel. The website allows the guests to leave reviews about the experience and hosts can earn badges and a reputation for being great hosts. Also, staying with a local host give you the chance to meet other motorcycle enthusiasts and learn about some of the great roads in the area. 

    14. Couch Surfing

    Couch surfing is another way to stay with a local host. You’ll share their home and it’s a great way to get to know the area in which you’re staying. Often people who are hosts really enjoy having out-of-town guests and are often open to showing their guests the sights and local attractions. 

    If you want to meet some great people and are willing to stay in a shared home, couch surfing might be for you. The couch surfing website provides a platform for hosts and guests to connect. It allows the guest an opportunity to leave reviews and report negative experiences, so, as a guest, you can feel more confident that you’ll have a safe experience and it’ll be more fun.

    15. Upscale Hotel

    Another option when you’re on a cross country motorcycle trip is to stay in a nice, upscale hotel. After a long stretch of camping and roughing it each night, it might be nice to spoil yourself and have a good night’s sleep. One of the perks of staying in an upscale hotel is the services you’ll receive. Nicer hotels have laundry services, not just washers and dryers. Stuff your dirty clothes in a bag and have them returned to you washed and folded.

    Pools, jacuzzis, and spas are commonplace in nice hotels as well as fully equipped gyms so you can get a good workout in or a massage during your stay. They also have perks like room service and complimentary snacks. Depending on your travel budget, consider a night or two in a really nice hotel.

    16. Budget Hotel

    An inexpensive budget hotel will give you a decent place to stay on the cheap. These are places such as Motel 6, Econo Lodge, or Holiday Inn. Often these rooms go for less than $100 per night, often as little a $50. Stay at a budget hotel when you just want a place to sleep and don’t expect too many perks, although you might get a free continental breakfast out of the deal.

    Accommodations can be hit and miss and towels and linens are generally lower quality, aka, scratchy. That’s why I usually pack my own, don’t get me wrong I pack light but my luggage rack always has a few things like a first aid kit, towel, rain gear, and a motorcycle maintenance kit. Because it’s zero fun getting stuck out without these things of a road trip.

    When looking for a budget hotel for your road trip it’s recommended that you look at reviews on websites like Yelp to get a good idea of what you’ll get for your money. It’s often easier to find a room in a budget hotel without a reservation so it is an option when you roll into town that’s not on your itinerary.

    17. Motorcycle friendly hotels

    Some hotels, motels, and travel lodges recognize the potential for catering to the motorcycle community. These will be places where you won’t get dirty looks when you roll in loud, tired, and grimy from a long day of riding. Many mainstream hotels have adopted a new attitude towards motorcycle guests and now offer designated motorcycle parking and other perks like, wipe down towels or a space to do maintenance or clean your bike during your stay after your road trip. 

    Often motorcycle friendly hotels will allow you to park your motorcycle under the carport directly at the main entrance give you peace of mind that your bike will be safe at night. So, at any hotel, be sure to ask if you can do that.  

    18. Youth Hostels

    Youth Hostels are a unique and cheap way to find a place to sleep while you travel. Hostels can be found all over the world and they are most popular in big cities like Manhattan, Chico, or San Francisco. Hostels offer dormitory style shared rooms with bunk beds and shared bathrooms. These are usually used by younger tourists when on a road trip around the USA.

    Or they offer private rooms at higher prices. Depending on the location, you can get a bed in a shared room starting at around $30 a night. In a shared room, if you’re traveling solo, you will most likely be sharing your room with strangers. You’ll claim a bunk and a locker, and ALWAYS lock up your belongings, and call the place home for a night.

    A good hostel will offer gender specific dorm rooms or co-ed rooms so you have a choice. While accommodations are minimal, they offer other perks such as a communal kitchen, shared refrigerator, coffee bars, live bands, movies, and game rooms. And, you’re always bound to meet someone interesting from another country.

    Because hostels are usually found in major cities, they may or may not have on-site parking. That may be a concern for some riders and can be a little expensive. I know for a fact that parking a motorcycle overnight in a San Francisco garage costs around $45 per night. So, keep that in mind if you choose a place to stay. Hostelling International is a great place to start.

    19. Stay on a Farm

    Consider staying a day or two on a working farm, ranch, or vineyard. Farmstayus.com is a website that connects guests with farm and ranch owners for a unique experience. You could relax and enjoy the sights, sounds and probably smells of a farm too. Do some fishing or horseback riding and if you want to really get involved, you can participate in the daily chores like, feeding the animals or milking the cows, or how about harvesting grapes on a vineyard.

    Prices will range quite a bit depending on where you stay, but the experience might be worth it to work into your budget. Seems like it would be a great way to experience country life while on a tour of the USA.

    20. Motorcycle Trailer

    If you’ve got the right kind of motorcycle, you could consider hitching up a pull-behind trailer so you always have a place to sleep wherever you go. These things come in plenty of different sizes and layouts and some with tents that give you a surprising amount of sleeping and living space. It’s also a great way to pack your gear and belongings while you travel. 

    You will need to have a bigger motorcycle like a Harley Davidson Road King or Honda Goldwing or a larger touring bike to pull a trailer big enough to sleep in or convert to a tent camper. This takes motorbike camping after a long ride to another level.

    21. Family and distant relatives

    Do you have family scattered across the country? Personally, I have cousins and second cousins all over the place that I’ve never met. But, knowing my family, all I’d have to do is put the word out that I’ll be in town, tell them I’m so-and-so’s grandkid, and I know I’ll have a place to sleep, a home-cooked meal, and a chance to learn a little bit about my ancestry. Most riders I know going on a long ride at least two weeks will stay with some family along the way. But be careful, chances are you won’t be going to bed early!

    And this works for more than just distant relatives. Maybe you’ve got an old college friend or military buddy that you haven’t seen in a long time. Get in touch and let them know you’ll be in town. Try not to impose too much and let them invite you to stay rather than you ask. Some will just want to have a visit, while others will open up their home. Don’t be insulted either way.

    22. Stay with Church Family

    Do you belong to a church community? My grandfather and uncle were both ministers in the Nazarene church and they knew a lot of other preachers around the country. I always felt that if I stepped into any Nazarene church around the country and dropped Grandpa’s name, I would have an instant family. So, consider contacting a local church in a town you’ll be visiting to see if someone would like to be a host family for a fellow church member. 

    23. Stay with internet friends met on forums

    Motorcycle forums are very popular and a great way to make internet friends with a common interest; riding. Post up on a forum that you’ll be taking a long, cross country motorcycle trip. You’ll probably be surprised with the number of offers you get from your forum friend to stay at their place, or at least meet up while you’re in their town. They might even join you for a leg of the cross country trip. Make sure they have their own bike though, I would never pillion a cross country trip.

    24. Apartment Hotels – Extended Stay

    There are other types of hotels that accommodate people who will be staying for longer periods of time. If you plan on taking a week-long break in one place, consider looking into an apartment hotel. It’s similar to renting a condo, but you will have hotel services like housekeeping, on a daily basis just as if you were in a hotel. 

    Some hotel chains are designed for this type of travel. They’ll include kitchenettes so you can prepare meals and are often set up more like an apartment with a separate living area. These types of hotels may offer weekly rates that might be less expensive than a daily rate. Perfect for your next cross country motorcycle trip.

    25. University Dormitory

    This last suggestion is limited to the summer months. Some colleges and universities will allow the general public to rent a dorm room while the students are away on summer break. You can often get a room for as little as $25 per night. You’ll most likely have a room with a shared bathroom, but some of the newer dormitories have really nice accommodations. So, it’s certainly something to look into.

    So, there you have it. 25 different places to sleep while on a cross country, or around the USA, motorcycle tour. Mix them up to fit them into your budget and get the best experiences during your journey. If you need help prepping for a camping trip on a motorcycle, be sure to check out our article by clicking here!

  • Dealing with Emergencies While Solo Motorcycle Touring

    Dealing with Emergencies While Solo Motorcycle Touring

    Reading Time: 12 minutes

    Solo Motorcycle touring can be a life changing and rewarding experience, but, even if you take all possible safety precautions, you’re still at risk of emergency situations. To deal with emergencies while on a solo motorcycle trip, carry a good first aid kit and have the knowledge to use it, carry a personal locator beacon, carry good travel insurance and roadside assistance.

    Avoiding a crash doesn’t guarantee that you won’t be injured while on a solo motorcycle trip. If you plan to camp in the backcountry, an injury can happen in any number of ways; snake bite or spider bite, a sprained ankle while hiking, or a serious cut from the slip of your axe or knife. Hopefully nothing like this will happen, but it’s best to be prepared so you can deal with an emergency  and get the help you need. 

    Help Yourself First

    If you’re traveling solo in a populated area and find yourself in an accident, chances are extremely high that someone will help you and call for an ambulance or paramedic. However, if your adventure takes you away from populated areas and into the back country, the odds of someone helping you and calling for assistance in much less likely, or it will take too much time. That’s why your first step in dealing with an emergency or injury is to help yourself. 

    Part of your luggage should include a basic first aid kit along with some additional items for more serious injuries. In addition to a good standard first aid kit, such as this one on amazon, include additional survival items such as a bright orange fire retardant blanket. This can be used for warmth but also as a signal when stretched out in an open area. Include a 36″ SAM Splint, which can be used to splint a number of sprains or breaks. Keeping a broken ankle or wrist protected by a splint until help arrives will be a great advantage. In the case of a laceration what bleeding, you can include an Israeli compression bandage. (also known as Izzy Bandages) These are designed to be used on yourself, or others, to stop serious bleeding. A clotting sponge is also a good way to stop bleeding. Another smart addition to your first aid kit is an epipen if you have serious allergies.

    Once you have a good medical kit put together, make sure it is stored in a bright orange or red bag so it is easily recognizable. Store it in a location that’s easy to get to. Don’t put it at the bottom of your saddle bags or inside your duffel bag forcing you to dig for it when you need it.

    Learn Basic First Aid

    There’s little reason to carry advance first aid items if you don’t know how to use them. Consider taking a first aid course through the American Red Cross, or a similar organization if you live outside the US. Knowing what to do if you are injured will help you take steps quickly. Make sure you know how to use a SAM splint, Izzy bandage, or clotting sponge and practice using them before hand.

    When learning first aid, make sure you learn how to do self-help first aid. The techniques for helping yourself are going to be different from helping another person. Part of self-help first aid is to be familiar with your body and how it functions. Know how to recognize when you are dehydrated, over heated, experiencing the onset of hypothermia, or have an allergic reaction to plants or insects. Recognizing when something is wrong will help you decide what action to take.

    Stay Calm

    Have you ever wondered how you would react if you were seriously injured and alone? In any case, the most important thing to do is to stay calm. Easier said than done, I’m sure. But staying calm will allow you to make better decisions, and quickly. But, how do you stay calm if you’re bleeding or in pain? 

    Being prepared can help. Having your first aid kit and first aid knowledge can help you take action. Take advantage of the adrenaline that kicks in when an injury occurs. This natural pain killer can last anywhere from 20 minutes to an hour, and although it causes your heart rate and breathing to increase, it will reduce your pain so you’ll be able to take action to help yourself.

    Once the initial injury has been treated as best as you can, it’s important to continue to stay calm so you can take the actions necessary to get yourself some help. Be sure to take long cleansing breaths to keep your mind clear. At this point, decide what you need to do next. Can you get on your motorcycle and ride for help? Do you need to send out a signal to be rescued? Make the decision and act.

    Make Sure You Can be Found

    One of the smartest things you can do when you’re on a lengthy motorcycle tour is to let people know where you are. You may have a set plan, but, our plans can change unexpectedly. So, before you take off into remote areas, communicate your plans to a contact person (friend or family member). Let them know where you will be and when they can expect to hear from you again. Also, give them a plan in case they don’t hear from you. A friend of mine has a common rule with his wife where he tells her that he will call at 3:00, and if she doesn’t hear from him by 6:00, she should start taking action. You can also check in with park rangers and file an itinerary. This will help narrow down the search and rescue area if you go missing.

    Carry a Personal Locator Beacon

    Technology makes it easier for us with the use of a GPS Personal Locator Beacon or PLB. These simple devices are designed to send out a distress signal via satellite and they do not require a subscription to any services to operate. When you purchase one, your device will be assigned a unique ID number.  When activated, the beacon will transmit on 2 different emergency frequencies and will last for at least 24 hours. Emergency services will be dispatched and will make their way to your beacon to offer assistance. There is no way to communicate with this type of beacon. It is simply a locator, so, it’s important to remain with the locator beacon at all times if you want a rescue team to find you. Keep in mind that any satellite communication device requires a clear view of the sky to operate, so if you’re in heavy trees, you may need to move to a clear location. 

    Other PLB’s offer more interactive services and include the ability to communicate via satellite, such as the inReach by Garmin or the Spot (check out the prices on Amazon). These include features in which you can communicate with friends and family via satellite text, sending them a message so you can check in from time to time. These personal communications do not go out to emergency services and require a subscription service to function. Depending on your subscription, these devices will record your location each time you check in allowing friends and family to follow you as you travel. It’s a great way to bring peace of mind to your family and a fun way to record your trip.

    But, how does it get help to you when you’re injured? All PLB’s, including the more advanced communication devices, have an SOS feature. When this button is pressed, it activates the locator beacon and sends the signal to local emergency services. They are given your gps coordinates and are required to send out a rescue team. 

    A word of caution about PLB’s. Because they have become so popular in recent years, their services have been abused by, how shall I word this, stupid people. Hikers and backpackers have used the signals for non-emergency situations such as, seeing a cougar, running out of water, a bee sting, or other situations that can simply be attributed to being out in nature. “Help! Help! I forgot to pack a clean pair of underwear!” is not an emergency. So, if you carry a PLB, only use the SOS beacon for true life threatening emergencies and only if you can’t rescue yourself. 

    A PLB should only be used in situations of grave and imminent danger to life. False alerts endanger lives and cause expensive disruption to Search & Rescue services. Deliberate misuse of the device could result in a penalty.

    McMurdo Fast Find 220PLB

    If you don’t carry a PLB there are some other things you can do to get help. Try dialing 911 on your cell phone even if you don’t think you have service in your location, you still might be able to connect. Carry an emergency survival whistle. The international distress signal for a whistle is 3 consecutive blows at 2 to 3 second bursts.

    Roadside Services

    Mechanical breakdowns happen no matter how prepared you think you are. Having roadside services can be the difference between being stuck and getting your bike to the nearest repair shop. Most roadside services will take care of minor problems such as a dead battery, flat tire, no gas, or towing up to 100 miles. Check with your insurance company to see if they have additional coverage that will include these convenient services. Consider becoming a member of the American Motorcycle Association. They offer plans for roadside assistance and membership gets you a lot of other perks such as discounts on gear and events.

    Trip Interruption Insurance

    In addition to your normal motorcycle insurance and roadside assistance, consider purchasing additional insurance that covers the hassles of an interruption to your trip. A trip interruption can include things like repairs that will take several days, illnesses or injuries that prevent you from continuing, or something that cancels your trip all together.

    Trip interruption insurance, depending on the package you purchase, will cover things like food and a motel stay for a limited amount of time while you wait for your motorcycle repair, etc. It’s designed to deal with the unplanned expenses of lodging when dealing the unexpected interruption. It is recommended that this insurance also cover the cost of shipping your motorcycle home if you need to cancel your trip and you’re unable to ride it for whatever reason; motorcycle damage or rider injury.

    When traveling abroad with your own motorcycle be sure to get international motorcycle insurance coverage from your insurance company. Most motorcycle insurance will provide temporary international insurance coverage to protect you while you are on your trip. This is great if you live in the US and your trip takes you into Canada or Mexico for a portion of the trip. If you travel abroad and rent a motorcycle, the rental company will provide you with a number of insurance options to protect you while you are using their motorcycle.

    Medical and Rescue Insurance

    Medical insurance is imperative when you’re traveling especially in the United State where health insurance can be confusing. If you are not covered through your employer, make sure you take the steps to get proper medical insurance through the ACA or through a personal insurance company. This will not only cover you if you are injured, but you will be able to get medical attention for common illnesses or small injuries such as the flu or an infection. 

    Another piece of insurance that you might consider is getting an Air Rescue Card. TheAirRescueCard.com is a company that provides air ambulance services designed to get you home in the event of an accident or medical emergency. Basically covering a serious injury that would cancel your trip and make public air travel impossible. They provide bedside to bedside ambulatory services from anywhere in the world. They can get you home. They offer short term memberships for coverage as short as $14 days, annual memberships or long term memberships. So, if you’re traveling internationally, this is an affordable extra level of coverage. 

    Another type of insurance or membership to consider is Air Medical Rescue membership. Helicopter ambulance services can proved fast response to remote places where it would be difficult for a ground ambulance to reach. In the US there is a network called AirMedCare. Membership with this network has you covered in more than 320 locations around the states.

    A lot of motorcycle riders debate whether or not they need this kind of medi-vac insurance. The argument is that most state, county and city emergency services are paid for by taxes and won’t cost you, the patient, anything. Also, not all medi-vac helicopters are equipped for rescue, such as lifting a stranded hiker from a cliffside, and they will require enough clearance to be able to land. On the flip side, local search and rescue services may not have the advance medical equipment and personnel needed to deal with a life threatening injury. So, as you can see, there are pros and cons to adding this coverage. 

    Notifying Family and Friends

    If you’re seriously injured and transported to a hospital, you will need the ability to notify friends and family. But what if you’re unable to communicate this information due to your injuries? You could be unconscious from an accident. This is where an emergency contact list comes in handy. There are a couple of ways to approach this. Whenever I ride, I always wear my Road ID bracelet. Engraved on it are the phone numbers of several family members and it includes my blood type and the name of the medication I am taking.

    If you don’t want to wear a Road ID bracelet, you can type out all your emergency contact information, blood type, names of medications and allergies onto a card and get it laminated. Keep that card on your person at all times when you ride. Don’t put it in your luggage or pannier bags. Keep it in your pocket or in your wallet, which is in your pocket so, if you are separated from your motorcycle, emergency staff will still be able to find the information. It’s a good idea to put all of your insurance cards along with the emergency info card in one location so emergency personnel can find it all quickly and easily.

    Stay Safe Ride Smart

    One of the most effective ways to deal with an emergency is to avoid the emergency all together. This seems obvious and in some cases it is out of our control. People driving cars don’t always see us on our motorcycles. Surprise mechanical problems happen, and no matter how skilled a rider you are, the risk of making a mistake and going down is a real one. 

    Do whatever you can to avoid injury. Ride smart and always wear your protective gear. So, if you do go down on your motorcycle, your risk of injury is reduced. Ride smart while you’re in the city too. Try to time your arrival and departure so that you are not caught up in rush hour traffic to reduce the risk of an accident with a car. 

    Lastly, always be safe when you’re off your motorcycle and camping in the wilderness. Use common sense fire safety and store your food properly to avoid encounters with wild animals. If you spend a day hiking, make sure you know your way back to camp, take precautions to avoid injuries while on the trail, and bring water and snacks with you. 

    While we can never be fully prepared for the unexpected emergency, we can do what we can to be safe and to get the help we need when we need it. I hope you’ve found valuable information in this article that will help you have a safe motorcycle journey no matter where you ride.

  • Overcoming Fears of Solo Motorcycle Travel

    Overcoming Fears of Solo Motorcycle Travel

    Reading Time: 17 minutes

    One of the reasons I started this website is to share my experience with planning and venturing out on my dream motorcycle trip; a 6 month solo tour of the US and parts of Canada. In planning this trip I find that I am forced to confront barriers that may get in my way, one of them being fear. The shorter motorcycle camping trips I’ve taken in the past have allowed me to work on overcoming much of my fear of traveling and camping alone, but I know there are more concerns with being alone on my motorcycle for months at a time.

    So, how do we overcome our fears of solo motorcycle travel? The best way to get over your fear is to face it and do the thing you’re afraid of doing. Start with small steps and slowly expose yourself to the activity until you become familiar with the things that caused you fear and learn techniques for dealing with unfounded fear and anxiety.

    Fear is “an unpleasant emotion caused by the belief that someone or something is dangerous, likely to cause pain, or a threat.”

    Did you catch that? The belief. You can experience fear even if there is no danger or threat at all. If this is the case, why do we let fear get in the way of allowing us to experience life to the fullest? When on a long motorcycle trip there are a number of fears that may prevent someone from enjoying it. And it’s not just about the fear of camping alone. It can also be the fear of riding a motorcycle alone, staying in a hotel alone, especially for women. It could be the fear of a breakdown in the middle of nowhere or the fear of encountering unfriendly, dangerous people or wildlife.

    For this article I tried to think of all the things I am afraid of regarding this trip, and find ways that I can deal with them and conquer them. Also, even though everything in this article applies to both men and women, I am going to address some of it from a woman’s point of view.

    Is Fear Natural?

    Fear occurs at different levels and in many different forms. The level of fear one person feels is directly related to the experiences they’ve had during their lifetime. Kids who have been bitten by a dog may have a fear of all dogs for the rest of their lives. On the most basic level, fear is a primitive emotion necessary for our survival. That primal fear that has been ingrained in our brains since the dawn of mankind is the emotion that causes us to spring into action when faced with a threat. It helps us make split second decisions to fight, flight or freeze.

    When we are being attacked, either by another human, an animal, or a force of nature such as fire, flood or earthquake, our survival instincts, driven by fear, will aid us in taking drastic action to remove ourselves from a dangerous situation. This is when fear is helpful and necessary. This is when fear is natural and justified. And this kind of fear doesn’t require a massive disaster to occur. It can be something small. Have you ever had a dog chase after you while riding a bicycle? Your fear of getting bitten kicks in and you get a burst of adrenaline so you can pedal faster and get away.

    But in reality the majority of people who live in a normal, first world society will rarely, if ever, have to experience that serious fight-or-die type of fear. In fact, much of the fear and anxiety we feel comes from our own minds and that is the fear we need to conquer if we want to enjoy traveling alone and camping alone.

    Mind Games

    As you sit in your tent in the woods at night, or in the middle of the desert, all by yourself, your mind can really mess you up if you let it. In this world of TV, horror movies and urban legends, we have a tendency to jump to the worst conclusion whenever we hear a noise in the night. Thoughts of zombies, serial killers and huge angry bears fill our heads when in all honesty, it’s probably just a chipmunk.

    The fears inside our heads don’t match up with what’s happening in real life. And if you dwell on those thoughts, you’ll only become more and more afraid and anxious with every night-time noise outside your tent. It will be a long, sleepless night. And for no reason at all. But, to be honest, it’s perfectly normal for your mind to have fearful thoughts in unfamiliar situations. The trick is to learn how to deal with those thoughts and overcome those unrealistic fears.

    There are a number of mind games that you can play to take control of your thoughts and overcome your fears, especially those initial fears that you’re going to feel the first few times you sleep outdoors.

    • Acknowledge your fears and recognize that they are normal.
    • Determine exactly what it is you are afraid of. Be specific.
    • Question your fears. Remember, fear is the belief that something is harmful.
    • Distract yourself with something enjoyable such as an activity or reading to occupy your mind.
    • Practice motivating self talk. Tell yourself that there is nothing out there that wants to hurt you. Because, quite honestly, that’s the truth.

    Overcome Fears by Starting Small

    One of the best ways to overcome your fear is to start exposing yourself to the activity that’s causing the fear. You don’t have to jump in with both feet right away. Start small and work your way up. Let’s assume you’re starting from the beginning. Maybe you already have some group riding experience and some experience with overnight trips in hotels and maybe a night in a campground, but you’ve never done anything alone. Where do you start?

    Each time you expose yourself to a situation that scares you, take notice of how you react to that fear. Notice your heartbeat and breathing patterns. Take note of what’s happening in your mind and pay attention to how you are talking to yourself. What is your mind saying? Are those thoughts taking your fears to an unnecessary level? Are they making the situation worse? Once you get to know how your mind reacts to the initial fears that you encounter when exposing yourself to new situations, you can then take steps to change your thought process.

    Ride By Yourself

    Start by getting some experience riding your motorcycle alone. Go on a few long rides, at least a few hours by yourself. Stay in populated areas at first, then gradually venture off onto more remote routes and less populated roads. Take a ride through some heavily forested areas to get used to the towering trees, strange shadows and winding turns. Ride out on some long, straight deserted roads to get used to the feeling of the vast, open desert. When I started going on day rides alone rather than in a group, I found myself enjoying it so much more. You can go anywhere you want. You can stop any time you want and you don’t have to wait on the rest of the group when you’re ready for kickstands up.

    Riding by yourself will also force you to find your own way which will force you to overcome your fear of getting lost. You won’t have a group leader planning the route or telling you which way to go. You will have to figure it out on your own. Take a few rides in different types of places like busy cities, small country towns, mountain roads. Practice using your GPS or a paper map on these small trips. If you find yourself in a situation where you think you might be lost, practice staying calm and making rational decisions based on knowledge and facts, rather than based on the emotion of fear. I live by the philosophy of you never get lost. You just make unplanned detours.

    Take an Overnight Motorcycle Trip By Yourself

    Take a trip farther away from home and spend the night in a hotel alone. This will get you accustomed to entertaining yourself without having friends and family around. It’s a great time to relax and recharge especially if you are somewhat introverted, or a mom who never gets a second alone (ahhhh). You can extend this short solo trip to include 2 nights in different locations giving you even more opportunities to experience traveling alone, interacting with strangers at restaurants and gas stations, and learning who to talk to and who to avoid. When you’re a woman traveling alone on a motorcycle, you’re going to get a lot of attention. Most of it will be friendly and encouraging as people are often in awe of your bravery. But occasionally you’ll run into that one creep who just wants to hit on you. Short solo trips will get you used to dealing with all sorts of people and sharpen your intuitions and people reading skills.

    Go Car Camping by Yourself

    If you’ve never been camping in your life, find some friends who camp and go with them a few times to learn the basics about camping, building a fire, cooking and sleeping outdoors, etc. But if you’re an experienced camper, start by leaving the motorcycle at home and doing a few solo camping trips in your car, close to home, and in a populated campground. This will get you used to sleeping outdoors and dealing with the sounds of nature and the darkness without having to be completely alone.

    Your first solo camping trip will also allow you the opportunity to practice setting up and taking down your equipment. You’ll learn to cook your meals outdoors and, most importantly, you’ll learn how to keep a clean camp and store your food properly. I recommend that you cook using the stove and cook wear that you will be taking on your motorcycle. Leave the iron skillet and big camp stove at home.

    It’s very important at this step to practice keeping your campsite clean, throwing away your trash each night, avoid eating or keeping food or scented items in your tent, and store your food in food lockers, bear lockers, or hung up depending on where you’re camping. Don’t leave food in your car because when you’re motorcycle camping, you won’t have the luxury of a car to stash your food in. Start these habits early and you’ll be less fearful of an animal encounter.

    Here are a few things you can do on your first solo camping trip that will help you keep from losing sleep due to unfounded fears.

    • Avoid reading scary stories or watching scary shows before or during your trip. Don’t read true crime stories or “Bear Attacks of the Century”. Yes, it’s a real book.
    • Stay busy. Keep yourself occupied with a chore or an activity to keep yourself entertained.
    • Some people like to sleep with ear plugs to dampen some of the smaller night time noises like rustling in bushes. Those little noises are what seem to cause a lot of the unnecessary fears we have.
    • If you don’t care for ear plugs, listen to the sounds you hear and try to identify them. Once you know what’s making the sound, you won’t be afraid of it.
    • Meditate, pray or use other relaxation techniques to calm your nerves such as deep breathing exercises. Relax and prepare yourself for sleeping. Repeat this step if you’re awakened by noises during the night.

    There is one more thing that you will likely encounter when you’re camping that can really freak some people out. If you hear normal animal noises outside your tent, don’t be afraid to investigate the sound. Get your flashlight and see what’s out there. When you do this, you’re likely to see two glowing eyes staring back at you. It can look a little creepy, but it’s nothing to worry about. If you’ve done your research you should already know what animals are common in the area. Those eyes likely belong to a raccoon, skunk or deer. Raccoons and skunks are nocturnal and they will all come out to find food as soon as the sun goes down. Let out a shout, tell them to get lost, they will take off and you can relax.

    Go Camping One Night with your Motorcycle

    Once you have a little bit of experience camping on your own, now it’s time to take the motorcycle. This time, venture out to a more remote and less populated campground. Try camping in an area where you know there will be more dangerous wildlife, such as bear country. This will also give you the opportunity to practice safety skills such as hanging your food if there are no bear lockers, keeping your campsite clear of scraps and trash. This time you won’t have your car to hide in if you’re scared. So, it will take you a little farther into your fear zone giving you a chance to practice good mental skills to overcome those fears. Extend these trips into two nights, or three. You’ll soon find yourself enjoying the outdoors more and more and letting go of the fears of being outdoors that used to keep you awake at night.

    What’s Making That Noise?

    One way to overcome fear is to become familiar with the noises you’ll hear at night.In this kind of situation we start to encounter unfamiliar noises or we don’t have the usual ambient sounds that lull us to sleep each night when we are home. Familiar noises like traffic, the neighbor’s dog barking or a distant train; these are noises we’ve come accustom to and they don’t cause us alarm. But when camping you’re going to hear a lot of squeaks, chirps, footsteps, rustling in the bushes, noise in the trees and sometimes it will be in your campsite. You can stay awake in your tent all night constantly saying “What was that?!” or you can become familiar and comfortable with those sounds.

    My tip for camping alone is to study up on the animals that are common in the area where you will be camping. You can learn the typical sounds that those animals make so that when you hear them in the wilderness, you’ll be able to identify the animal and decide if you really need to be anxious about it or not. In fall of 2018 I was tent camping on California’s central coast. I was lulled to sleep by the gentle sound of ocean waves in the background and an occasional screech of owls in the trees. But at about 2:00 AM, I heard the most hideous grunting and growling from what seemed to be right outside my tent.

    The sound traveled as this thing walked past and into the bushes and I could tell there was more than one of them. I already knew there was nothing in the area that could hurt me and as they walked away the sound slowly disappeared, but I had never heard such a disturbing sound before. When I got home I did a little research and it turned out to be skunks. Just skunks looking for food. But, even though I was not familiar with the growling sounds, they didn’t scare me because I already knew what animals were in the area and I knew that none of them would bother me or hurt me as long as I kept a clean camp and my food put away. Now I know what a growling skunk sounds like.

    Overcome Your Fear of People

    A lot of solo travelers, solo campers and wilderness enthusiasts will often say that the thing they fear most is other people. Like any fear, this is a legitimate concern and there are certainly people who don’t have your best interest in mind. Overcoming this fear takes a basic trust in humankind. Travelers will tell you that the majority of people they encounter are good natured, kind, are interested in your journey and are willing to lend a helping hand if and when you need it.

    I’ve been on numerous solo trips and I have always met friendly people who often invite me for a cup of coffee or to join their group at camp for a beer. As a woman on a motorcycle, people seem to be more impressed with my courage and bravery to travel alone and it usually ends up in a good conversation. Back when I owned a vintage motorcycle, my 1984 Yamaha FJ1100, I got so much attention from men…wait, I mean, my motorcycle got the attention. I met a lot of gentlemen who either owned that bike or knew someone who owned it and I really enjoyed talking about the motorcycle. Again, I met some really nice people. As for those people who are not so nice; here’s where you really need to trust your intuition and use your instincts. Practice common sense safety. Stranger danger isn’t just for our kids.

    Another tip for getting over your fear of strangers is to carry something that provides you with protection against an attacker. Whether it be pepper spray, a knife, a fire arm or your teddy bear, this is a personal choice. Often simply having some type of protection laying close by as you sleep, will help settle your fears.

    Practice Good Safety

    There are  other things you can do that will help you with how much fear you might have when you travel and especially when you stop for the nigh, which seems to be the time when people are scared the most. Practicing good safety habits is one of those things. In the outdoors, practice keeping your campsite clean to avoid attracting animals that are looking for food. If animals come snooping around, but you know you stored your food properly, your fears will be lessened and you can relax more knowing that they won’t find what they’re looking for.

    Make sure you arrive at your campsite before sundown. This will give you time to get familiar with your surroundings and determine if there are any special precautions you should take to be safe. I once asked a camp host if I could switch sites simply because my neighbors were a group of rowdy, beer drinking guys. When I told her I was traveling alone, she didn’t give it a second thought and assigned me a new site. She was even nice enough to deliver some campfire wood to me. Letting her know that I was alone, and feeling her empathy, told me that she and her husband would be keeping a watchful eye out for me and that gave me some peace of mind.

    If you’re staying in a hotel, practice common sense safety habits. Park your motorcycle in a safe place and lock it to avoid theft. Bring all your valuables in with you. Lock your hotel doors and windows. Doing these simple things will give you more peace of mind and reduce or even eliminate your fears of traveling alone.

    Reacting to Fear

    No matter where your trip takes you, to the wilderness or to a big city, there’s really no way to completely avoid a fearful moment or a tense or anxious situation. So, when it happens, it’s important to not let your fear get the best of you so you can make intelligent decisions to get out of a dangerous or fearful situation. Hearing scary noises in the middle of the night that you know are a valid reason for concern will get your adrenaline pumping and that fear will make it more difficult to make rational decisions. Your first instinct when encountering a bear is to run. What’s the last thing you’re supposed to do when encountering a bear? Run. This is the perfect example of why you need to control your fears so you can make the right decision.

    If you find yourself in a tense situation, such as getting lost or hearing a bear in your campsite, take a moment to breath and assess the situation. Take a break from riding if you’re lost, calm your nerves and take some time figure out where you are and where you need to go. You won’t be able to make the right decision if your mind is fogged with panic. The same goes for when you’re in your tent and can hear the huffing of a bear sniffing around your camp. Take a few deep breaths to calm your nerves. Assess the situation and decide what action you need to take. Often, if an animal is passing through your camp, you don’t need to do anything but let it pass.

    Wrap Up

    I hope the information laid out in this article can help anyone who is new to solo motorcycle travel to overcome their fear of taking the next step. Fear is a natural emotion, but it should not be so paralyzing that you never do things you’ve always wanted to do. Take steps to overcome your initial fears. Learn techniques to reduce your fears and to deal with new fears that you will encounter while on your journey.

    Every time you encounter a new fear, especially in a more controlled manner, you will come out stronger. You will build up more strength and courage with each experience. Your goal is not to become fearless. Instead, your goal is to not let fear take you over. Get out, take risks and enjoy your adventure.

  • 9 Different Motorcycle Stand Options: How To Put A Motorcycle On A Stand

    9 Different Motorcycle Stand Options: How To Put A Motorcycle On A Stand

    Reading Time: 14 minutes

    If you’re like me, you enjoy doing your own maintenance work on your motorcycle at home. And no motorcycle garage would be complete without some type of stand for your bike. A stand makes it possible to do so many repair jobs from things as simple as lubing your chain, to removing the wheels or doing a complete front fork rebuild.

    There are a lot of different types of motorcycle stand for different motorcycle models. It’s important to understand what each one does so that you can choose the best motorcycle stand. Sometimes you’ll find yourself needing to put your bike on a stand when you’re on a ride in the case of a breakdown. So, this article will cover 9 different methods for putting your motorcycle up on a stand.

    Center Stand

    Center stands are permanently installed on the motorcycle usually in addition to a kickstand or side stand. Center stands are probably most common on dual sports, adventure bikes and touring bikes, although just about any standard or sport bike can have one installed. Big, heavy cruisers don’t generally have center stands due to their weight.

    The center motorcycle stand is installed just under the center portion of the bike and attached to the frame. It is spring loaded to keep it folded up under the bike when not in use. When the motorcycle is on the stand, the rear wheel will be lifted off the ground by a couple of inches. This makes it very easy to do any type of maintenance on the rear wheel and chain, or if you just need the bike upright to do maintenance. The front wheel, however, will still contact the ground.

    Use caution when placing your motorcycle on the center stand as it will not be as stable as it is on the side stand. Center motorcycle stands provide only a narrow footprint and raise the center of gravity leaving your bike more vulnerable to tipping over. Center stands aren’t’ really designed to be used every time you park your motorcycle but they can be really handy when parking on some surfaces such as on a slight sideways incline. The center stand is also very nice to have if you do a lot of touring. It make chain maintenance on the road very easy and, if you have to fix a flat on the road, a center stand will make that possible. Another benefit is that it makes it easier to pack side cases when the bike is up on the stand. I find it a lot easier to secure bags onto my motorcycle if it is upright rather than leaning to one side.

    Putting your motorcycle on the center stand can be tricky especially if you have a heavy bike or if you don’t have the upper body strength to do it. But, there is a technique to it. Stand at the left side of your bike. With your right foot, hold the center stand against the ground. With your right hand, grab the left side of the motorcycle (some bikes come with a special handle for this) and lift up, while at the same time, kicking your right foot and the center stand forward. The motorcycle will pop up onto the stand. It takes some practice to get it right, but once you figure out the leverage points, it will become second nature. To take your bike off the center stand, simply push the bike forward slightly and the stand will snap back up, and your bike will plop back to the ground. Be sure to hold it steady and have the kickstand ready to hold the bike up.

    Dirt Bike Box Stand

    box stand

    This is the simplest stand you can own. It’s basically a small square platform on a box shaped frame that’s about a foot or two tall. You will most often see these types of stands around the dirt bike track as generally dirt bikes do not come with kick stands. To get your motorcycle onto this stand you will have to lift it up and set it on the stand yourself.

    Dirt bikes are not very heavy compared to other motorcycles and there is a simple technique to lifting the bike onto the stand without injuring yourself or pulling your back out. To lift it up:

    • Stand on one side of the bike
    • Grab the rear fender on the opposite side
    • Squat down slightly and push your hip against the motorcycle
    • Lift up with your hip and legs and swing the bike onto the stand

    Your legs and hips are doing the heavy lifting rather than your arms and back. When you do it right, it’s a simple 2 second process. Places you should NOT grab and lift are the pipes, the rear wheel or reaching down to pick it up by the swing arm. Doing so could cause injury (hot pipes) or cause you to do a whole lot more work that you need to.

    Rear Swing Arm Stand

    rear stand small

    Rear wheel stands with swing arm attachments are a very common way to lift up the rear wheel of your motorcycle. These stands are designed to lift the motorcycle by fitting under the swing arms. The shape of the lift, along with its wheels, uses leverage to lift the bike up a few inches off the ground. There are several different brands on the market and most will come with different attachments to accommodate different bikes. I personally use a Pit Bull stand and I’ve been very happy with it. You can find them on Amazon. Padded platforms are designed to lift the bike from under the swings arms. Spool attachments allow you to lift the bike from rear wheel spools. I’ve always found it easier to use rear swing arm spools with the stand and the spools also double as rear sliders adding protection if your bike goes down.

    Most rear stands are universal and will work with nearly all motorcycles. However, if you have a motorcycle with a single sided swing arm, you’ll need a stand designed for it. These stands work the same way, but they will attach to the side without the swing arm by fitting into the wheel axle.

    Like any stand, it takes a little bit of practice to hold your motorcycle in place with one hand and line up the stand with the other. It’s a bit of a balancing act, but once you have it figured out, you’ll have no problems popping your bike up. A rear stand is hardly used by motorcycle riders. Nevertheless, many riders prefer rear stand for their motorcycles for extra safety on flat spots. It takes little effort to add a rear stand with a removable handle to your motorcycles.

    Front Fork Stand

    front wheel stand

    Front fork stands are similar to rear swing arm stands and you can often buy them in sets. Check out the price on a set here on Amazon. These stands are designed to kind of cradle the front forks between two supports, lifting the front wheel off the ground. The placement of the stand is super important because, if the forks don’t set in place just right, the motorcycle has a risk of falling off the stand. That would suck if you’ve taken off your front wheel already. Yikes.

    Keep in mind that you can not use the front stand alone. It is not stable enough to hold your bike steady, so you must use it with a rear stand. Always put the bike on the rear stand first. This will provided the stability needed to enable you to raise the front wheel. Front for stands are great for storing your bike during the off season, for removing the front wheel or working on the brakes. However, you will not be able to remove the front forks with this kind of stand.

    Triple Tree Stand

    A Triple tree stand is very similar to a front fork stand, but instead of lifting the motorcycle by the forks, it attaches to the center hole under the triple tree. In case you don’t know, a triple tree, or triple clamp, is a somewhat triangular shaped clamp that attaches to the top of your forks and to the front of the motorcycle frame. Your handlebars are also attached to the triple tree.

    Stands like this will come equipped with 4 or 5 different size pins to insure you have one that will fit your brand of motorcycle. These stands provide you with a stable platform allowing you to do a number of repairs to the front of the motorcycle, such as a front fork rebuild. Find one that fits your bike here.

    Snap Jack Folding Portable Jack

    Not every motorcycle owner has room to store large motorcycle stands, or they want something that is portable that can be packed in their on board tool kit. That’s where the Snap Jack comes in handy. The Snap Jack, make by Tirox, is a patented two piece, folding stand that fits under the swing arm opposite side of the side stand or kick stand. When you push on it, it snaps into place, lifting the rear wheel off the ground by about an inch, or just enough to spin the wheel making it the perfect stand for doing chain and rear wheel maintenance on the road.

    The first version of the Snap Jack had a few flaws, but thanks to consumers who voiced their concerns and wishes, the company came out with the Snap Jack V2 and included a lot of improvements. When you purchase it, the kit will come with a Velcro strap that you attach to the front brake lever to prevent the motorcycle from rolling forward. It also comes with two rubber non-skid pads that will assist in keeping the jack steady on a smooth surface.  Cotter pins lock the jack into place when the bike is lifted, to prevent the jack from folding accidentally.

    Installing the jack is a little tricky and make take several tries to get it at the right angle so it lifts the bike sufficiently. There are a few precautions to take when using the stand. When pushing the jack in place, as it snaps and lifts the bike, be sure to keep the fleshy part of your hand away from the hinge or it will take a bite out of you. Also, when releasing the jack, keep your fingers clear of the hinge. If you’re paying attention, you won’t have any problems with it, however, wearing a glove will help protect your skin from painful pinches.

    Hydraulic Lift

    So far the stands I’ve talked about work great for sport bikes, smaller motorcycles or adventure bikes, but what if you have big 1300 pounder like a Gold Wing or a fully loaded Road King? This is where a hydraulic lift comes in handy. These lifts come in a variety of styles and brands but they all generally work the same. They come with casters so you can easily roll the lift under the motorcycle. Once you find a secure spot for it to lift against the frame, you’ll use a foot pump to begin lifting the bike. Some lifts will come with a handle so you can pump up the lift by hand.

    Hydraulic lifts will raise the entire motorcycle from the center lifting both wheels off the ground. Some taller scissor lifts can lift a motorcycle up a couple of feet allowing you to work on the motorcycle while standing comfortably. Easier on the back. Be careful of scissor stands however, as the bike will lose stability the higher it is raised, especially large motorcycles. In any case, when you select a hydraulic lift, make sure you purchase one that will handle your motorcycles weight capacity. Not all stands are built tough enough to lift your heavy bike. Here’s one on Amazon that is rated to hold up to 1500 pounds. A good investment if you plan to do your own maintenance.

    Hydraulic lifts also come in large professional models where you can roll your motorcycle onto a platform, some with wheel chocks, then raise the bike up so you can work on it while comfortable standing. These are great for some repairs, however, if you’re doing anything that requires the wheels be lifted off the platform, you’ll have to use a different stand.

    Motorcycle Dolly

    A motorcycle dolly has a different purpose than other motorcycle stands. It’s not designed to lift the motorcycle wheels off the ground but, it will keep your bike steady and in place while doing maintenance and repairs. A low profile dolly is used to move a heavy motorcycle around on a solid surface in any direction. Let’s say you have a limited amount of space in your garage and you want to park your motorcycle in a tight spot. Often backing it in can be tricky and you risk bumping into things as well as scratching or denting your motorcycle.

    With a motorcycle dolly you will roll your bike onto the dolly and secure it into place. The wheels on the dolly will allow you to push it into any tight spot, against a wall, or where ever you need to fit it in your garage or shop. Very simple, very handy. They are surprisingly inexpensive too and you can find them easily, like this one on Amazon.

    Other reasons for using a dolly is if you own more than one motorcycle, or have a collection and you may want to easily move your bikes around, rearrange them, bring one out for riding, etc. Or, if you have a motorcycle that you don’t ride very often that you need to occasionally move out of the way.

    DIY Stand

    A lot of creative people have built their own motorcycle lifts and stands using woods, screws and nails. Sometimes you need something similar to a center stand or a hydraulic lift that lifts both wheels off the ground from the center of the motorcycle. A common DIY stand consists of several 2×4 or 2×6 pieces of lumber, glued and nailed together, this serves as the lift.

    On one end of the lift, you can install a long piece of lumber, or long sturdy pipe to use as a handle. After sliding the homemade lift under the motorcycle, use the handle’s length for leverage, turning the lift onto its side. In doing so, it will lift the motorcycle off the ground.

    A homemade box stand would be super easy to build using some two by fours and some sturdy plywood on the top and bottom. Apply some anti-skid rubber material under the legs to keep it from sliding when you lift the bike onto the stand. You can also apply rubber padding on the top to protect the bottom of your bike.

    On the road I’ve seen dual sport riders getting very creative with stands on bikes that don’t have a center stand. Often a tree stump, a log, or a big rock will provide you with the perfect height to get your bike off the ground so you can repair a flat. Be extra cautions when doing something like this and make sure you don’t puncture a pip or oil pan by setting your bike on a jagged rock. Use common sense.

    Remember, that any type of do it yourself, homemade lift or stand is not guaranteed to hold the weight of your motorcycle or is it guaranteed to keep your bike steady. While many people have had good luck with DIY stands, you still need to be cautious. The benefits of a manufactured stand over a homemade one, is that they are tested and rated to hold a certain amount of weight, and the company may provide some protection to the consumer if the stand or jack fails. However, if your DIY stand fails, your bike falls off and is damaged, that’s all on you. So, think it through before you build your stand.

    To wrap it up, there you have 9 different ways you can lift up your motorcycle to make maintenance, repairs and storage much easier.

    infographic about motorcycle stands

  • Motorcycle Road Trip Planning: 10 Steps To Motorcycle Trip Planning

    Motorcycle Road Trip Planning: 10 Steps To Motorcycle Trip Planning

    Reading Time: 17 minutes

    One of my dream trips that I’ve wanted to do for years is a solo motorcycle tour around the United States, and I plan to make that happen very soon. But the question is, how does one begin to plan for such a trip? Not everyone is brave or crazy enough to just pack up and ride without figuring out where they will go and where they will stay ahead of time. Also, if your time is limited, careful planning is necessary so you can see the sights and still make it back home on time and on schedule. Also, it’s better to arrange all of your riding maps, hotel confirmations, directions etc. with your free online itinerary.

    In this article, we’ll look at 10 steps you might want to take to map out your route, calculate your miles and figure out where you will stop for lodging, gas, and sightseeing. Keep in mind that this is only one way of mapping out a cross-country ride. It’s how I have approached it, and hopefully, it will work for you.

    1. Determine the Length of your Trip

    This is an important first step because it will determine the length of your route and may limit the number of attractions or towns you can visit. If you are considering a tour of the entire country, from coast to coast and back, you will probably want to give yourself at least a couple of months to do it right. Just to give you an idea, it takes about 5 to 6 days to drive from New York to Los Angeles if you drive 8 to 10 hours a day or 800 to 1,000 miles per day, and that’s without stopping to see the sights. So, just the fact that you’ll be on a motorcycle will cut those hours in half. In addition, if you want to see any landmarks or get to know the towns you’ll be visiting, this will increase your travel time even more.

    If you don’t have 2 or 3 months to dedicate to your ride, you can consider taking a shorter trip and enjoying a shorter route, one that covers a particular region of the country. A grand tour of the Pacific Northwest, or a tour of canyon lands and deserts of Utah and Arizona.

    At this point, it’s also a good idea to consider what type of roads you’d like to ride. Do you want to limit it all to the freeway or interstate highway riding? Or, would you like to brake away from the highway and tour some of the less travelled roads? The type of road you select will also determine how many total miles you’ll be able to ride. Riding at highway speeds makes going from point A to point B a quicker journey. While riding through winding forest roads or narrow country roads will slow you down significantly.

    The last thing to consider is the time of year you want to ride. Some parts of the country are limited by season. So, if you want to see the northeastern part of the country, don’t plan your ride in winter. If you want to see Death Valley and surrounding deserts, don’t do it in the summer, you’ll hate it. In fact, Death Valley campgrounds and hotels or accomodations are closed during the summer months because the valley floor in July regularly reaches temperatures of close to 120°F. The best time to visit the desert is in March and April when the wildflowers are in bloom. So, summer in the north and winter in the south.

    One last tip is to always add a couple of days to your expected time, up to a week depending on your full trip length. This will allow you to relax and not feel in such a rush. It will also keep you prepared for unexpected downtime in case your motorcycle needs repairs or if you realize you just need an extra day of rest before getting back on the motorcycle.

    At this point, set a date. Get all the approvals you need from your boss, spouse, kids, dogs and cats.

    2. Decide How Many Riding Miles Per Day?

    Not that you know how long your total trip will take, it’s time to break it down into average daily mileage. Determine how many miles you have ridden in the past. What’s been your longest day so far? How did you feel during the ride and after? You will want to avoid riding so many miles in one day that you begin to compromise your safety. Also, when trying to figure this out, you need to look beyond mileage only and look at how many hours you will be on the motorcycle, and how much energy you’ll be spending while riding. Twisty, technical roads will wear you out faster than cruising on the freeway.

    When plotting out your route you’ll find that some days will be shorter than others due to the towns or sights you want to visit. This makes a long riding day easier to handle knowing that you’ll have a shorter ride the next day. But, too many long days in a row will take its toll, so keep this in mind when mapping out your ride.

    3. Decide What you Want to See

    This is a great time to get out a bag map, lay it out on the kitchen table and start a motorcycle trip planning. I like to use paper maps at this point rather than staring at a computer screen. A big map gives you a visualization of the big picture. A laminated map like this one on Amazon, along with a set of colored dry erase pens is the perfect tool for this step. This is your brainstorming session. At this point, don’t worry about mileage, just start marking all the points you’ve always wanted to visit. If you have friends or family that you want to see, mark it down on your map.

    You can use different colors to determine “must see” sights vs. sights you’d like to see if you have time. If some towns will require more than one day’s stay, write down a number alongside that town on the map. Right now, you’re starting to build your route and it is soon going to take shape. This is the fun part. And at this point, you can mark down anything you want, any natural or man-made wonder you’ve ever dreamed of seeing, even the giant ball of twine in Cawker City, Kansas. Seriously.

    4.  Choose What Kind of Roads you Want To Ride

    All right. Now you have a map with a bunch of stopping points on it. Now it’s time to string all those stops together. This is the point where you will start to determine what kinds of roads you want to ride on. A motorcycle trip is not just about the stopping points, it’s also about the scenery along the way. The beauty of the road, connecting with nature and not letting the world zoom past you is what these kinds of trips are all about. In my opinion, the freeways and highways should be ditched as much as possible. An open road journey or freeways won’t take you through quaint little towns or through great national parks. Although they may be necessary on some days, try to find a more exciting path. Determining the kinds of paths before going on a trip can help you to plan the most scenic motorcycle rides.

    At this step, you can add some online research to your planning. Motorcycle rider forums are a great resource for finding amazing roads. The United States is full of legendary roads such as The Tail of the Dragon in North Carolina, or Highway 36 in Northern California, 140 miles of twisties, or Pikes Peak in Colorado. If you’re looking for some of these great riding experiences, it’s time to add them to your brainstorming map. Trace out these “must ride” roads in their own special color. (I know, this color coding thing may sound a little hokey but if you love maps and you love the planning process like I do, you’ll have a lot of fun doing it).

    5. Plot Out a Preliminary Route

    Now that you have points of interest and special roads you want to ride, go to your laminated map and start tracing routes between the sights you’ve circled. Keep in mind that this is just a preliminary route and you’ll be nailing down actual roads later in the planning process. So, don’t worry too much about accuracy. You can trace out the main highways, then look a little closer on the map to see if there’s an alternate route that will take you off the highway. Do this for every single sight or stopping point you circled on your map, even the ones that aren’t that important.

    During this process of tracing a logical route, you’ll probably find a few stops that are going to be impossible to see without doing a bunch of backtracking and zig-zagging. This is where you’ll start eliminating those sights. Hopefully, that giant ball of twine won’t be out of the picture. That would be tragic. At this point, you’ve probably noticed why the laminated map and dry erase pens are so perfect for this step. Erase, re-draw, erase, re-draw. On a large map you won’t be able to see some of the more narrow roads, but at least you’ll get a good idea of which roads you’ll take to get from one point to the next.

    6. Estimate your Daily Mileage

    At this next step you will get your first opportunity to calculate your daily mileage. Using your map’s distance ratios scale, make a rough estimate of how many miles you will have to ride between each of your stopping points.  Don’t be surprised if you’ve plotted so many attractions on your map that you will have to ride for a year to get them all in. This step is another point in which you will start eliminating some things and changing your preliminary route to match what you’ve determined to be your average daily riding time and mileage. If your average is 350 miles, then at every 350 miles on your route, make a mark on the map. On some spots on the map, you will determine that you can ride more or you can ride less in a day.

    This step of the process is going to take a little more time than previous steps and will take a lot more thought along with some trial and error. Again, you’ll probably find yourself erasing and re-drawing, erase, re-draw, erase, re-draw. What you have now, standing back and looking at your giant map, is the rough route, rough mileage and roughly the number of days you will be on your trip. Count up the days and be sure to include the non-riding, sight-seeing, or motorcycle maintenance days that you’ve marked on your map.

    7. Plot your Route on GPS

    Motorcycle GPS ride maps can be handy while you plan for most scenic motorcycle rides. Now it’s time to get more detailed and start plotting your actual route using electronic maps, or GPS systems. A lot of people will automatically turn to satellite Maps for this step, which is a good resource for this step. But, there are other web based trip planners that do a good job in providing regional and road maps. Below are a few of the better route planning websites I’ve found.

    • Roadtrippers Trip Planner – It’s a great motorcycle trip planner for finding attractions, camping, hotels, lodging in a specific area
    • Trip Maker by Rand McNally – Services like customize a route and get calculated miles, total driving time and estimated gas prices make it a good motorcycle trip planner.
    • Harley Davidson’s Ride Planner – This is the leading online resource for planning a trip on your motorcycles. You can customize your route and decide to avoid highways. You can also download your route to a GPX file, which means GPS Exchange Format, for your navigation system. The map also shows you where the HD dealerships are located. For road planning and assistance while you are on a motorcycle road trip, download the mobile app as it aids in allowing you to utilize other options and route a longer ride.
    • The Open Road Journey Planner – A source of information for motorcycle riders looking for a motorcycle road trip planning, great roads, or routes. This ride planner will provide both long and short distance riders with plenty of alternatives and inspiration. Take a look at the reviews and the scenic photos from fellow bikers to pick the best route needed for your next road trip. Once you’ve made a choice, download directions to your GPS. Additionally, to let people know who the top dog is, the website awards motorcyclists as they complete rides and challenging tasks. In short, this motorcycle trip planner can help you by all means along the way.
    Additionally, there are plenty of websites where you may find regional and road maps, GPS files, and other great resources for your long ride or a road trip planning. You can also find people who can help you to make your travel planning at ease. They can help you with data driven insights on accommodation trends. You can also check out outlets such as The New York Times, USA Today, LA Times and so on to learn about the motorcycle road trip planning and a perfect ride.

    Use your big, paper map that you’ve marked up as a reference and start plotting out a route for each section. You can split it up day by day or route out a few days at a time. I find that it’s easier to build a route from one major city to another, then determine what the total is. From there you can divide the route up by mileage and day.

    This is the point where you can zoom into the map and find the fun, scenic roads, off the main highways. Most maps start with giving you the quickest route even if you choose the “avoid highways” options. This is a good starting point. You can tweak the route to hit the roads and points of interest that you want to see.

    At this point in your planning you want to take the time to map out each day’s mileage based on how many miles your are comfortable riding and based on what sights you want to see. Be careful that you don’t schedule too many long riding days in a row. Often when people plan out each day, they want to see so many things that they become over-ambitious. For every two long mileage days, schedule a short day or even a non-riding day in places where you want to spend some time seeing the sights.

    Once you have each day, or each section mapped out, be sure to save each section of the route that you build. You’ve put in a lot of work so far and you don’t want to lose it. If you’re using Google maps, go to their website called My Maps, where you can save your own custom maps. If you use other route planning websites you will likely have to create an account to safe your routes.

    8. Choose Lodging and Gas Stops

    In the last step you chose a fairly detailed route with every road and turn. You’ve split up the route into days depending on how many miles you want to ride each day. Now you need to figure out where you’re going to stay each night and determine where your gas stops will be.

    There is a wide variety of lodging and accommodations to pick from when you’re traveling with a wider variety of costs. This step will be determined by how much money you have to invest in the most scenic motorcycle rides. Hotels, motels, Air B-n-B’s are the more expensive accommodations, even if you prefer to stay at the less expensive ones. This can be easily done using a mobile app. Camping is a very affordable option depending on where you are and you can often find BLM land that you can camp on for free. Another option is couch surfing, something I’ve never tried, but people seem to have good luck with it.  Whichever option you select, do plenty of research and read reviews of fellow bikers who have stayed at a particular hotel or campground. You can take a look at newspapers like The New York Times, USA Today and LA Times to find more information about motorcycle trip planning and a perfect ride.

    A month or two before your big motorcycle tour, you may want to consider making reservations at places where you know it will be difficult to find lodging on the fly. I certainly wouldn’t do this for every stop or every night, especially if you’re on an epic month long trip, or longer. But, if you do make reservations will ahead of time, make sure you understand cancellation policies.

    You will be making adjustments to your daily rides due to the availability of lodging. You may have to extend a day’s ride to get to a certain campground, or you may shorten your ride for the day. Again, be careful not to schedule too many miles in one day.

    It’s a smart idea to mark now gas stops based on how many miles you can travel between fill ups. It’s nice to have a general idea of how far the next fuel station is so you know whether or not to top-off before leaving a town.  If you will be riding on some out-of-the-way roads with few gas stops, you may want to consider carrying extra fuel. For tips on carry extra gas, read this article. Come to think of it, even if your planned route has a gas stop in a small town, it’s entirely possible that the gas station will be closed or no longer in service. This has happened to me in a few tiny Northern California mining towns. One station, closed on Sundays.

    9. Research the Final Route

    This is the point where you want to do some final research on your route and be ready to make a few adjustments. GPS navigation systems, satellite maps like Google maps are never 100% accurate. They don’t take into account things like rush hour traffic, dangerous neighborhoods, construction or road closures. So, don’t rely totally on GPS.
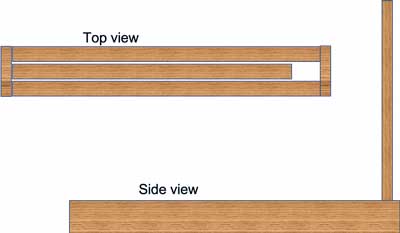
    If your route takes you through some larger cities, take some time to do some research on those cities and consider traffic, rush hour, etc. Is it making you ride in a notoriously bad neighborhood? GPS map systems can lead you into places you might not want to go. Use the mobile app as a guideline and then do some research especially if your GPS takes you through a city. Keep working on the traffic patterns and the neighborhoods and check to see if there are any major construction projects going on that will create a delay.
    While on your ride, you should take time daily to study the next day’s route. Look up information such as traffic, weather, road closures and construction. Make a note of the season and the probable weather in the locations you’ll be riding through. Watch the local news for local information that might affect your ride.

    10. Be Open to Changes

    Your route and daily itinerary should always remain flexible. Even though you’ve put a lot of work into planning each day of you ride, you have to be willing to change it on the fly. You never know what you’re going to encounter when on the road. You will face obstacles such as road closures, detours, traffic, or a sudden urge to take a side trip to see the giant ball of twine. So, always be willing to make impromptu changes to your journey and don’t stress over the fact that you didn’t stick to your plan 100%.

    If you make sudden changes to your itinerary, be sure to notify someone of your changes, especially if you are traveling alone and riding solo. Maybe this should have been mentioned earlier in this article, but you should always give your ride itinerary to your spouse, a family member or a close friend before you leave, and update your itinerary with that person whenever you make changes. Also, sharing motorcycle GPS ride maps through the mobile app is a good idea when you are on a motorcycle tour. Always consider riding bikes with registered trademarks.

    There are more factors to take into account if you plan to camp along the way than if you are staying in motels or any other accommodations every night. In case you face issues or adverse situations, there are a few products that can keep you protected. It’s better to pack products like a set of rain gear in case you find yourself in a storm. A tiny tool roll, some zip ties, can easily be packed and can be very helpful. Additionally, a modest tire-repair kit can come handy. Consider carrying water bottles and healthy snacks with less added sugar and a combination of dried fruit, and nuts as it can be very useful while you are on a road trip. After you’ve done all this planning, you can look forward to getting your motorcycle in peak travel condition, to deciding what equipment to bring, what clothes to pack. Also, consider riding bikes with registered trademarks and arranging all of your riding maps, hotel confirmations, directions, and more with your free online itinerary.

    I hope this list of 10 things to do to map out the most scenic motorcycle rides has helped you in making your epic vacation a reality. Remember to always stay safe, trust your intuition, relax and enjoy the road.

  • How to Reduce Helmet Wind Buffeting on a Motorcycle

    How to Reduce Helmet Wind Buffeting on a Motorcycle

    Reading Time: 7 minutesHave you ever been riding down the freeway on your motorcycle and you feel your head shaking around involuntarily? Like an invisible force is slapping your head from side to side, up and down, forward and back in a weird random pattern. You find it hard to focus and you tense your neck and shoulders to keep it under control and 15 minutes later you have a stiff neck and a splitting headache. You have been the victim of wind buffeting.

    What is Helmet Wind Buffeting? According to the Oxford Dictionary, buffeting is “The action of striking someone or something repeatedly and violently.” or,  “Irregular oscillation of part of an aircraft, caused by turbulence.” On a motorcycle, it is the turbulent wind flowing around the windshield, front fairings, and helmet that cause the buffeting.

    Wind buffeting is not the same as resistance. Wind resistance is the constant pressure of the wind blowing against the rider. The official definition is: “the forces that are in opposition to the relative motion of an object as it passes through the air”. Anyone who rides a naked motorcycle, a bike with no windshield, is familiar with wind resistance, and it is usually a constant force that the rider can adapt to. Buffeting is different.

    What Causes Helmet Wind Buffeting?

    Wind buffeting most often occurs on motorcycles with windshields or front fairings, and at freeway speeds. While the windshield pushes the oncoming wind away from the rider’s chest and shoulders, that wind begins to swirl around the edges and the inside of the windshield creating a vacuum, or airflow in the opposite direction. Wind can also flow up under the fairing and blow directly onto the rider’s chest or helmet. The air streams created in this vacuum are not consistent, so they and they can catch the edged of your helmet causing movement or vibration. Some riders who wear open face helmets and sunglasses have noticed that buffeting can go as far as shake their sunglasses while riding.

    Wind buffeting can also be cause by a side wind even if your helmet and windshield are perfectly adjusted to prevent it. A strong air flow from the side will break up when it hits you and your motorcycle. This can cause the air to swirl around your helmet causing vibration or unwanted, random movement. In face, on any noticeably windy day, you can expect to experience some buffeting.

    Sometimes riding with a passenger can break up the usual wind flow that you’re used to and cause the air to flow in a different pattern around your helmet. You or your passenger may experience the annoying affects of wind buffeting. So, it’s a problem that can’t be solved 100% of the time, but there are things you can do to reduce it.

    How to Reduce Wind Buffeting

    The first thing to look at is your windscreen. No matter what size you have on your motorcycle, if it’s not adjusted properly for your riding height, it can cause buffeting. If the wind coming off the windscreen and hitting the rider just under the helmet, the wind will catch the helmet and cause it to move around. So the key is to make sure the wind is passing over the top of the helmet, or, some on sport bikes, or motorcycles with small windscreens where the wind doesn’t go over the rider, the wind should hit below the helmet and across the rider’s shoulders.

    So, the trick is to adjust the height of your windshield, or purchase an aftermarket windshield that will move the wind up and over your helmet. If you don’t want to invest in a new windshield, you might want to consider a windscreen spoiler blade add on that bolts to your existing windshield.

    If your windshield height is adjusted properly and you still notice a problem, one solution is to provide some airflow just under the windshield. Having a small gap between the windscreen and the fairing will allow a slight amount of wind to flow up the inside of the windscreen reducing the vacuum that forms in that area. The amount of wind flowing through this gap is just enough to reduce the problem and not so strong that it blows agains the rider. Some touring motorcycles have the ability to adjust this gap on the fly or electronically to accommodate freeway riding. Another solution to adjusting this gap if you still notice buffeting, is to add spacers to the bolts that secure the windshield, providing a little more space under the windshield.
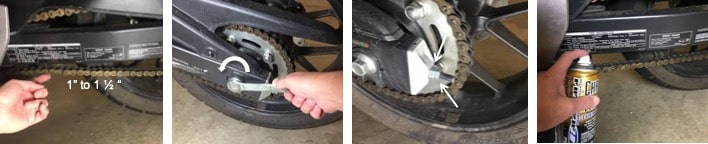
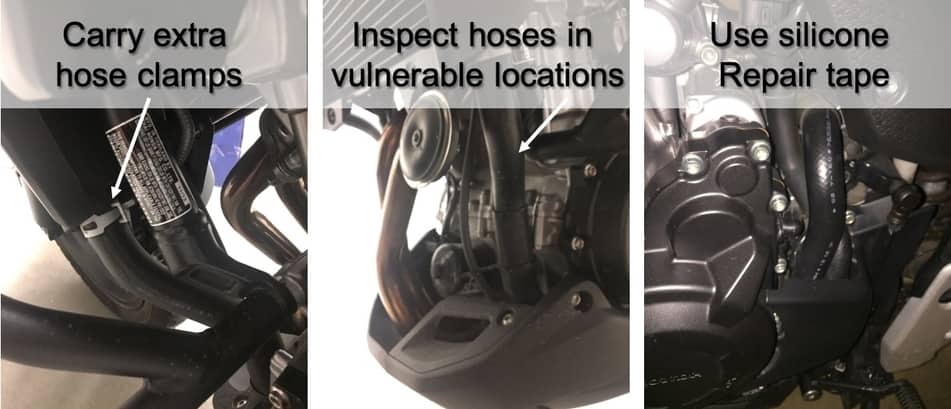
    Another common area where riders notice a problem is the wind flowing up from under the front fairing or under a larger windshield. This wind can flow up the riders chest and cause movement of the helmet. A common solution for this problem is to install lowers on each side of the motorcycle, just below the fairing. This will cause the wind to flow around the riders legs instead of upward. There are a wide variety of lowers made by the manufacturers, especially Harley Davidson. But, there are also a lot of aftermarket choices that are sure to work with your motorcycle and your riding set-up. Look up your motorcycle here on Twisted Throttle to see if they have a solution for your bike.

    The solution to wind buffeting doesn’t necessarily have to be installing a large windscreen. Often your helmet can be the culprit. As an example, my CB500x has a small windscreen that is not tall enough to move the wind up and over my head. It’s only tall enough to reduce the wind resistance against my chest and slightly on my shoulders. I used to have the windscreen in its upper most adjustment and ride with a dual sport helmet and had no wind buffeting. However, when I purchased a standard, full face helmet, I noticed more buffeting. The new helmet shape changed the way the wind flowed and caused an annoying amount of movement. My solution was to lower the windscreen slightly. This caused the wind to flow just below my helmet resulting in no more buffeting. If you have a similar situation, the key here is to purchase a good aerodynamic helmet that helps reduce wind noise and wind resistance making for a comfortable ride. Also, fun fact, adding a windshield to your motorcycle will help with wind buffeting too!.

    So, to sum it up, reduce wind buffeting by looking at your

    • Windshield height and how the air flows over the windshield
    • Add windscreen spoiler to help deflect the wind over your head
    • Add space for air flow under your windshield
    • Add lowers to each side under the windshield
    • Wear an aerodynamic helmet

    Related Questions

    How can I tell where the wind is coming from? To figure out where the wind is coming from can be a little tricky if you don’t have a wind tunnel, laboratory and a staff of specialists handy. But you can still get a good idea of where wind flow is coming from. Go out for a ride on a calm day and get your motorcycle up to freeway speed where the wind is most noticeable. With your hands, start feeling around for that point where the wind hits. Place your hand, fingers together, palm down, at the side of your tank and move it around slowly until you feel where the wind resistance is happening. Do the same at the top and the sides of your windscreen. This test will give you a good idea of where the problem is coming from.

    What’s the body position for riding in the wind? A cross wind, or wind coming from the side, is the type that causes the most problems for a rider, but in any case the best way to deal with excess wind is to create a lower rider profile. Lean over your tank and duck down as much as possible. Sometimes it’s nice to have a tank bag that you can lean on. In the case of a strong side wind, you will find yourself having to lean into the wind to keep your motorcycle upright and on a straight path. One way to reduce this is to create some drag on the same side as the wind by sticking out your knee. You’ll see professional Moto GP riders do this to slow themselves down just before a turn. Sticking out your knee helps reduce that sideways push that a side wind causes. Depending on how windy it is, it may not completely solve the problem, but it will help.

    How do I measure more windshield height? Sizing a windshield is a two person job and if a very simple, 5 minute procedure. With the rider sitting on the motorcycle, off the kickstand, the second person will measure the distance from the top of the headlight, or handlebars, to the riders nose. You want the rider to be able to look over the top of the windshield and not through it. It will still be tall enough to deflect the wind over the rider, but not so tall to interfere with the rider’s vision.

  • DIY Roadside Motorcycle Repairs (5 Common Repairs)

    DIY Roadside Motorcycle Repairs (5 Common Repairs)

    Reading Time: 12 minutes

    I admit to leaving the house on my motorcycle for a weekend trip without any repair items except a multi-tool. My motorcycle is fairly new, I keep it well maintained and I have confidence it will perform well on my rides. But, I realize that when I’m out on the road, anything can happen. That unforeseen breakdown could happen at any moment. So, I decided to research some potential breakdowns and learn how to fix them. I know there are plenty more miss-haps that can happen and there are more serious breakdowns, but, these are just a few that, if one if prepared, can be fixed on the roadside and you can be on your way.

    1. Loose Chain

    If your motorcycle has a belt or shaft drive then this wouldn’t apply to you. If your drive system breaks down it’s likely a lot more serious. But chains stretch over time and they need regular lubrication. I was once reminded of this when I took a weekend camping trip to the Northern California coast. On my way home I notice a squeaky rattling noise. At my next stop I looked at my chain and it was bone dry and extremely loose. Unfortunately I didn’t have anything in my kit to lubricate it or adjust it. So, it home, about 100 miles and fixed it up there.

    So, what should you do if your chain is dangerously out of adjustment when you’re on a long trip? Below are the steps, tools and products you will need to clean, lube and adjust your chain on the roadside. These are general guidelines as the tools and steps may be specific to your motorcycle.

    • You will need the following:
      • A wrench that fits the rear axle bolt
      • A smaller wrench that fits the adjustment bolt
      • Small can of chain cleaner
      • Small can of chain lube
      • A Rag
      • Know your motorcycle’s recommended chain slack, found in the owner’s manual

    It’s easier to do this adjustment if your bike is on a stand, but, if you don’t have a center stand, or a Snap Jack, it’s still possible to make this adjustment with the rear wheel on the ground.  Proper chain slack is generally between 1 to 1 1/2 inches but check your owner’s manual to be sure.

    • Steps
      • Clean the chain. While you won’t be able to do a thorough cleaning on the side of the road, you can at least get most of the dirt and grime off with a small canister of chain cleaner and a rag. Consider packing an old toothbrush too.
      • Loosen the rear axle bolt a couple of turns. It does not have to be very loose. Some bikes will have a cotter pin through the axel bolt. This should be removed and replaced with a new one if possible. If you don’t have a new one, don’t lose or break the one you have.
      • Most bikes will have an adjustment nut at the rear of the swing arm on each side and some will have two. If there are two, loosen the outer nut a few turns, then turn the inner nut clockwise a half turn at a time. This will pull the chain tighter. Always repeat the adjustment on the other side, equally.
      • Check the chain slack and repeat the turn by turn adjustment until the chain is properly tightened. Again, be sure to turn the adjustment bolts equally on both sides of the rear wheel.
      • Once the chain is at the correct tension, tighten down the rear axle bolt. Replace the cotter pin.
      • Final step, lube the chain. If your bike is not on a stand, then you will have to lube the chain in sections and roll the bike as you go.

    2. Broken Hose

    A cracked or broken hose can affect a motorcycle in a lot of different ways depending on what hose is broken. Hoses will commonly break or form a crack at the connection point. If this is the case, you can often trim off the hose at the crack, fit it back on and clamp it down again. Carry extra hose camps with you in case one breaks.
    If you have a crack in a hose or in the fuel line, you can use silicone self fusing repair tape around the hole or crack. This type of tape sticks to itself when it is stretched and doesn’t rely on adhesives which can loose it’s ability to stick if it gets wet. When applying the tape, stretch it tight as you wrap to get a good seal. You can reinforce the repair by placing a few zip ties around the tape to prevent it from unwinding.

    A taped up hose is a temporary repair in most cases. Hopefully it will be enough to get you going again so you can ride to the nearest town for a permanent fix. So, remember to keep a few hose repair supplies in your tool kit especially if you are on a long trip in remote locations.

    3. Broken Clutch Cable

    A sudden broken clutch cable can leave you stranded on the side of the road. While it is possible to shift gears without a clutch in some circumstance, and you may be able to limp your way to the nearest town in second gear, replacing your clutch cable on the roadside is really the best option if this ever happens to you. It’s a relatively simple repair.

    A spare clutch cable specific to your motorcycle is one of my recommended repair items to take on long distance motorcycle trips. The repair usually only requires one tool: a 10mm or 12mm open end wrench which should always be included in your on board tool kit.

    The trickiest part of this repair is figuring out where the cable line threads through the motorcycle, and you may have to remove some side panels to see the path. So, when removing the old cable, pay close attention to where it goes.

    • At the clutch lever, loosen the perch adjuster and move it all the way towards the cable to loosen the cable, and remove the cable from the clutch lever.
    • At the clutch end on the engine, loosen the adjustment nuts and remove the cable from the clutch bracket.
    • Take the new cable and squirt some lube down one end until a little bit drips out the other end. A small bottle of all purpose lubricant should be part of your on board tool kit.
    • String the new cable through the same path as the old cable. HACK: Don’t remove the old cable until you’re ready to install the new cable. String it through as you slide the old one out.
    • Attach the cable to the clutch lever first and secure it to the perch adjuster, leaving the cable loose.
    • Attache the other end of the cable to the engine side and tighten the adjustment nuts until the majority of the free play has been removed.
    • Do the fine adjustments at the clutch lever to remove any excess free play. Check your owner’s manual for the recommended amount of free play for your motorcycle. If you don’t get this adjustment spot on while on the road side, don’t worry, it’s ok to estimate.
    • After you set the free play, tighten the nuts at the engine side until they are secure. Then, tighten the adjustment screw on the perch adjuster.

    Before you put all your tools away, make sure the new cable is secured with all the necessary cable stays or zip ties. Turn your handlebars all the way to the left and right to check for any interference. Lastly, start the motorcycle and check the clutch engagement to make sure it’s in the right spot. Make any minor adjustment if necessary, and you’re ready to get back on the road.

    4. Broken Shifter Lever

    On many motorcycles the shifter lever is in a vulnerable location and can be broken if the motorcycle is tipped over, dropped, or crashed on its left side. Sometimes you can get yourself up and running with a generous amount of duct tape wrapped around the joint of the shifter arm and the toe lever. But, this repair is not going to last and can create a frustrating riding experience. So, your best bet is to do a quick roadside replacement of the shifter lever.

    This is probably one of the easier roadside repairs as it only needs a few tools and a replacement part. Make sure you carry a spare lever that fits your specific motorcycle. The tools needed will depend on your motorcycle but are often just a couple of hex key wrenches and small open ended wrenches, or you could use an adjustable wrench. In most cases you won’t have to remove any side panels or covers to access the lever and its attachment bolts.

    Some bikes also have a rocker arm that should be inspected to make sure it isn’t bent or cracked. Often, even if there is a slight bend to the rocker arm, your shifter will still function properly and this can be repaired later on. Also, on some bikes, the end of the shifter lever may be attached to the foot peg bracket and you may need to remove that bracket to replace the lever.

    5. Burned Out Headlight or Tail Light

    The first step is to know what kind of bulbs your motorcycle requires and keep replacement bulbs in your on-board repair or tool kit. A lot of bikes, especially naked bikes or cruisers, use a standard H4 or H7 bulb that can be found at any auto parts store. Tail lights and turn signal light bulbs are much smaller and you should check your owners manual to find out exactly which bulbs to purchase for your kit.

    Pro Tip: Avoid touching the glass portion of the bulb. Oils on your hands can create hot spots which will cause the bulb to burn hotter, reducing the life of the bulb.

    It is much easier to replace a headlight bulb on a naked bike. Motorcycles with round, exposed headlights are by far the easiest but the exact procedure will depend on your make and model.

    • Start by removing the headlight lens using the required wrench for your bike.
    • Remove the connector from the back of the bulb. This will free up the headlight making it easier to work with.
    • Remove the rubber cover on the back of the lens. This protects the inside of your headlight from dust and moisture.
    • Remove the secure spring from the back of the bulb. You may have to loosen one of the small screws, but do not remove them completely.
    • Remove the bulb and inspect it to make sure it is blown. A burned out bulb will look a little brown and the filament inside will be broken. If it’s not, if the bulb looks good, then you may have a deeper problem, such as a bad fuse.
    • Replace the bulb with a new one. Line up the spacers on the bulb with the notches on the housing. It will only fit one way.
    • Plug in the connector.
    • Reverse each removal procedure and secure your headlight lens back on the motorcycle.

    Replacing the headlight bulb on a motorcycle with plastics is a bit more tedious, but you don’t always have to remove the covers to access the bulb. This, of course will depend on your make and model. Sometimes you will have access to the bulb by reaching down under the dash. But, on many bikes you will have to remove some covers, and possibly the entire dash, to access the bulb. You will follow the same procedures outlined above for removal and replacement of the bulb.

    Tips for Successful Roadside Repairs

    Keep track of your screws! If you’re on the side of the road you’re likely working on dirt, gravel or a grass surface. Dropping a screw or nut is a real pain in the neck and will be hard to find. So, get out some kind of container that you can keep all the screws, nuts, washers, clips and whatever bits and pieces you need to remove to make your repair. Use a removed cover as a tray, or get out a cup or bowl from your gear. And, whatever you do, don’t kick over the screw tray! Not that it’s ever happened to me.

    Be safe! Make sure you push your bike completely out of the roadway before you start making your repair especially if you are on a busy road. Having traffic zoom past you while you are kneeling down, preoccupied by your repair task, can make for a dangerous situation. Curious drivers often become fixated on what’s happening on the roadside which can cause them to swerve dangerously close. So, if you can pull into a parking lot, or stop at a pull out, rest stop or vista point, then you will be in a much safer place to do your motorcycle repairs.

    If you’re alone, especially for us women, accept the assistance of strangers only if you feel safe. Trust your intuition on this one. Most people who offer to help you out have nothing but good intentions, so you shouldn’t pass up the kindness of a stranger out of fear. In my experience, 99% of people are good and kind hearted. Your gut will tell you when to say thanks, but no thanks.

    It’s important to check if you need an oil change. Oil filters should also be replaced with every oil change. You can also do it by yourself. Install a new oil filter after the oil has been drained, then refill the engine with the right kind and quantity of motorcycle oil, as directed in the owner’s manual, using a funnel.

    Changing an air filter is essential. The performance of your motorcycle will suffer if the air filter, which keeps particles out of the engine, is dirty and clogged. Although it’s not always difficult, changing an air filter can take some time. While the gas tank and other components might need to be removed in order to access the air filter, this is not always the case. The air filter should be removed and replaced once you’ve entered the air box. Then put back everything you took out.

    Also, you may need to bleed your brakes out if they feel squishy. It’s quite easier to do on a bike than in a car. On a bike, the bleeder screw and brake levers should be easily accessible. Once you get to the brake levers and the bleeder screw, you can just bleed the brakes, which should make everything feel better.

    In any case, being prepared before you leave for your trip will help you get out of a tight spot, fix common problems on the road side, and get back on the road before you know it.

  • Tips To Rent a Motorcycle In The USA

    Tips To Rent a Motorcycle In The USA

    Reading Time: 15 minutes

    Have you ever planned a vacation to a beautiful destination and wish you could bring your motorcycle with you? Have you ever wanted to test ride a motorcycle for an entire day but dealers aren’t even willing to let you take it around the block? Are you planning on visiting the United States and want to see the country on two wheels? Renting a motorcycle could be your solution.

    In this post, I’ll talk about how to rent a motorcycle and everything that’s involved in doing so. I’ll try to answer all your questions like, what’s required to rent, how much does it cost, insurance, safety, where to rent, and anything else in between.

    Requirements for Renting

    Renting a motorcycle is similar to renting a car meaning that they don’t let just anyone jump in and drive off; you have to meet certain requirements. The most obvious requirement is a license and a credit card (any major credit card will do). Like car rental companies, motorcycle rentals require that you carry a valid driver’s license with an M1 rating, or motorcycle rating, that is recognized in the state you reside.  Unfortunately, a learner’s permit won’t cut it and will not be accepted by any rental company.

    If you are from a country outside the US, any motorcycle license that is recognized in your home country will be valid when renting. However, if your license is written in a language other than English, you should consider getting an IDP (international driver’s permit). This will eliminate any confusion or language barriers in the case of an accident or any encounter with law enforcement.

    Most motorcycle rental companies will have age limits and you must be at least 21 years old to rent. Of course if you were to rent a motorcycle in other countries this age would change. Some companies have raised this to 25 years old. Often, if you are younger than 21, you can rent a scooter, moped, or another small engine vehicle as long as you are over 18. The reason for this is to ensure that the renter has at least a few years of riding experience or maturity.

    Insurance Requirements

    The minimum insurance coverage for motorcycle rentals is liability insurance with a minimum amount of coverage and this may vary depending on the state in which you are renting. It is required by law. However, your own liability insurance that you have at home for your own motorcycle does not meet this requirement. Rental insurance is different and separate. Basic liability insurance is usually provided by the rental company and is included in the daily cost. This liability insurance will cover you if you cause an accident that results in injury or property damage to someone else.

    While liability insurance is the minimum amount of coverage required, there is always a way to increase your coverage if you want. Some companies will charge a daily rate for supplemental liability insurance. This will increase the amount of coverage in the case of an accident. For example, if the basic liability insurance covers up to $15,000, then the supplemental insurance will cover up to $30,000, or $50,000 depending on which plan you choose.

    Comprehensive insurance is also an add-on cost charged on a daily basis. This type of coverage will be in addition to the liability insurance and will cover you in the case of theft or damage to the motorcycle. For example, if the motorcycle turns up missing when you walk out of your hotel, this insurance will cover the cost of that theft. If the motorcycle is damaged by something other than your negligence; i.e. hit by a car, knocked over by someone, dented from a flying golf ball, smashed headlight from an angry, jealous bar patron after you hit on his girl, those damages will be covered by the comprehensive insurance.

    Often you can bump up your insurance coverage again to include loss or damage to your personal property. With this upgrade, you will be covered if someone breaks into your saddlebags or luggage and steals your personal belongings.

    Be aware that with any type of insurance coverage, there may be a deductible of anywhere from $500 to $5,000. So, even if the damage is covered, or even if the theft of the motorcycle is covered, you will be responsible for paying the deductible.

    It’s extremely important to read the fine print when dealing with insurance coverage. And, if you’re not on a super tight budget, it may very well be worth the cost to get the full coverage available so you can rent and ride without worrying about any of that. Paying a little extra per day would be better than buying the company a new motorcycle. Consider it based on the deductible amount, how long you’re renting, where you’re riding (although anything can happen anywhere).

    How Much Does it Cost?

    The cost of renting a motorcycle will vary depending on what type of motorcycle you rent. Smaller bikes tend to be cheaper while the big bore bikes and fully loaded cruisers will cost more. But, in general, you can expect to pay at least $125 per day for a small bike, and up to $300 or more for a big touring motorcycle. Select the bike that not only fits your budget but fits your riding ability. Some rental companies will offer discounts for military or law enforcement or if you are a member of an auto club such as AAA. And if you’re an old fart, over 55 or 60, they may have senior discounts. Check with the company to see if any apply to you.

    Security deposits are often required and are placed on a credit card when you rent the motorcycle. If all goes well, the security deposit will be refunded to you after the bike is returned. Depending on what kind of insurance coverage you choose, the security deposit can be as much as $5,000 and that amount MUST be available on the credit card used for the deposit. So, if they charge $3,000 for your deposit, but your card limit is only $2500, that card won’t be valid. So, be ready to have that credit available at the time of renting.

    Another common cost that people don’t always consider is the cancellation fee and late charges. Cancellation fees can be anywhere from 30% to 60% of the rental cost and some companies require cancellations 30 days in advance. So, cancel within a month of your trip or else you could be paying hundreds of dollars for not renting the motorcycle. This policy will be different for each rental company so before renting, make sure you understand it completely.

    Late fees are another cost that can surprise the renter. Most rentals are made on a 24-hour basis and if you rent a bike for 2 days, you will likely be required to return it at the end of the second day. In addition, you may have to return the bike during business hours so this may limit your return time. Always make sure you not only understand how many days your renting, but ask the company exactly what day and time the late fees will begin to incur. You’ll want to know this because late fees can be as expensive as $25 per hour. Yes, per hour.

    One last fee that some people don’t always expect is a surcharge. This is an extra daily charge if the motorcycle is rented during a special event such as a motorcycle rally or gathering. This is similar to what hotels do on holiday weekends, they increase the rates when they know their product is in high demand. So, if you’re renting to go to Sturgis, be ready for a surcharge.

    What’s Provided?

    When you get a motorcycle rental, the company is required to provide you with the motorcycle and one helmet. Of course, you can always use your own helmet if you prefer, but if you don’t have one, they are required to provide it. Also, even though some stated in the US do not have helmet laws, you may still be required to wear a helmet while operating the rental motorcycle, this is for insurance purposes. If you require a second helmet for a passenger, the rental company should have them available for a reasonable daily fee, like $10.

    Rental companies may also have riding gear, jackets, pants, leathers, and possibly gloves or boots that you can rent for a daily fee. The availability of these items will vary with each company. It’s also a good idea to ask if they recommend any local roads or routes that are fun on the motorcycle and they may provide route maps of nearby roads, so it’s a good idea to inquire about that. Motorcycle rentals are easily available for motorcycle riders. Rental motorcycles are easy to find with valid motorcycle endorsement. Motorcycle enthusiasts keep a track of great bike like a Harley Davidson and others that are available for rent. Eaglerider locations are the best spot for motorcycle riders to get rentals. The rental rates are usually non refundable and the rents are usually location or tours contract.

    The rental company should also provide you with an orientation of the motorcycle you’re renting. It’s important that you are familiar with the location of things like the gas tank (don’t laugh, sometimes it’s under the seat), turn signals, horn, ignition, kill switch, fuel switch if it has one, etc. It’s important that you feel confident and comfortable on the bike before you ride off, so, even if it’s not a required part of the inspection, take the motorcycle for a quick spin around the parking lot or block before you leave and ask questions if you have them.

    Limits and Restrictions

    Each rental company will have its own set of restrictions and limitations so it’s important to read the rental agreement to understand exactly what they are. Here are some restrictions you can expect.

    If you’re renting within the United States you will likely be required to stay within the US border. You will not be allowed to ride into Mexico or Canada unless you have made special arrangements with the rental company to do so.

    You will likely be restricted to riding on certain roads depending on what kind of motorcycle you rent. For instance, if you rent a street bike, you will not be allowed to ride that bike on unpaved roads, fire roads, gravel roads, on sand, or on any unauthorized road. Again, it’s up to the rental company to determine exactly what this means. Often, any supplemental insurance that you purchase will be void if you ride in a restricted area.

    Also, be aware of any mileage limits. Often you can purchase a rental plan that includes unlimited mileage, but make sure you are aware of any limitations before you sign the rental agreement. Some companies may go as far as to have you file a basic itinerary, but this may not be too common.

    What’s Expected of You, the Renter?

    You, as a renter, are expected to properly maintain the motorcycle while it is in your possession. While a good motorcycle rental company will make sure the bike is maintained and ready to go when you rent it, you are responsible for keeping it fueled up, keeping the chain lubed if you ride more than 1,000 miles, keeping the tires at optimal pressure, checking the oil level and other fluid levels daily before you ride. These are topics that should be covered in your orientation so there is no confusion regarding your responsibility and how to do these simple maintenance tasks.

    You are also expected to follow traffic laws for each state in which you ride. This includes speed limits, parking, curb colors, crosswalks, pedestrian right-of-way, left-hand turn lanes, and those pesky left-turn green lights where you have to wait for oncoming traffic. Whatever the rules are, you’re expected to know and follow them.

    On a side note, lane splitting is legal in only one state: California. Also on a side note, if you are visiting from outside the US, make sure you are familiar with how to pump gas in the states. It’s easy to get confused with different types of fuel such as diesel or ethanol.

    3-Wheeled Motorcycles

    If you are interested in renting a three-wheeled motorcycle such as a trike, Can-Am Spyder, or a Polaris SlingShot, you will run into different requirements as far as licensing goes. But, the good news is, that in some states, you may not need a motorcycle license at all.

    To ride a basic trike style motorcycle, such as the Harley Davidson Freewheeler or Tri-Glide you will need a motorcycle license, or a 3-Wheel vehicle license in most states, if not all of them. If you have a motorcycle license, you’re good to go. If you don’t, then you will need a 3-Wheel license. You won’t be able to rent one with a basic automobile driver’s license.

    Riding a Can-Am Spyder requires the same licensing as above unless you’re in California. In the state of California, it is legal to ride a Spyder-type vehicle with only a basic automobile driver’s license. It is the only state that allows this (as of 2018).

    The Polaris SlingShot has much more lenient requirements, probably because the vehicle closely resembles a car rather than a motorcycle and is controlled with a steering wheel instead of handlebars. Therefore, to drive the SlingShot, you only need a basic automobile driver’s license in most states. But, the states of Montana, Wisconsin, Maine, New York, and Massachusetts require that you have your motorcycle license to drive one.

    Not all motorcycle rental companies will rent 3-wheeled vehicles and you may have to seek out a dealership to inquire about rentals. In any case, you will likely be required to wear the same safety equipment as when riding a motorcycle, such as a helmet and proper riding gear.

    Peer-to-Peer Motorcycle Rental

    There is a new way to rent motorcycles that are gaining more popularity and that’s peer-to-peer motorcycle rentals. Think Air B-n-B for your bike. Companies such as twistedroad.com or riders-share.com provide platforms where people can list their own motorcycles for rent. You, as the renter, can search for an available bike in your area, communicate with the owner and make the rental arrangements.

    There are several benefits to this type of ride-sharing or motorcycle sharing. First of all, the rental prices are much lower than rental companies and they are set by the owner of the motorcycle. Second, you will likely have a much wider variety of motorcycles to choose from and you may even be able to rent a vintage bike or custom motorcycle.

    Payments and insurance are provided by the rental platform which takes that hassle out of the equation. Keep in mind that companies like riders-share.com will have stricter requirements than a basic rental company. For instance, renters must be at least 25 years old, have a minimum of 3 year’s riding experience, and renters must meet a list of criteria regarding traffic violations, DUI records and felony charges. So, if you consider renting from a peer-to-peer company, be sure to read their rental policies to make sure you meet those important criteria.

    Can I Rent a Motorcycle for a Track Day?

    If you’re interested in riding a motorcycle on the race track, (which by the way is one of the funniest things you could ever do as a rider) and you need to rent a ride, you will have to rent from a company that provides motorcycle specifically for the track. I can’t imagine any average motorcycle rental company that would allow you to ride one of their rentals on a race track due to the risk of crashing.

    Track Day Providers are companies that purchase the use of a race track for the day to allow amateur riders to learn how to ride the track and how to race their bikes. The organizers offer coaching, instruction, emergency medical services, mechanical services, and everything else to allow you, the average rider, the rip around the track on your motorcycle as fast as you can (for a price). Often these companies will provide motorcycles for rent. These bikes are specifically set up to be safe on the track. They are stripped down, safety wired, and have no lights or rearview mirrors.

    These rentals will often come with extras, not just bikes. The rental package may come with a set of race tires, tire warmers, pit services as well as coaching and instruction. So, if you want to do a track day, but don’t want to ride your own motorcycle, a rental through one of the companies might be the way to go.

    Related Questions

    How far in advance should I book a motorcycle rental? 

    This will depend greatly on the rental company that you choose, but keep in mind that it would be best to make a reservation several months in advance especially if you are riding in a popular location or for a rally or event. But, if you get a wild hair, there’s always a chance of last-minute availability, but that would be hit or miss.

    What if I get in an accident while renting a motorcycle?

    If you’re in an accident, follow the normal procedures in getting medical or emergency assistance if someone is injured. You will likely be required to notify the rental company as soon as you are able. Most rental companies will provide you with an emergency phone number to call for assistance in the case of an accident.

    What if my rented motorcycle breaks down? 

    Most motorcycle rental companies will provide a phone number for roadside assistance. Some rental companies will have special insurance for vacation interruptions. In these cases, depending on the coverage, the rental company may pay for your transportation or lodging. In the case of peer-to-peer rentals, you must notify the owner of the motorcycle immediately if the motorcycle breaks down or if you are involved in a traffic accident.

    Can I rent a 250cc motorcycle on a car Licence?

    Licensing requirements for motorcycle rentals follow the law of the land. So, if you have a car license, any motorcycle with a displacement greater than 150cc will likely require a motorcycle license.

    At what age can I get a motorcycle rental?

    For most motorcycle rentals you will need to be 21 years old. There are some rental companies that offer rentals for people under 21, but they will require you to show proof of having taken a motorcycle safety course or motorcycle riding training.

    How can I lease a motorcycle with no credit?

    To lease a motorcycle without credit can be difficult, but not impossible. First, you would need to go through a private owner or small dealership. Many of the larger dealerships require that you have an established credit history before you can sign a motorcycle purchase agreement.

    Do I need a motorcycle endorsement to rent a motorcycle?

    In general, a valid motorcycle license or a motorcycle endorsement on a car license is required. In some cases, you may be able to rent from one of the companies that provide rentals for those under 21 years old with proof of training or course completion.

    Do I need insurance for rental motorcycles?

    In most cases, you will need to provide proof of insurance or a guarantee of insurance from your personal insurer. In some states, the rental company may be able to get you an exemption from coverage if they have their own insurance policy on file for riders who have taken a safety course or training class.